
For the past few months, my WordPress server, on an unmanaged virtual private server (VPS), has been freezing once or twice a month. I had to power cycle it to get it up and running again. I found out that the server’s Ubuntu 20.04 LTS (Long-Term Support) operating system was no longer supported as of May 31, 2025. (Ubuntu LTS versions are released every 2 years and each version receives 5 years of standard security maintenance.)
My VPS hosting platform, DigitalOcean, does provide upgrade scripts to the latest Ubuntu 24.04 LTS version, but I’m not sure whether the freeze issue is caused by the hardware, the software, or a virus. Just to be safe, I decided to build a new VPS, which would hopefully be located on different hardware.
Below, I’ve updated the instructions from Ubuntu 20.04 to WordPress From Scratch to use the latest Ubuntu 24.04 LTS operating system. Though these instructions may mention DigitalOcean, they should also apply to Amazon Lightsail and other VPS providers.
Create Server
I use the DigitalOcean web interface to create a new Droplet (a.k.a. VPS). DigitalOcean provides a bunch of new options, but I choose the very basic setup (1GB CPU, 25GB SSD, 1000GB transfer) with root user/password authentication for $6/month. For the operating system, I select the latest LTS version of Ubuntu, “Ubuntu 24.04 (LTS) x64”.
DigitalOcean provides the IP address of the new VPS and a convenient web-based console app which automatically logs in as the root user. However, I prefer to SSH (Secure Shell) from my Windows 10 desktop, using Ubuntu terminal on WSL (Windows Subsystem for Linux).
Update Server
Log into the server and apply any pending updates by doing the following:
ssh root@ip_address
# Update apt repositories to the latest with info
# on the newest versions of packages and their dependencies.
apt update
# Use apt full-upgrade, rather than apt upgrade, to
# intelligently handle dependencies and remove obsolete packages.
apt full-upgrade
# Remove dependencies which are no longer used (frees up space)
apt autoremove
# Issue a reboot command
reboot
Note: If you are prompted to select between the local version and the new version of a file (usually when configuration files like “/etc/ssh/sshd_config” are different), choose the new version by selecting the “install the package maintainer’s version” option.
Secure Access to Server
To secure access to the server, I want to disable the root user login and change the default SSH port 22 to a custom port number. This would make it very difficult for a hacker because he or she would first need to guess both my custom port number and non-root username to connect.
Log back into the server as the root user and run these commands:
ssh root@ip_address
# Optional: change the root password if you were provided with a default one
passwd
# Create a new non-root user
adduser mynewuser
# Grant all sudo privileges to the new user
# visudo opens /etc/sudoers using vi or nano, whichever is configured text editor.
# Same as "sudo vi /etc/sudoers" or "sudo nano /etc/sudoers" but includes validation.
visudo
# User privilege specification (add mynewuser to this section)
root ALL=(ALL:ALL) ALL
mynewuser ALL=(ALL:ALL) ALL
# Edit the SSH configuration "sshd_config" file to disallow SSH root login
# and change the SSH port number (say from 22 to 3333)
nano /etc/ssh/sshd_config
# Change the default listen "Port 22" to the custom port:
Port 3333
# Do not permit root user login by changing "PermitRootLogin yes" to:
PermitRootLogin no
# Add this line to allow only mynewuser to connect using SSH
AllowUsers mynewuser
# Uncomment and disable useDNS as it provides no real security benefit
UseDNS no
# Restart the SSH service so the changes can take effect
systemctl daemon-reload
systemctl restart ssh
Without exiting your current SSH session (just in case something goes wrong), test the new settings by opening up a new terminal window on your client and running the following commands:
ssh -p 3333 root@ip_address
# Log in as non-root user should succeed
ssh -p 3333 mynewuser@ip_address
Turn on the firewall to allow access to only the HTTP, HTTPS, and custom SSH ports. The UFW (Uncomplicated Firewall) tool allows us to easily configure the iptables firewall service. Run these commands on the server:
ssh -p 3333 mynewuser@ip_address
# Allow access to custom SSH port, HTTP port 80, and HTTPS port 443
sudo ufw allow 3333/tcp
sudo ufw allow http
sudo ufw allow https
# Enable the firewall
sudo ufw enable
# View firewall status
sudo ufw status
If you want to avoid having to input the password when logging into the server, you can configure SSH key-based authentication by following the instructions at Configure SSH Client and Key-Based Authentication (on macOS and Linux).
The above steps configure a basic level of security for the server.
Fix DigitalOcean Droplet Console
The change above breaks DigitalOcean’s Droplet Console app. We need to update the Droplet Agent service, running on the VPS, with the new SSH port number.
ssh -p 3333 mynewuser@ip_address
# Edit the Droplet Agent's configuration
sudo nano /etc/systemd/system/droplet-agent.service
# Add the new SSH port number to ExecStart as an "sshd_port" argument
ExecStart=/opt/digitalocean/bin/droplet-agent -sshd_port=3333
# Restart the Droplet Agent service
sudo systemctl daemon-reload
sudo systemctl restart droplet-agent
When launching the Droplet Console on the DigitalOcean web interface, go the Droplet’s Access page and change the “Log in as…” user from “root” to “mynewuser” before clicking on the “Launch Droplet Console” button. Attempting to open the console using the root user will result in an authentication error.
Install LEMP
WordPress requires a HTTP server, PHP, and MySQL. The LEMP (Linux, Nginx, MySQL, PHP) software stack matches those requirements.
Install PHP:
sudo apt update
# Install PHP with Nginx integration, MySQL integration, and
# Graphics Library (required by WordPress to generate thumbnail images)
# php-fpm - PHP FastCGI Process Manager for Nginx integration
# php-mysql - PHP library to call MySQL database
# php-gd - PHP graphics library to manipulate image files
sudo apt install php-fpm php-mysql php-gd
# Show PHP version (should be 8.3.6 or later)
php --version
Install MySQL Database Server:
sudo apt install mysql-server
# Do a test connect to MySQL server without password (blank)
mysql -u root
mysql> status
mysql> quit
# Secure MySQL Server
sudo /usr/bin/mysql_secure_installation
# Answer Yes to "VALIDATE PASSWORD COMPONENT"
# Select 2 for STRONG "password validate policy"
# Note: Inputted strong password must end in letter or number, not special character!
# Answer Yes to "Remove anonymous users"
# Answer Yes to "Disable root login remotely" (if you don't need remote access)
# Answer Yes to "Remove test database and access to it"
# Answer Yes to "Reload privilege tables now"
# Log back into MySQL server
mysql -u root
# Set password for MySQL root user
mysql> ALTER USER 'root'@'localhost' IDENTIFIED BY 'MyPassword';
mysql> flush privileges;
mysql> quit
# Log into MySQL server as root user with password required
mysql -u root -p
mysql> show databases;
mysql> quit
Install Nginx HTTP Server:
sudo apt install nginx
Browse to your server, “http://ip_address”, and you should see the default “Welcome to nginx!” page.
Enable PHP integration by editing the default Nginx server block file with this command: “sudo nano /etc/nginx/sites-available/default”.
...
# Add "index.php" to front of the index list
index index.php index.html index.htm index.nginx-debian.html;
...
# Uncomment the .php handler section to only have these active lines
# Note: use "php-fpm.sock" (link to latest) instead of the outdated "php7.4-fpm.sock"
location ~ \.php$ {
include snippets/fastcgi-php.conf;
# With php-fpm (or other unix sockets):
fastcgi_pass unix:/var/run/php/php-fpm.sock;
# # With php-cgi (or other tcp sockets):
# fastcgi_pass 127.0.0.1:9000;
}
# Don't forget to uncomment the closing bracket above!
...
}
Check and reload the Nginx server so the changes above will take effect:
sudo nginx -t
# Reload Nginx to make changes take effect
sudo systemctl reload nginx
Create a PHP test script in the default root web directory with this command: “sudo nano /var/www/html/info.php”. Input the following content:
phpinfo();
?>
Browse to “http://ip_address/info.php” and you should see a page containing information about the PHP installation.
Create a MySQL test script with this command: “sudo nano /var/www/html/mysql.php”. Input the following content:
// HTML response header
header('Content-type: text/plain');
// Database connection parameters
$DB_HOST = 'localhost';
$DB_PORT = 3306; // 3306 is default MySQL port
$DB_USER = 'root';
$DB_PASS = 'MyPassword'; // MySQL root password you set above
$DB_NAME = 'mysql'; // database instance name
// Open connection (all args can be optional or NULL!)
$mysqli = new mysqli($DB_HOST, $DB_USER, $DB_PASS, $DB_NAME, $DB_PORT);
if ($mysqli->connect_error) {
echo 'Connect Error (' . $mysqli->connect_errno . ') ' . $mysqli->connect_error . PHP_EOL;
} else {
// Query users
if ($result = $mysqli->query('SELECT User FROM user')) {
echo 'Database users are:' . PHP_EOL;
for ($i = 0; $i < $result->num_rows; $i++) {
$result->data_seek($i);
$row = $result->fetch_assoc();
echo $row['User'] . PHP_EOL;
}
$result->close();
} else {
echo 'Query failed' . PHP_EOL;
}
}
// Close connection
$mysqli->close();
?>
Browse to “http://ip_address/mysql.php” and you should see a page listing the current MySQL database users.
Debug LEMP
To debug issues with LEMP, you can first check service status and system logs:
sudo systemctl status mysql
sudo systemctl status nginx
sudo systemctl status php8.3-fpm
# Check system log
sudo journalctl -xeu mysql
sudo journalctl -xeu nginx
sudo journalctl -xeu php8.3-fpm
Second, you can look at the application-specific log files located at:
Nginx: /var/log/nginx/error.log
PHP: /var/log/php8.3-fpm.log #version might be different from 8.3
For performance reasons, the debug logs from the PHP-FPM worker threads are discarded by default. If you wish to see error logs from your PHP applications, you will need to enable logging from worker threads.
Run the following commands on the server:
# Note: Version might be different from 8.3
sudo nano /etc/php/8.3/fpm/pool.d/www.conf
# Uncomment this line:
catch_workers_output = yes
# Edit main PHP-FPM config file to set log level; otherwise you won't see any
sudo nano /etc/php/8.3/fpm/php-fpm.conf
# Uncomment this line:
log_level = notice
# Reload the PHP-FPM service to make the changes take effect
sudo systemctl reload php8.3-fpm
You should now see error logs from the PHP worker threads outputted to the “/var/log/php8.3-fpm.log” file.
Create WordPress Database
Create a MySQL database and user for WordPress by running these commands on the server:
mysql -u root -p
# Create a MySQL WordPress database
mysql> create database wordpress;
# Create a MySQL user with password
mysql> create user wordpress@localhost identified by 'MyWordPressPassword';
# Grant the MySQL user full privileges on the WordPress database
mysql> grant all privileges on wordpress.* to wordpress@localhost;
# Make the privilege changes effective
mysql> flush privileges;
# Double-check by showing the privileges for the user
mysql> show grants for wordpress@localhost;
# Exit the MySQL interactive shell
mysql> quit
Install WordPress
Note: Because I plan to migrate WordPress from the old server to this new server, I need to ensure that the WordPress versions are the same on both. I’ve updated WordPress on the old server to the latest 6.9.1 version and will install the latest WordPress version on this new server also. If you are restoring WordPress from an old database backup, you can download the matching WordPress version from WordPress Releases.
Install WordPress by running the following commands on the server:
cd /tmp
wget https://wordpress.org/latest.tar.gz
# Uncompress the WordPress archive file to "/var/www/wordpress"
sudo tar -zxvf ./latest.tar.gz -C /var/www
# Change ownership of the uncompressed wordpress directory and files
# Nginx process runs under user "www-data" so it should have write access
sudo chown -R www-data.www-data /var/www/wordpress
# Create a wp-config.php configuration file by copying from the sample.
cd /var/www/wordpress
sudo cp wp-config-sample.php wp-config.php
# Edit the wp-config.php file
sudo nano wp-config.php
# Input the newly-created MySQL database, user, and password
define('DB_NAME', 'wordpress');
define('DB_USER', 'wordpress');
define('DB_PASSWORD', 'MyWordPressPassword');
Update the Nginx server block file to use the installed WordPress by running these commands:
sudo mv /etc/nginx/sites-available/default /etc/nginx/sites-available/wordpress
# Update the Nginx server block file with the new location
sudo nano /etc/nginx/sites-available/wordpress
# Change document root from "/var/www/html" to "/var/www/wordpress"
root /var/www/wordpress;
# Update the sites-enable soft link
sudo rm /etc/nginx/sites-enabled/default
sudo ln -s /etc/nginx/sites-available/wordpress /etc/nginx/sites-enabled/wordpress
# Reload the Nginx configuration
sudo systemctl reload nginx
Browse to your server, “http://ip_address/”, and follow the WordPress instructions to complete the installation.
Configure Nginx for Custom Permalinks
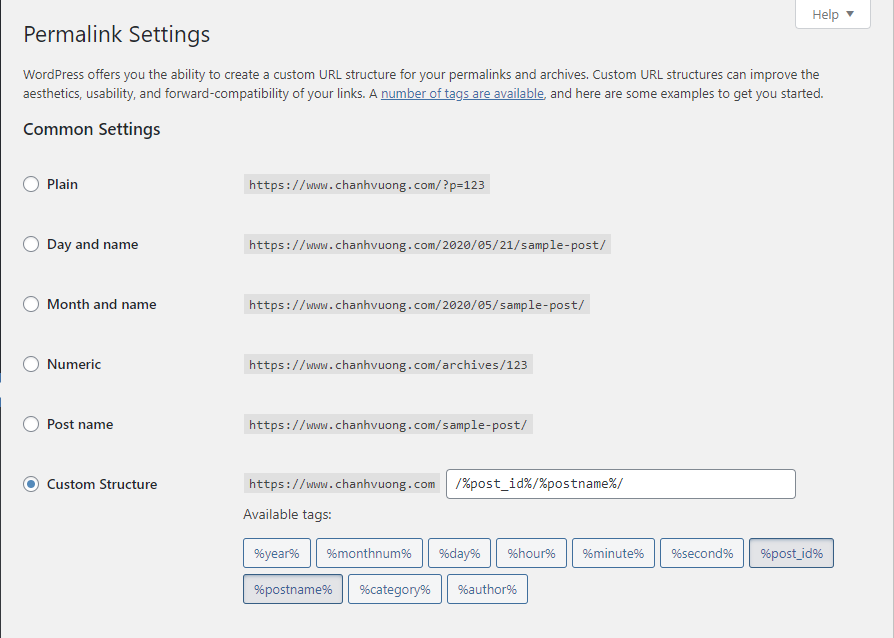 WordPress allows you to configure a custom structure for permalinks. For example, instead of the default post permalink “https://www.mydomain.com/?p=123”, you could use custom “https://www.mydomain.com/123/mytitle” instead.
Unfortunately, the default Nginx server block configuration will return 404 errors for custom WordPress permalinks. To fix this custom permalink issue, edit the “/etc/nginx/sites-available/wordpress” file to modify the “try_files” directive like so:
...
location / {
#try_files $uri $uri/ =404;
try_files $uri $uri/ /index.php?$args;
# Add "/index.php?$args" to support WordPress custom permalinks and post preview
# Remove "=404" because it breaks custom permalinks and always cause 404 errors!
}
...
}
Reload Nginx for the changes to take effect.
Migrate WordPress
The instructions in this section are for migrating the WordPress database data from the old server to the new server. Or for restoring from an old database backup. They are updated from Install Ubuntu, LEMP, and WordPress on an Unmanaged VPS.
Before restoring the WordPress database on the new server, make sure that WordPress, its plugins, and its themes are updated to the latest versions on the old server. If you are restoring from an old database backup image instead, then make sure that the WordPress installed on the new server has a matching version (the WordPress version when the database backup was taken).
On the new server, make sure first to install all the necessary WordPress plugins and themes to match the old server. You do not want to install the plugins after restoring the WordPress database because the plugin installations might overwrite their existing configurations in the database. Likewise, adding a theme might overwrite any existing CSS style override directives in the database.
The migration process is to take a WordPress database backup on the old server and then restore the database on the new server. Also, we will manually copy any images over.
First, do a database backup on the old server and also copy image files:
ssh -p 3333 myolduser@myolddomain.com
# Dump WordPress database image (--no-tablespaces for portability)
# Note: sudo might not be necessary (depending upon your MySQL configuration)
sudo mysqldump --no-tablespaces -u oldmysqluser -p olddatabasename > /tmp/wordpress.sql
# You will be prompted to input the password for oldmysqluser
# Copy the database SQL file to the new server
scp -P 3333 /tmp/wordpress.sql mynewuser@ip_address:/tmp/
# Copy the image files from the old server to the new server
sudo scp -P 3333 -r /var/www/oldwordpress/wp-content/uploads/* mynewuser@ip_address:/tmp/wp-content-uploads/
$ Log out of the old server
exit
Second, if your new server has a different WordPress file location than the old server, you will need to edit the “wordpress.sql” file to update the file location for images. For example, find and replace “/var/www/oldwordpress/” with “/var/www/wordpress/”. Also, if you intend to use a domain name different from the old domain name, you’ll also need to find and replace the old domain name with the new.
The built-in editors like vi and nano are not the best for processing a large file (which the database SQL file could be). Instead, use the sed (stream editor) utility which processes a file line by line, instead of loading the entire file into memory.
sed -i 's#/var/www/oldwordpress/#/var/www/wordpress#g' wordpress.sql
# Can use the / delimiter instead because we are not matching file paths
sed -i 's/olddomain.com/mydomain.com/g' wordpress.sql
Finally, restore the database and image files on the new server:
ssh -p 3333 mynewuser@ip_address
# Empty the existing WordPress database
# Note: This will not affect the associated database user and privileges
mysql -u root -p
mysql> drop database wordpress;
mysql> create database wordpress;
mysql> quit
# Import the database SQL file
mysql -u root -p wordpress < /tmp/wordpress.sql
# Move the image files to the WordPress location
sudo mv /tmp/wp-content-uploads/* /var/www/wordpress/wp-content/uploads/
# Change ownership of image files
sudo chown -R www-data:www-data /var/www/wordpress/wp-content/uploads/
Browse to your server at “http://ip_address/” and you should see the main page of your restored WordPress website.
Update DNS for Domain Name
You will notice that if you drill into links on the new WordPress website, it will take you back to the old server. This is because the domain name is still pointing at the old server’s IP address. We need to update the DNS records so the domain name will point at the new server’s IP address.
On the DigitalOcean web interface, look for the Networking section to view the Domains. Select the domain, edit the DNS “A” record (Address record), and change to the new server’s IP address. This change may take a few minutes to an hour to propagate across the Internet.
You can check what IP address is returned by doing the following on your Linux or macOS client:
nslookup mydomain.com ns1.digitalocean.com
nslookup www.mydomain.com ns1.digitalocean.com
# Flush the DNS cache (Linux only)
sudo resolvectl flush-caches
# Flush the DNS cache (macOS only)
sudo dscacheutil -flushcache; sudo killall -HUP mDNSResponder
# Ping from the client
ping mydomain.com
Tip: You can clear the Chrome browser’s DNS cache by browsing to its internal DNS lookup page and clicking on the “Clear host cache” button. You can also check which IP address is returned by inputting “mydomain.com” and clicking the Lookup button.
You will need to edit the Nginx server block file so that both “mydomain.com” and “www.mydomain.com” are recognized and served. Edit the “/etc/nginx/sites-available/wordpress” file to have the follow change:
...
#server_name _;
server_name mydomain.com www.mydomain.com;
...
}
Reload Nginx for the changes to take effect.
You can now browse to your server at “http://mydomain.com/” or “http://www.mydomain.com/” (once the DNS change is propagated).
Configure Secure HTTPS Access
Note: Because my old WordPress was set up to use HTTPS access only and I wanted to avoid disruptions as the DNS change propagated, I manually copied the Nginx server block file and the SSL public/private certificate files from the old server to the new server.
In order to properly support HTTPS, you will need a third party issued SSL certificate for your server. (Browsers will show an unsecured warning icon if your server uses a self-signed SSL certificate.) Fortunately, Let’s Encrypt provides free TLS/SSL certificates and instructions to install Certbot, its client app.
Run the following commands to generate your SSL server certificate:
# Note: Let's Encrypt recommends using Snap, which comes with Ubuntu by default
sudo snap install --classic certbot
# Link Certbot executable in user's bin directory for easy access (by $PATH)
sudo ln -s /snap/bin/certbot /usr/local/bin/certbot
# Test running Certbot
certbot --version
certbot --help
# Get certificate and have Certbot edit the nginx server block file automatically
sudo certbot --nginx
# Hit enter to leave a blank email address if prompted for one.
# Your domain names will be listed with and without "www" prefix (from nginx server block file),
# leave the input blank to select all options.
# If Certbot is successful, you will see the following output
Deploying certificate
Successfully deployed certificate for mydomain.com to /etc/nginx/sites-enabled/wordpress
Successfully deployed certificate for www.mydomain.com to /etc/nginx/sites-enabled/wordpress
Congratulations! You have successfully enabled HTTPS on https://mydomain.com and https://www.mydomain.com
Certbot will reload Nginx automatically, so you can browse to “https://mydomain.com/” to see your secured website.
Tip: You can check the Nginx server block file to see the changes were made by Certbot, tagged with “# managed by Certbot” comments. Basically, Certbot will enable HTTPS with the certificate file location and have HTTP redirect to HTTPS.
The Let’s Encrypt certificate expires in three months. Thankfully, the Certbot installation scheduled a renewal task to run automatically twice a day using systemd timers. The scheduled task will check the expiration date and if it is within 30 days of expiration, the task will issue a renewal to update the certificate.
NEXT LEFT LAST PASSED UNIT ACTIVATES
...
Tue 2026-02-17 11:37:00 UTC 5h 13min - - snap.certbot.renew.timer snap.certbot.renew.service
...
Issue this command to do a dry run of the renewal process to double-check that there are no issues:
sudo certbot renew --dry-run
Tip: In the WordPress “Settings->General Settings”, make sure to use the HTTPS URL “https://www.mydomain.com” for both the “WordPress Address (URL)” and “Site Address (URL)” options. This will ensure that browsers would show the secure icon for your website.
Now, when you browse to your website, the browser should redirect to HTTPS (if you use the HTTP URL) and display the “Connection is secure” informational icon.