
Update: I’ve provided updated instructions using the latest Ubuntu 24.04 LTS at Ubuntu 24.04 LTS and WordPress From Scratch.
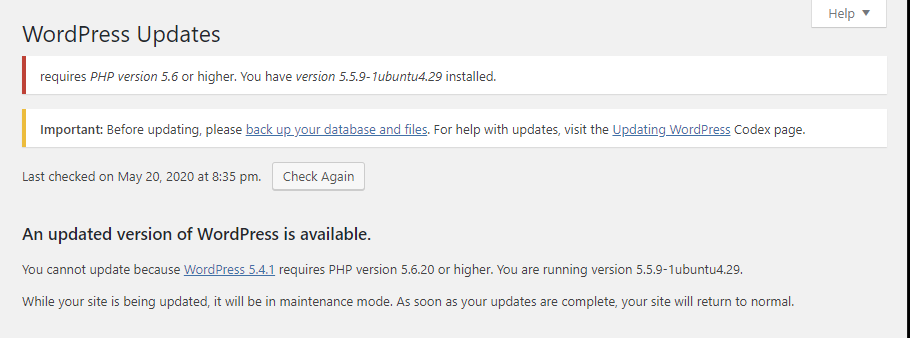
My website has been running on an unmanaged virtual private server (VPS), using Ubuntu 14.04, from DigitalOcean since 6 years ago. Unfortunately, the latest WordPress (as of version 5.2) requires at least PHP version 5.6.20 which Ubuntu 14.04 does not support (Ubuntu 14.04 supports PHP 5.5.9).
 Although DigitalOcean provides upgrade scripts to migrate from Ubuntu 14.04 to 20.04 (actually from Ubuntu 14.04 to 16.04, 16.04 to 18.04, and finally 18.04 to 20.04), I decide to avoid any possible issues by creating a new WordPress Ubuntu server from scratch.
Below, I’ve updated the instructions from Install Ubuntu, LEMP, and WordPress on an Unmanaged VPS to use the latest Ubuntu 20.04 operating system. Though these instructions may mention DigitalOcean, they should also apply to Amazon Lightsail and other VPS providers.
Create Server
I decide to use the latest version of Ubuntu, “Ubuntu 20.04.6 (LTS) x64”, provided by DigitalOcean. The 32bit version is not listed. The 64bit version uses slightly more memory than 32bit, but should provide better security and performance. In the future, if I decide to increase the memory to greater than 4GB, the 64bit version would be required.
Once the server is created, I update the DNS for my domain (example: “mydomain.com”) to point at the server’s IP address.
Update Server
After secure shelling (SSH) into the server as the root user, I notice that there are updates pending. I do the updates using the following commands:
ssh root@ip_address
# Update apt repositories to the latest with info
# on the newest versions of packages and their dependencies.
apt update
# Use apt full-upgrade, rather than apt upgrade, to
# intelligently handle dependencies and remove obsolete packages.
apt full-upgrade
# Remove dependencies which are no longer used (frees up space)
apt autoremove
# If a restart is requested, issue a reboot command
reboot
Note: I’m switching to using the “apt” command instead of “apt-get” because “apt” is more user-friendly. Both “apt” and “apt-get” are very similar, using the same options. There are a few differences though, like “apt full-upgrade” instead of “apt-get dist-upgrade”. Check out this page, Difference Between apt and apt-get Explained, for more details.
Secure Access to Server
To secure access to the server, I want to disable the root user login and change the default SSH port 22 to a custom port number. This would make it more difficult for a hacker because he or she would first need to guess both my custom port number and non-root username to connect.
Log into the server as the root user and run these commands:
ssh root@mydomain.com
# Optional: change the root password if you were provided with a default one
passwd
# Create a new non-root user
adduser mynewuser
# Grant all sudo privileges to the new user
# visudo opens /etc/sudoers using vi or nano editor, whichever is the configured text editor.
# It is equivalent to "sudo vi /etc/sudoers" or "sudo nano /etc/sudoers" but includes validation.
visudo
# User privilege specification (add mynewuser to this section)
root ALL=(ALL:ALL) ALL
mynewuser ALL=(ALL:ALL) ALL
# Edit the SSH configuration "sshd_config" file to disallow SSH root login
# and change the SSH port number (say from 22 to 3333)
nano /etc/ssh/sshd_config
# Change the default listen "Port 22" to the custom port:
Port 3333
# Do not permit root user login by changing "PermitRootLogin yes" to:
PermitRootLogin no
# Allow only mynewuser to connect using SSH
AllowUsers mynewuser
# Disable useDNS as it provides no real security benefit
UseDNS no
# Restart the SSH service so the changes can take effect
systemctl restart ssh
Test the new settings by opening up a command window on your client and running the following commands:
ssh -p 3333 root@mydomain.com
# Logging in as non-root user should succeed
ssh -p 3333 mynewuser@mydomain.com
# Sudo from non-root user into root account (if you ever need to).
# Alternatively, the "su -" command will switch user to root, but requires root password
sudo -s
# Show current user (should be "root")
whoami
Tip: If you cannot login with either the root or non-root user, double-check the changes using your original SSH window (which should still be connected to your server). If you don’t have that original SSH window still connected, your VPS provider should provide console access (like having a virtual keyboard and monitor connected directly to the server) through their website for recovery scenarios such as this.
Finally, turn on the firewall to allow access to only the HTTP, HTTPS, and custom SSL ports. The UFW (Uncomplicated Firewall) tool allows us to easily configure the iptables firewall service. Run these commands on the server:
sudo ufw allow 3333/tcp
sudo ufw allow http
sudo ufw allow https
# Enable the firewall
sudo ufw enable
# View firewall status
sudo ufw status
The above steps configure a basic level of security for the server.
Install LEMP
WordPress requires a HTTP server, PHP, and MySQL. The LEMP (Linux, Nginx, MySQL, PHP) software stack matches those requirements.
Install PHP:
sudo apt update
# Install PHP with Nginx integration, MySQL integration, and
# Graphics Library (required by WordPress to generate thumbnail images)
# php-fpm - PHP FastCGI Process Manager for Nginx integration
# php-mysql - PHP library to call MySQL database
# php-gd - PHP graphics library to manipulate image files
sudo apt install php-fpm php-mysql php-gd
# Show PHP version (should be 7.4.3 or later)
php --version
Install MySQL Database Server:
sudo apt install mysql-server
# Do a test connect to MySQL server without password (blank)
# By default, MySQL allows only root login from root user, so we have to use "sudo"
sudo mysql -u root
# Allow connection from a non-root Linux user
# Switch from default “auth_socket” plugin to “mysql_native_password” plugin
mysql> use mysql;
mysql> update user set plugin='mysql_native_password' where User='root';
mysql> flush privileges;
mysql> quit
# Log into MySQL server as root user without "sudo"
mysql -u root
mysql> quit
# Secure MySQL by requiring root password
sudo /usr/bin/mysql_secure_installation
# Answer Yes to "VALIDATE PASSWORD COMPONENT"
# Select 2 for STRONG "password validate policy"
# Note: Inputted strong password must end in letter or number, not special character!
# Answer Yes to "Remove anonymous users"
# Answer Yes to "Disable root login remotely" (if you don't need remote access)
# Answer Yes to "Remove test database and access to it"
# Answer Yes to "Reload privilege tables now"
# Log into MySQL server as root user with password
mysql -u root -p
mysql> show databases;
mysql> quit
Install Nginx HTTP Server:
sudo apt install nginx
Browse to your server, “http://mydomain.com”, and you should see the default “Welcome to nginx!” page.
Enable PHP integration by editing the default Nginx server block file like so: “sudo nano /etc/nginx/sites-available/default”.
...
# Add "index.php" to front of the index list
index index.php index.html index.htm index.nginx-debian.html;
...
# Uncomment the .php handler section to only have these active lines:
location ~ \.php$ {
include snippets/fastcgi-php.conf;
# With php-fpm (or other unix sockets):
fastcgi_pass unix:/var/run/php/php7.4-fpm.sock;
}
...
}
Reload the Nginx server so the changes above take effect:
Create a PHP test script in the default root web directory like so: “sudo nano /var/www/html/info.php”. Input the following content:
phpinfo();
?>
Browse to “http://mydomain.com/info.php” and you should see a page containing information about the PHP installation.
Create a MySQL test script like so: “sudo nano /var/www/html/mysql.php”. Input the following content:
// HTML response header
header('Content-type: text/plain');
// Database connection parameters
$DB_HOST = 'localhost';
$DB_PORT = 3306; // 3306 is default MySQL port
$DB_USER = 'root';
$DB_PASS = ''; // blank or password (if you set one)
$DB_NAME = 'mysql'; // database instance name
// Open connection (all args can be optional or NULL!)
$mysqli = new mysqli($DB_HOST, $DB_USER, $DB_PASS, $DB_NAME, $DB_PORT);
if ($mysqli->connect_error) {
echo 'Connect Error (' . $mysqli->connect_errno . ') ' . $mysqli->connect_error . PHP_EOL;
} else {
// Query users
if ($result = $mysqli->query('SELECT User FROM user')) {
echo 'Database users are:' . PHP_EOL;
for ($i = 0; $i < $result->num_rows; $i++) {
$result->data_seek($i);
$row = $result->fetch_assoc();
echo $row['User'] . PHP_EOL;
}
$result->close();
} else {
echo 'Query failed' . PHP_EOL;
}
}
// Close connection
$mysqli->close();
?>
Browse to “http://mydomain.com/mysql.php” and you should see a page listing the “Database users”.
Debugging LEMP
To debug issues with LEMP, look at these log files:
Nginx: /var/log/nginx/error.log
PHP: /var/log/php7.4-fpm.log
For performance reasons, the debug logs from the PHP-FPM worker threads are discarded by default. If you wish to see error logs from your PHP applications, you will need to enable logging from worker threads.
Run the following commands on the server:
sudo nano /etc/php/7.4/fpm/pool.d/www.conf
# Uncomment this line:
catch_workers_output = yes
# Edit main PHP-FPM config file to set log level; otherwise you won't see any
sudo nano /etc/php/7.4/fpm/php-fpm.conf
# Uncomment this line:
log_level = notice
# Reload the PHP-FPM service to make the changes take effect
sudo systemctl reload php7.4-fpm
You should now see error logs from the PHP worker threads outputted to the “/var/log/php7.4-fpm.log” file.
Create WordPress Database
Create a MySQL database and user for WordPress by running these commands on the server:
mysql -u root -p
# Create a MySQL WordPress database
mysql> create database wordpress;
# Create a MySQL user with password
mysql> create user wordpress@localhost identified by 'mypassword';
# Grant the MySQL user full privileges on the WordPress database
mysql> grant all privileges on wordpress.* to wordpress@localhost;
# Make the privilege changes effective
mysql> flush privileges;
# Double-check by showing the privileges for the user
mysql> show grants for wordpress@localhost;
# Exit the MySQL interactive shell
mysql> quit
Install WordPress
Note: Because I need to migrate an old version of WordPress from the old server, I need to install the exact same old WordPress version, copy the WordPress database over, and then upgrade WordPress to the latest version. The WordPress 5.1.5 release is listed here and I would download “wordpress-5.1.5.tar.gz” instead of “latest.tar.gz” below.
Install WordPress by running the following commands on the server:
cd /tmp
wget https://wordpress.org/latest.tar.gz
# Uncompress the WordPress archive file to "/var/www/wordpress"
sudo tar -zxvf ./latest.tar.gz -C /var/www
# Change ownership of the uncompressed wordpress directory and files
# Nginx process runs under user "www-data" so it will have write access
sudo chown -R www-data:www-data /var/www/wordpress
# Create a wp-config.php configuration file by copying from the sample.
cd /var/www/wordpress
sudo cp wp-config-sample.php wp-config.php
# Edit the wp-config.php file
sudo nano wp-config.php
# Input the newly-created MySQL database, user, and password
define('DB_NAME', 'wordpress');
define('DB_USER', 'wordpress');
define('DB_PASSWORD', 'mypassword');
Update the Nginx configuration to use the installed WordPress by running these commands:
sudo mv /etc/nginx/sites-available/default /etc/nginx/sites-available/wordpress
# Update the Nginx server block file with the new location
sudo nano /etc/nginx/sites-available/wordpress
# Change document root from "/var/www/html" to "/var/www/wordpress"
root /var/www/wordpress;
# Update the sites-enable soft link
sudo rm /etc/nginx/sites-enabled/default
sudo ln -s /etc/nginx/sites-available/wordpress /etc/nginx/sites-enabled/wordpress
# Reload the Nginx configuration
sudo systemctl reload nginx
Browse to your server, “http://mydomain.com/”, and follow the WordPress instructions to complete the installation.
Tip: If you are migrating a WordPress website from an old server to your new server, check out the “Migrate WordPress” section from my older post, Install Ubuntu, LEMP, and WordPress on an Unmanaged VPS.
Configure Nginx for Custom Permalinks
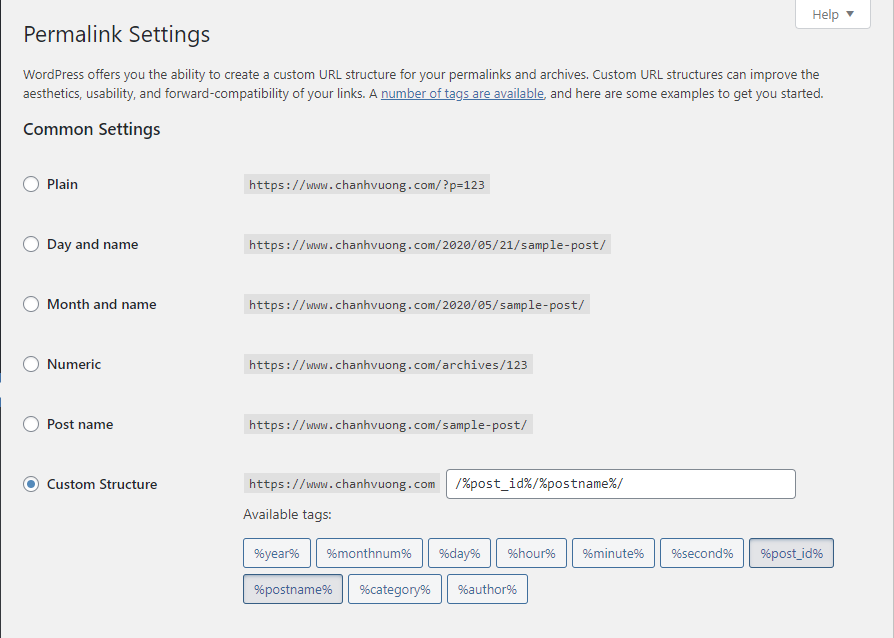 WordPress allows you to configure a custom structure for permalinks. For example, instead of the default post permalink “https://www.mydomain.com/?p=123”, you could use “https://www.mydomain.com/123/mytitle” instead.
Unfortunately, the default Nginx server block configuration will return 404 errors for custom WordPress permalinks. To fix this custom permalink issue, edit the “/etc/nginx/sites-available/wordpress” file to modify the “try_files” directive like so:
...
location / {
#try_files $uri $uri/ =404;
try_files $uri $uri/ /index.php?$args;
# Add "/index.php?$args" to support WordPress custom permalinks and post preview
# Remove "=404" because it breaks custom permalinks and always cause 404 errors!
}
...
}
Reload Nginx for the changes to take effect.
Configure Secure HTTPS Access
In order to properly support HTTPS, you will need a third party issued SSL certificate for your server. (Browsers will show an unsecured warning icon if your server uses a self-signed SSL certificate.) Fortunately, Let’s Encrypt provides free SSL certificates.
Run the following commands to generate your SSL server certificate:
sudo apt install certbot
# See help info for Certbot options
certbot --help
# Get a SSL certificate for mydomain.com
sudo certbot certonly --webroot -w /var/www/wordpress -d mydomain.com -d www.mydomain.com
# Copy out the SSL certificate files to the Nginx directory
sudo mkdir /etc/nginx/ssl
sudo cp /etc/letsencrypt/live/mydomain.com/fullchain.pem /etc/nginx/ssl/mydomain-fullchain.pem
sudo cp /etc/letsencrypt/live/mydomain.com/privkey.pem /etc/nginx/ssl/mydomain-privkey.pem
# Let's Encrypt certs expire after 3 months so you have to renew them within 3 months
sudo certbot renew
If you are interested, my older post, Free SSL Certificate from Let’s Encrypt for Nginx, has details on how the SSL certificate is generated and a cron job (see section “Cron Job To Renew”) to automatically renew the certificate.
Finally, edit the Nginx server block file to redirect HTTP traffic to HTTPS and to use the SSL certificate. The contents of the “/etc/nginx/sites-available/wordpress” server block file would look like the following:
server {
listen 80;
listen [::]:80;
#server_name _;
server_name mydomain.com www.mydomain.com;
# Permanent redirect HTTP to HTTPS
return 301 https://$host$request_uri;
}
# HTTPS SSL Server Configuration
server {
listen 443 ssl;
listen [::]:443 ssl;
# SSL Server Certificate
ssl_certificate /etc/nginx/ssl/wordpress-fullchain.pem;
ssl_certificate_key /etc/nginx/ssl/wordpress-privkey.pem;
ssl_protocols TLSv1.2 TLSv1.1 TLSv1;
# Web root
root /var/www/wordpress;
# Add index.php to the list if you are using PHP
index index.php index.html index.htm index.nginx-debian.html;
#server_name _;
server_name mydomain.com www.mydomain.com;
location / {
# First attempt to serve request as file, then
# as directory, then fall back to displaying a 404.
#try_files $uri $uri/ =404;
try_files $uri $uri/ /index.php?$args;
}
# pass PHP scripts to FastCGI server
location ~ \.php$ {
include snippets/fastcgi-php.conf;
# With php-fpm (or other unix sockets):
fastcgi_pass unix:/var/run/php/php7.4-fpm.sock;
}
}
Don’t forget to reload the Nginx service so the changes can take effect.
Tip: In the WordPress “Settings->General Settings”, make sure to use the HTTPS URL “https://www.mydomain.com” for both the “WordPress Address (URL)” and “Site Address (URL)” options. This will ensure that browsers would show the secure icon for your website.
Now, when you browse to your website, the browser should redirect to HTTPS (if you use the HTTP URL) and display the “Connection is secure” informational icon.