
Update: Go to Bootable USB Flash Drive to Install Mac OS X 10.10 Yosemite if you want to install Mac OS X 10.9 Mavericks or Mac OS X 10.10 Yosemite instead. The instructions below will not work for Mac OS X 10.7 Lion or later versions.
I thought it would be useful to put the Mac OS X 10.6 Snow Leopard installer on a USB flash drive. It would be faster than reading from a DVD. I can use it with a Macbook Air or Pro Retina which do not come with a DVD drive. And the USB flash drive is more portable and robust than a DVD.
Note: I’m doing the following on a Macbook running Snow Leopard. The resulting USB flash drive will boot on Intel-based Macs only. If you want to boot the USB flash drive on a PowerPC-based Mac, please see the comments.
Create a DMG file
 You can skip creating a DMG (Disk iMaGe) file if you clone directly from the Snow Leopard “Mac OS X Install DVD” disk to the USB flash drive. I just wanted a DMG file for speed and convenience; in case I need to clone to a dual-layer DVD or to another USB flash drive.
- Insert the Snow Leopard 10.6 “Mac OS X Install DVD” disk into the DVD drive.
- Run the “Disk Utility” application (under the “Applications/Utilities” folder).
- On the left-hand pane, you will see “Mac OS X Install DVD” appear under the DVD drive when the DVD is mounted. A “Mac OS X Install DVD” disk icon will also appear on the desktop.
- If you don’t see the “Mac OS X Install DVD” even after waiting for a while, try closing and starting the “Disk Utility” application again.
- On the left-hand pane, select the “Mac OS X Install DVD” by clicking on it.
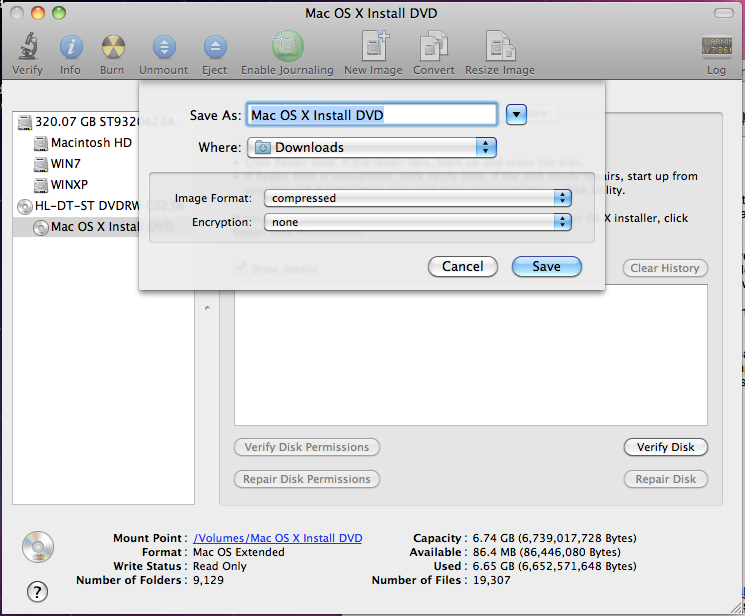
- Click on the “New Image” icon, located in toolbar at the top.
- Select the location to save the DMG file (“Mac OS X Install DVD.dmg”) to. Leave the defaults of “compressed” for “Image Format” and “none” for “Encryption”.
- Click on the “Save” button. The DMG file creation can take 20 minutes or longer.
Format USB Flash Drive as Mac OS X Bootable
 You will need an 8GB USB flash drive. Format it as a Mac OS X bootable drive by following these steps:
- Insert the USB flash drive.
- Run “Disk Utility”.
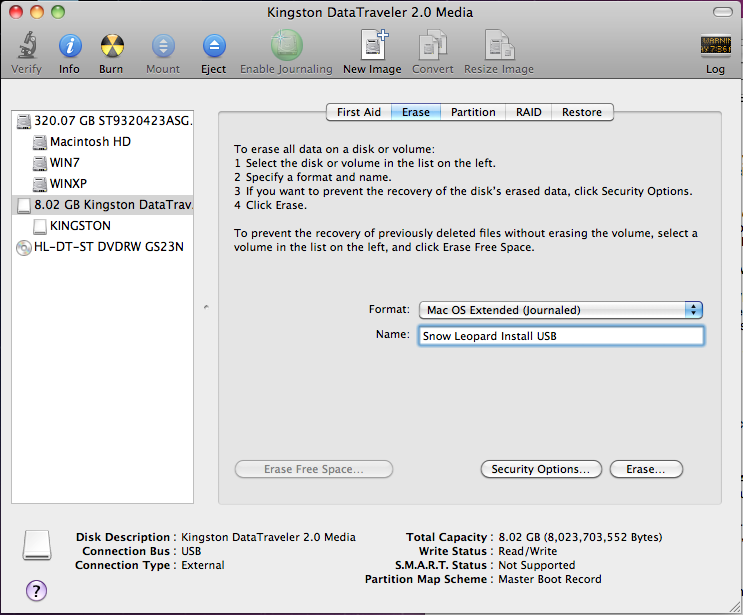
- On the left-hand pane, select the USB drive (not the FAT32 or other partition under it).
- Click on the “Erase” tab, select “Mac OS Extended (Journaled)” for “Format” and input a name like “Snow Leopard Install USB” (or anything because this will be overwritten later).
- Click the “Erase…” button and then the “Erase” button. This format operation will take less than a minute to complete.
- Once the format completes, make sure that the USB flash drive is selected in the left-hand pane. In the bottom pane, check that the “Partition Map Scheme” is set to “GUID Partition Table” (which means it is Mac OS X bootable). Under Snow Leopard, formatting as “Mac OS Extended (Journaled)” appears to select the “GUID Partition Table” scheme by default.
- If you are not running Snow Leopard and the “Partition Map Scheme” is not set to “GUID Partition Table”, please repeat steps #1-3 above and then the following alternative steps:
- Click on the “Partition” tab, select “1 Partition” under “Volume Scheme”, ensure “Mac OS Extended (Journaled)” is selected for “format”, and leave the name alone or change it to be anything (it will be overwritten later).
- Click on the “Options” button and ensure that “GUID Partition Table” is selected. Click OK.
- Click the “Apply” button and then the “Partition” button. This format operation will take less than a minute to complete.
Restore DMG file to USB Flash Drive
 Restore the DMG file to the bootable USB flash drive:
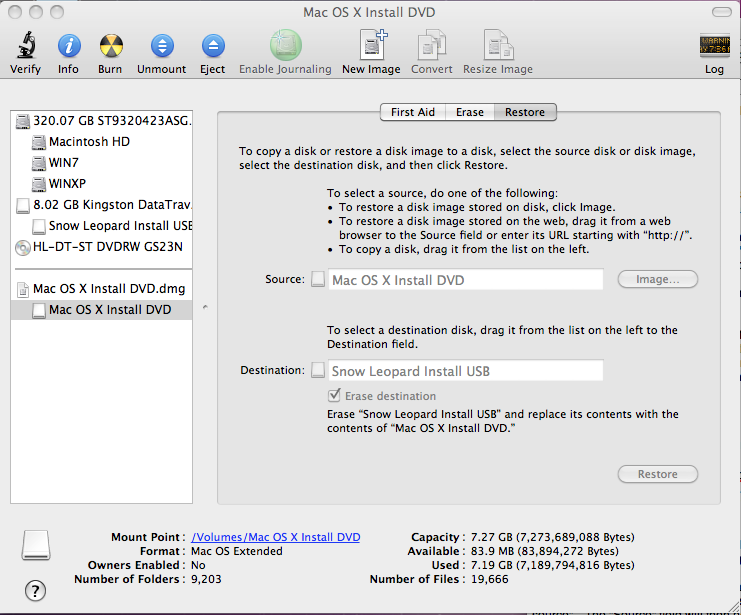
- Locate the “Mac OS X Install DVD.dmg” file that was created earlier. Double-click on it to mount and launch it. You will see a “Mac OS X Install DVD” disk icon appear on the desktop. You can close the “Mac OS X Install DVD” application window that was also opened.
- Insert the Mac OS X bootable USB flash drive that we created above.
- Run the “Disk Utility” application. On the left-hand pane, you should see both the USB flash drive and the mounted DMG file.
- On the left-hand pane, select the partition under the USB flash drive.
- Click on the “Restore” tab and drag that same partition (under the USB flash drive) to the “Destination” field (you will see a green plus mouse icon appear when you drag over the field).
- If you cannot drag the “Mac OS X Install DVD” partition under the DMG file to the “Source” field (on Snow Leopard, the green plus mouse icon won’t appear and no action is taken on the drop), you can instead right-click on the “Mac OS X Install DVD” partition and select “Set as source”. The “Source” field will then be filled with the partition name.
- Even though you can click on the “Image…” button and select the DMG file, when you do the restore, Disk Utility will throw a “RESTORE FAILURE” error with the message: “Could not find any scan information. The source image needs to be image scanned before it can be restored.”
- If you are cloning directly from the “Mac OS X Install” DVD, you can just drag the partition under the DVD drive to the “Source” field.
- I left the “Erase destination” box checked. With this box checked, the restore operation took about 25 minutes. When this box was unchecked, the restore operation reported that it would require 4 hours.
- Click the “Restore” button, then the “Erase” button, and input your Mac OS X administrative password.
- When the restore completes, you may see two “Mac OS X Install DVD” application windows appear, the first from the mounted DMG file and second from the USB flash drive. There will also be two “Mac OS X Install DVD” disk icons on the desktop. Also, notice that the partition under the USB flash drive is now named the same as the source, “Mac OS X Install DVD”.
- Select the USB flash drive in the left-hand pane. In the bottom pane, double-check that the “Partition Map Scheme” is still set to “GUID Partition Table”.
- If you are not using Snow Leopard and find that the “Partition Map Scheme” is no longer set to “GUID Partition Table”, you may need to redo the restore. Reformat the USB flash drive (per the alternative instructions above) and before doing the restore, uncheck the “Erase destination” box. I fear that the “Erase destination” function may modify the partition map scheme to be something other than “GUID Partition Table”.
Boot from the USB Flash Drive
- Insert the USB flash drive.
- While starting your Mac, hold the Alt/Option key down to launch the Startup Manager.
- Select the USB flash drive to boot from; it will be labeled “Mac OS X Install DVD”.
Most of the information above was derived from:
Hey thanks for the tips, i just have problem at the very end. I’ve followed all the steps and have gotten to restarting my computer and selecting the external hard drive labelled Mac OS X install DVD. After i click it, the apple logo on the white/grey screen comes up but then nothing else happens, any ideas whats happening?
I’m trying to going from Leopard to Snow Leopard
Thanks
Hi Melatonin,
Is the Mac that you are trying to upgrade, an Intel or PowerPC mac? Looks like the GUID Partition Table only works on Intel-based macs. For PowerPC-based macs, the Apple Partition Table is required instead. Here’s more details on the partition types.
If your Mac is a PowerPC-based, then you will need to reformat the USB flash drive, choosing the Apple Partition Table as the partition scheme instead. Then to boot from the USB flash drive, it looks like you need to use the PowerPC mac’s Open Firmware mode to issue some command lines. I found a post which talks about booting Leopard USB on PowerPC (the comments are also rich in information and alternatives), but it should work similarly for Snow Leopard.
If you have an Intel-based Mac, let me know and I’ll see if I can help you debug some more.
Good luck!
Hi, thanks for the reply.
I have a Macbook pro 2.5Ghz Intel COre 2 Duo
Hi Melatonin,
I glanced through the reference post’s comments and it looks like several folks encountered the same issue you did, where the Apple logo appears but nothing happens. Unfortunately, there were no definitive answers to the issue. There were a couple of ideas on how to get it working, but they are not definitive fixes. I’ve listed them below:
Alternatively, you could just buy an external USB DVD drive (I’m assuming the DVD drive on your Macbook is broken or flaky).
Good luck – Chanh
Thanks for the help, will try those out
I accidently trashed and emptied the entire applications folder i have zero applications not even system prefrences it says no application to open document. any advice please
Hi Kimber,
Sorry to hear about trashing the entire Applications folder. I’m not sure if there is an easier way to fix that, other than to do a re-installation of the operating system.
Regards.
I followed it all to the letter but when I inserted the boot disk into my mac book pro (which has 10.8 installed)… (option restart to select the external), the mac goes through the first step of os x update installation and then says it can’t… so all in all it is not rebooting via the external drive.. any advice?
Nice explanation for creating clone of install dvd of Mac 10.6 to usb drive using disk utility. But, its really time consuming process. So, one can refer to any cloning software to get job done fast and easily.
thank you thank you thank you.. i too put up detailed instructions online like this.. and so appreciate it when others do too. very much appreciated !
I followed your instructions and got it copied to my pendrive. Will it work if I bought a new blank HDD to install on it? Got to know before buying a new one.
Hi Macko,
Cool. Yes, you can use a new hard drive, boot your mac off the USB flash drive, and then install the Mac OS X operating system onto the new hard drive.
Regards.
If you get this error
“Could not find any scan information. The source image needs to be image scanned before it can be restored.”
but you can drag the DVD across to source (because it’s dimmed), then you might need to mount it from within diskutility first
Tried this out and it worked. I used my new iMAC with Yosemite to get the the DVD onto the USB. Then booted up my laptop using the USB key as instructed.
My laptop is a MacBook pro 2,2 (intel Core 2 Duo). I went from Tiger to Snow Leopard. It works, cannot comment too much on performance – it was slow and still seems slow .. so far.
Hello,
many thanks to you for your nice Work !
Regards
M. Bahadir
This webpage represents a very rare thing: A set of instructions that are COMPLETE and THOROUGH! This prevents so many headaches and failures! Thanks for your efforts!