
In my earlier post on Configuring Outlook 2003/2007 for Gmail IMAP, I mentioned that there was a problem with deleting messages. Specifically, when I deleted a message in the Gmail Inbox, the message was deleted from the Inbox but still left in the “All Mail” folder; so it didn’t show up in the Trash. The workaround was to drag the message from the “All Mail” folder to the Trash.
Microsoft fixed the above Gmail delete message problem in Outlook 2010 and in Live Mail 2011. To enable this fix, in Live Mail, go to menu “File->Options->Mail->Advanced->IMAP” and enable the “Use the ‘Deleted Items’ folder for IMAP accounts” option. (Live Mail 2012 enables this option by default.)
(Update: Either Microsoft or Facebook fixed the following Facebook email crash issue because I no longer see it.) There was a major downside to using Live Mail 2011 if you receive emails from Facebook. Simply, when you attempt to read an email from Facebook, Live Mail 2011 would crash. (I looked into using rules to move emails from Facebook into a folder, but rules only work for POP3 accounts, not Gmail IMAP.)
Note: Live Mail 2012 is the last version. Thankfully it does not exhibit any of the issues above and is still fully functional under Windows 10.
 Configure Gmail IMAP
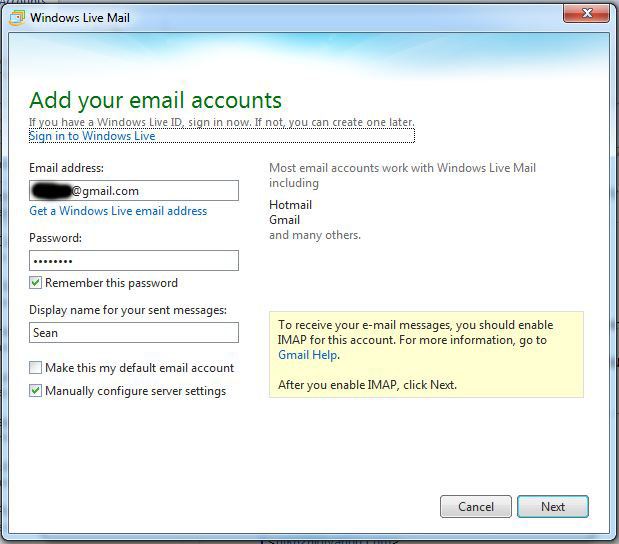
When you first run Live Mail, it will prompt you with an “Add your email accounts” dialog. If you don’t see this dialog or wish to access it later, go to menu “File->Options->Email accounts”.
To configure for Gmail IMAP, do the following on the first page:
- Input your Gmail email address.
- The password should be your Google Mail app-specific password if you have generated it. Otherwise, input your regular Gmail password.
- Select the “Manually configure server settings” option.
On the next “Configure server settings” page, do the following:
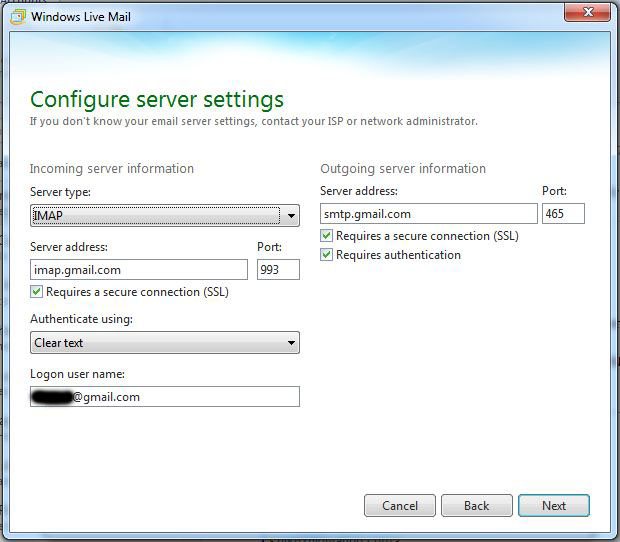
- Select “IMAP” as the “Server type”.
- Input “imap.gmail.com” into the IMAP “Server address” under the “Incoming server information” section.
- Select “Requires a secure connection (SSL)” under the IMAP “Server address”.
- The IMAP “Port” should change from “143” to “993” automatically; but if it doesn’t, make the change manually.
- Select “Clear text” for the “Authenticate using” option (the alternative “Secure Password Authentication” method is not supported by Gmail).
- The “Logon user name” field should include the ending domain “@gmail.com”, not just your username.
- Input “smtp.gmail.com” into the SMTP “Server address” under the “Outgoing server information” section.
- Select “Requires a secure connection (SSL)” and “Requires authentication” under the SMTP “Server address”.
- The SMTP “Port” won’t automatically change, so manually change it from “25” to “465”.
When you click on the next button, Live Mail will create the Gmail account and perform the initial IMAP folder sync. Once the sync completed, I tested by selecting a message in the Inbox and deleting it. When I checked the “[Gmail]->All Mail” folder, the message was not listed there. And when I checked the “[Gmail]->Trash” folder, I saw the deleted message. It worked! I no longer had to do the “move to Trash” workaround.
Issue: Duplicate Unread GMail Messages
A strangeness I noticed was that the “Unread email” folder under “Quick views” would show a duplicate of each new message. Duplicates occur because each new unread message appears both in the Inbox folder and the “[Gmail]->All Mail” folder. You can eliminate the duplicates by hiding the “All Mails” folder. To hide the “All Mail” folder, left-click on it and select the “Hide this folder from list” menu item. After making this change, you should see only one copy of each message in the “Unread email” folder.
If you want to unhide the “All Mail” folder, left-click on the email account name and select the “Show or hide folders…” menu item. Under the All tab, select the “All Mail” item and click on the “Show” button to the right. Hit Ok to close the dialog. You should see the “All Mail” folder under “[Gmail]” again.
Issue: Unwanted GMail Folders
Live Mail recognizes Google Mail’s IMAP folder names and maps them correctly. So you should only see two main folders, “Inbox” and “Gmail”. Under “Gmail”, there are “All Mail”, “Drafts”, “Sent Mail”, “Spam”, “Starred”, and “Trash” sub-folders.
If you see other IMAP folders, then they represent custom labels in Google Mail. You can either hide them or delete them. To delete, do the following:
- Log into Gmail and delete the custom labels.
- Under Live Mail, right-click on the top Gmail email account label (in the left-side view), and click “Download all folders” to refresh the IMAP folders displayed. The unwanted IMAP folders will disappear.
Configure Yahoo Mail IMAP
 Yahoo’s new IMAP access is available to all Yahoo Mail users. Yahoo Mail’s IMAP configuration is almost identical to Gmail’s. (I prefer IMAP to POP3 so use the configuration below myself.)
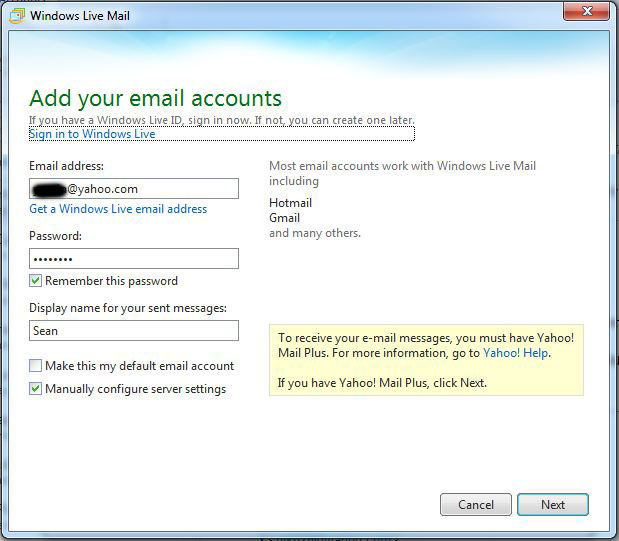
To configure for Yahoo Mail IMAP, do the following on the first page:
- Input your Yahoo Mail email address.
- The password should be your Yahoo Mail app-specific password if you have generated it. Otherwise, input your regular Yahoo Mail password.
- Select the “Manually configure server settings” option.
On the next “Configure server settings” page, do the following:
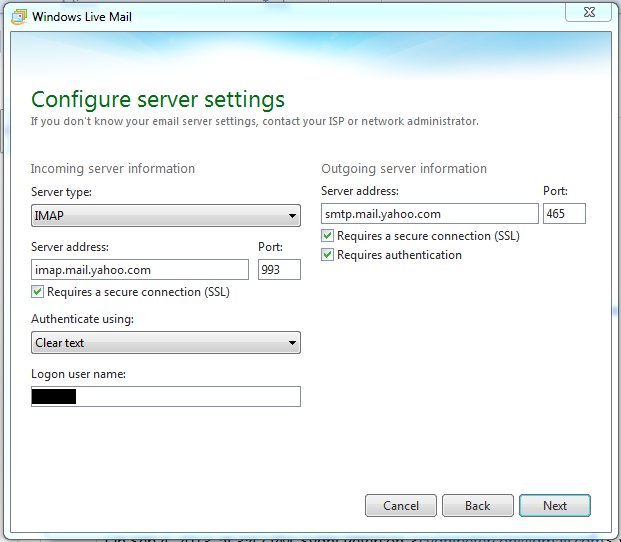
- Select “IMAP” as the “Server type”.
- Input “imap.mail.yahoo.com” into the IMAP “Server address” under the “Incoming server information” section.
- Select “Requires a secure connection (SSL)” under the IMAP “Server address”.
- The IMAP “Port” should change from “143” to “993” automatically; but if it doesn’t, make the change manually.
- Select “Clear text” for the “Authenticate using” option.
- The “Logon user name” field should just be your username (don’t include the the ending domain “@yahoo.com”).
- Input “smtp.mail.yahoo.com” into the SMTP “Server address” under the “Outgoing server information” section.
- Select “Requires a secure connection (SSL)” and “Requires authentication” under the SMTP “Server address”.
- The SMTP “Port” won’t automatically change, so manually change it from “25” to “465”.
Issue: Unwanted Yahoo Mail Folders
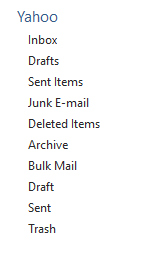 Live Mail does not recognize Yahoo Mail’s IMAP folder names. As a result, we end up with a combination of Live Mail folders and Yahoo Mail folders. So, we will see both “Drafts” and “Draft”, “Sent Items” and “Sent”, “Junk E-mail” and “Bulk Mail”, and “Deleted Items” and “Trash”. (Live Mail actually creates its missing folders in Yahoo Mail.)
First, we need to teach Live Mail how to map its folders to Yahoo Mail’s folders.
- Go to menu “File->Options->Emails accounts”, select the Yahoo Mail account, and click on “Properties”.
- Click on the “IMAP” tab.
- Under “Special Folders” section, change the IMAP paths to match the Yahoo Mail folder names accordingly:
- Change “Sent Items” to “Sent”.
- Change “Drafts” to “Draft”.
- Change “Deleted Items” to “Trash”.
- Change “Junk E-mail” to “Bulk Mail”.
- Hit Ok and answer Yes to the “Would you like to refresh your folders” dialog.
Second, we then can delete the Yahoo Mail folders created by Live Mail.
- Right-click on the “Sent Items” folder and select “Delete”.
- Right-click on the “Drafts” folder and select “Delete”.
- Right-click on the “Deleted Items” folder and select “Delete”.
- Right-click on the “Junk E-mail” folder and select “Delete”.
The correctly-mapped IMAP folders won’t offer the “Delete” menu item so you won’t be able to delete them by mistake. You will end up with just “Inbox”, “Archive”, “Bulk Mail”, “Draft”, “Sent”, and “Trash” folders.
Configure Yahoo Mail POP3
Note: If you don’t have a Yahoo Mail Plus account which is required for Yahoo POP3, you can use Yahoo’s new IMAP access above instead.
To configure Yahoo Mail POP3, follow the steps for the first page above. On the next “Configure server settings” page, do the following instead:
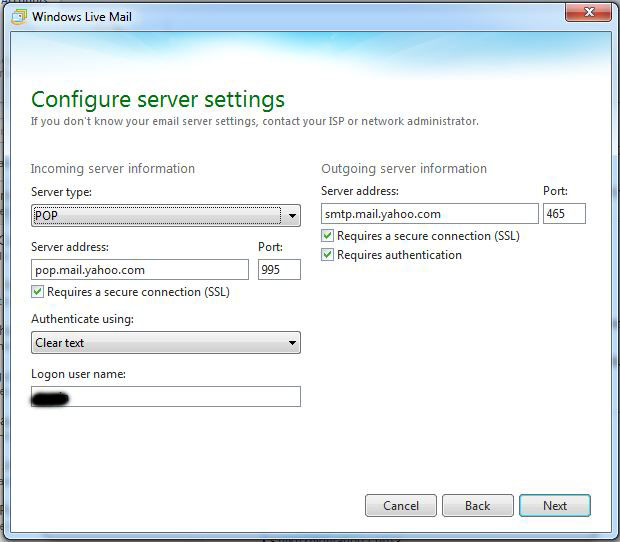
- Select “POP” as the “Server type”.
- Input “pop.mail.yahoo.com” into the POP3 “Server address” under the “Incoming server information” section.
- Select “Requires a secure connection (SSL)” under the POP3 “Server address”.
- The POP3 “Port” should change from “110” to “995” automatically; but if it doesn’t, make the change manually.
- Select “Clear text” for the “Authenticate using” option.
- The “Logon user name” field should just be your username (don’t include the the ending domain “@yahoo.com”).
- Input “smtp.mail.yahoo.com” into the SMTP “Server address” under the “Outgoing server information” section.
- Select “Requires a secure connection (SSL)” and “Requires authentication” under the SMTP “Server address”.
- The SMTP “Port” won’t automatically change, so manually change it to “465”.
Issue: Display Order of Email Accounts
After adding several email accounts, I noticed that Live Mail’s account list (on the left in the main window) was not listing the email accounts in the order of creation; they were in some random order. To re-arrange the display order, just left-click on the email account name and select “Move up” or “Move down”.
I imagine that the above IMAP and POP3 configuration instructions are still applicable to Outlook 2010.
These sites helped me to figure out the quirks of Live Mail 2011: