
As of macOS 10.15 Catalina, I could no longer use TrueCrypt 7.1a because it does not support 64-bit and Catalina is 64-bit only. Looking for an alternative, I found VeraCrypt, which was forked from TrueCrypt.
Install VeraCrypt
Here’s how I installed VeraCrypt on my macOS 12 Monterey MacBook:
- Install macFUSE (previously known as OSXFUSE). Thankfully, the latest macFUSE 4.2.4 version supports macOS 12 Monterey.
- After the installation completes, you will see this message: ‘System software from developer “Benjamin Fleischer” was blocked from loading.’
- Open System Preferences, Security & Privacy, General tab, unlock the bottom-left “Click the lock to make changes”, and click the Allow button on the bottom-right.
- You will be prompted to restart.
- Install VeraCrypt. (VeraCrypt version 1.25 or later supports macOS 12 Monterey. Version 1.25.7 is the latest.)
Convert TrueCrypt Volume to VeraCrypt
While VeraCrypt does support TrueCrypt volumes, I decided to convert to a VeraCrypt volume to avoid any compatibility issues now or in the future. (There are claims that VeraCrypt cannot open very old TrueCrypt versions.)
To make a clean start, I thought to mount the old TrueCrypt volume file (a.k.a. encrypted file container), create a new VeraCrypt volume file, and then copy from the former to the latter. Unfortunately, I am unable to use TrueCrypt on my macOS 12 Monterey machine.
Thankfully, VeraCrypt as of version 1.0f supports converting TrueCrypt volume files and non-system partitions to VeraCrypt volumes. One can do so by performing one of the following:
- Change Volume Password
- Set Header Key Derivation Algorithm
- Add/Remove key files
- Remove all key files
Because my TrueCrypt volume file does not use key files and I don’t want to change the password, I will use the “Set Header Key Derivation Algorithm” option. This option will also allow me to change to a more secure hash algorithm, from RIPEMD-160 to SHA-512. (Whirlpool is also a good choice for hash algorithm, but SHA-512 is used by the Gubbermint!)
Note: The AES-256 encryption algorithm I used for my TrueCrypt volume file is still good. As long as a strong password (of at least 14 characters) is used, AES-256 is pretty secure. Unfortunately, none of the conversion options above provide a method to change the encryption algorithm.
Here’s how I converted my password-protected TrueCrypt volume file to VeraCrypt:
- Run the VeraCrypt app.
- At the bottom, click on the “Select File…” Button and choose the TrueCrypt volume file.
- Click the “Volume Tools” button (near bottom-right) and choose the “Set Header Key Derivation Algorithm…” option.
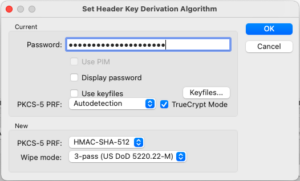 The “Set Header Key Derivation Algorithm” dialog will appear:
- Input the password.
- Make sure that the “TrueCrypt Mode” option is checked. (The “TrueCrypt Mode” option is enabled by default because my volume file name uses the TrueCrypt “.tc” file extension.)
- On the bottom “new” section, change “PKCS-5 PRF” from “Unchanged” to “HMAC-SHA-512”. (Doing this will change the hash algorithm.)
- Click the OK button.
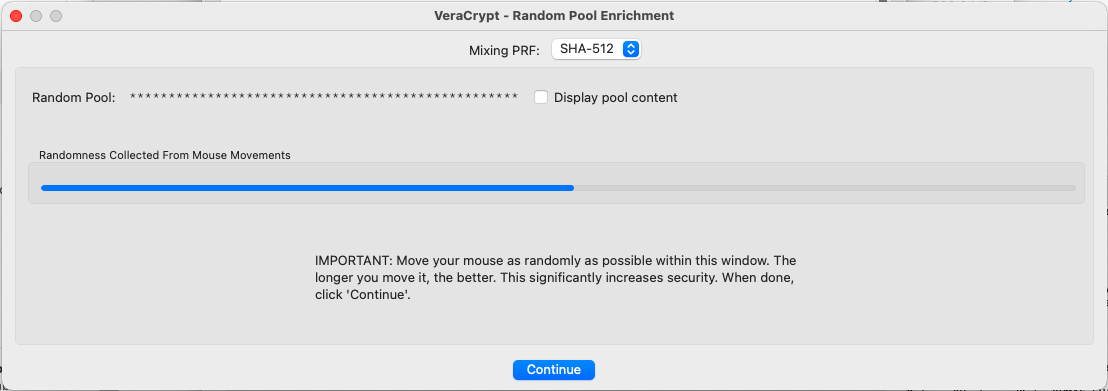
 The “VeraCrypt – Random Pool Enrichment” dialog will appear:
- Inside the dialog window, drag your mouse around by moving it randomly while holding down the left-click. (Or do a “three finger drag” if you have that configured.)
- Once the “Randomness Collected From Mouse Movements” progress bar is full, click on the Continue button. (Note that clicking the top-left red X icon is the same as clicking Continue. It does not do a cancel.)
- It took less than 30 seconds to convert my 512MB TrueCrypt volume file.
- Change the volume file’s extension from “.tc” to “.hc”. (VeraCrypt’s file extension is “.hc”. When opening “.hc” files, VeraCrypt will not enable the “TrueCrypt Mode” option by default.)
- Select the renamed volume file and click on the bottom-left Mount button.
- Input the password. (The “TrueCrypt Mode” option should not be checked.)
- The volume file will be mounted as a new drive.

Over the weekend, I finally had to move from Truecrypt to Veracrypt and was looking for how to do the conversion. Then after reading your post here, where you said you were gonna just copy the contents from a TC volume to a VC volume, I realized I could do that, no conversion needed (since I have still have TC installed on this older (Win10) machine). Just mounted both volumes at the same time. Worked like a charm, as expected. Thanks for writing this up, even if I didn’t do the actual conversion!
Hi Rob,
Glad you got it working.
Duh, I should have done what you did, create a new volume, copy from the old, and avoid all the technical research!
Chanh