
I discovered that my Dell Optiplex 3050 desktop’s motherboard supported a NVMe M.2 SSD drive. Supposedly NVMe drives, which look like small circuit boards, are even faster than SATA SSD drives. So I decided to upgrade my Samsung 860 EVO 250GB 2.5 inch SATA SSD drive to a Crucial P2 500GB NVMe M.2 SSD drive.
Rather than re-install Windows 10 from scratch, I decided to clone from the old drive to the new drive. Previously, I would use the Clonezilla utility; but this time, I decided not to use it because it was not user-friendly and did not take care of resulting boot issues (on the new drive). Thankfully, I found Macrium Reflect Free, which supported live disk cloning and also included a boot repair tool. (Live or “on the fly” disk cloning allows one to use Windows while it is being cloned.)
Below are instructions on how to clone from a SATA SSD to a NVMe SSD using Macrium Reflect Free. We’ll also handle cloning from a smaller to larger capacity drive and repairing the new drive so it can boot up successfully.
Note: The instructions should also work for cloning to and from non-SSD drives.
Disable BitLocker
I recommend disabling BitLocker before cloning the drive. In the past, when booting from a cloned BitLocker-enabled drive, BitLocker would require me to manually input the recovery key because the drive signature had changed. I had to do this every time I booted the computer. The problem was finally solved after I disabled and then re-enabled BitLocker.
To disable BitLocker, run “Manage BitLocker”, select the main “C:” drive, and click “Turn off BitLocker”.
Install Macrium Reflect Free
- Browse to the Macrium Reflect web page.
- Toward the bottom, under “Backup at Home”, click on the “Download Free” link in the “Reflect 8 Free” section.
- Check the “I need a personal free license” option and enter your email address. Hit Continue.
- You will get an email from Macrium containing the download link. Paste that link into the browser to download the Macrium Reflect Download Agent (“ReflectDLHF.exe”).
- Run the download agent and click on the “Download” button to download Macrium Reflect Free. (I downloaded a file named “v7.3.5854_reflect_setup_free_x64.exe”).
- The download agent should execute the downloaded setup file automatically. (If it doesn’t, you can run the setup file manually.)
- Once the installation completes, you should see a “Macrium Reflect” shortcut on the desktop.
There is usually a price paid for being free and Macrium Reflect Free is not an exception. Macrium Reflect installs a Windows update service which automatically runs. Worst, even if you stop that service or set it to manual or disabled state, Macrium Reflect (when you run it) will start the service again and set it to Automatic. Which means that you must manually stop the service and set it to manual/disabled every time after you launch Macrium Reflect.
To reduce chance of the the Macrium Service doing something, you can at least disable the update checks:
- After running Macrium Reflect, go to the Help menu and select “Configure Update Check…”.
- Unselect the two Update options: “Hourly background checks for software updates” and “Daily checks for software updates when Macrium Reflect loads”.
- Click OK to apply the changes.
Clone the Drives
Ensure that the new NVMe SSD drive is installed on the motherboard. Alternatively, you could put the drive in a USB enclosure and connect it to the computer. However, the USB interface would reduce the data transfer rate so cloning would be significantly slower.
- Run the installed “Macrium Reflect” application.
- Select the source disk. I selected my 250GB SATA SSD drive.
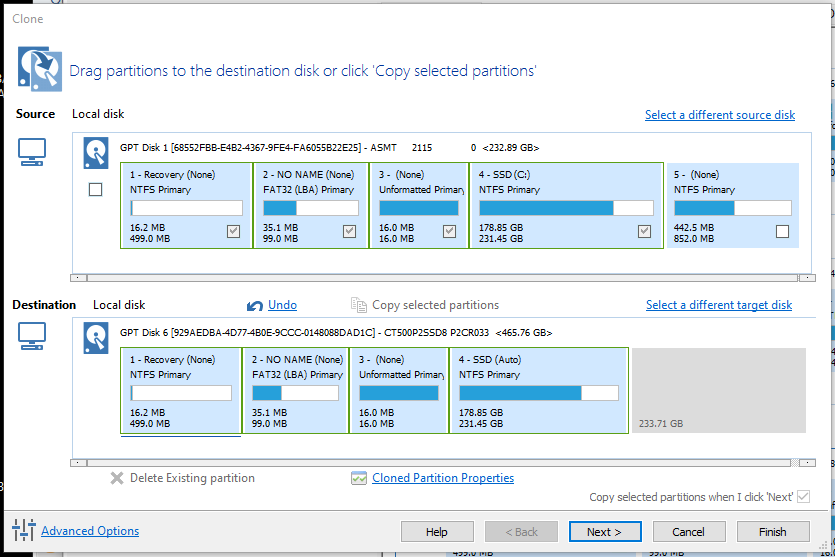
- Click on the “Clone this disk…” link that appears under the selected source disk. A Clone dialog window will appear.
- Click on the “Select a disk to clone to…” link and select a destination disk. I selected my 500GB NVMe SSD drive.
- Delete any existing partitions on the destination disk.
- Note: No changes will be made to the source and destination disks until we commit them using the Next button.
- Because the sizes of the two drives are different, we cannot just copy all the partitions as-is. We want to increase the size of the main partition (usually labeled as the “C:” drive) which contains the Windows operating system. It is the largest partition and is the second to last partition.
 Under the source disk, unselect the last partition so we won’t copy it. We’ll copy it later once we have resized the main partition under the destination disk.
- Take note of the size of the last partition because we will need this info below. In my case, the last partition size is 852.0 MB.
- Click on the “Copy selected partitions” link on the destination disk. You will see all partitions but the last appear on the destination disk.
- Under the destination disk, select the “main” partition (currently the last partition in destination disk) to resize it.
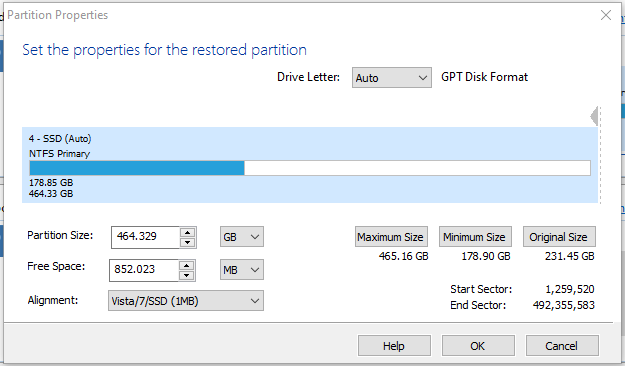
- Click on the “Cloned Partition Properties” link to view the properties of the main partition. A dialog window will appear.
 Near the bottom, in the “Free Space:” section, click on the drop-down to change from “GB” (Gigabyte) to “MB” (Megabyte). Then input the size of the source disk’s last partition. In my case, I inputted “852.0” which was then adjusted to “852.023” automatically.
- Note: You could also resize the partition by dragging the vertical dash line to the right but that is very inaccurate.
- Click on the OK button to close the dialog.
- The destination disk’s remaining unused space will now be the same size as the source disk’s last partition.
- Drag and drop the last partition from the source disk to the destination disk. We are now ready to actually perform the disk cloning.
- Click on the Next button to commit the changes we have made. Click Next to skip the scheduling screen because we want to start the disk cloning process immediately. Click Finish.
- Macrium Reflect refers to the disk cloning as “backup” so it will ask you to confirm that you wish to do the backup. After that, it will ask you to check to confirm that the destination disk will be overwritten before finally proceeding with the disk cloning.
Technically, you could use Windows while the disk cloning is occurring in the background. However, I don’t recommend it. The safest method is to only have Macrium Reflect Free running to ensure the most up-to-date information is cloned.
Create Rescue Media
Unfortunately, the new destination disk will most likely not be able to successfully boot Windows 10. Fortunately, Macrium Reflect provides a method to create a bootable USB flash drive containing a Rescue Media tool to fix bootup problems.
Note: On startup, when Windows 10 fails to boot, it will attempt an Automatic Repair. Ultimately, the repair will fail.
- Insert a USB flash drive into your computer. (The Rescue Media uses about 610MB so a 1GB USB flash drive is sufficient.)
- The USB flash drive must be set to use MBR (Master Boot Record), not GPT (GUID Partition Table), because Rescue Media does not support the latter.
- If the USB flash drive uses GPT, you can convert to MBR by running the “DiskPart” tool and inputting these commands:
> list disk
(you will see a list of disk drives)
> select disk 6
(or whatever the disk number of your USB flash drive is)
> convert mbr
> exitWarning: Be careful to select the correct disk number!
- On the Macrium Reflect menu, select “Other Tasks” and then the “Create Rescue Media…” action.
- Under “Select Device”, select the “Removable USB Flash Drive”.
- Click on the Build button to create the Rescue Media.
Fix Boot Issue
- Shutdown the computer. I recommend disconnecting the source disk to avoid confusion.
- With the Rescue Media USB flash drive inserted, start the computer.
- If your computer’s BIOS supports it, you can hit F10 or F12 to open up the boot menu and select the USB flash drive to boot from.
- Otherwise, if the BIOS is configured to bootup from USB drives, it should boot from Rescue Media if it is the only bootable drive.
- Once Rescue Media finishes booting up, it will show the Restore tasks on the left by default.
- Select “Fix Windows boot problems”. A dialog window will appear showing the available Windows 10 operating systems. Because I have disconnected the source disk, I only see one Windows 10 installation.
- Select the Windows 10 installation and click Next.
- Check the destination disk as the Boot Drive. Click Next.
- Click Finish to repair the destination disk.
- Shutdown the computer, remove the USB flash drive, and power on again.
You should be able to boot up Windows 10 successfully from the destination disk.
Enable BitLocker
If you have disabled BitLocker earlier, don’t forget to re-enable it. To enable BitLocker, run “Manage BitLocker”, select the main “C:” drive, and click “Turn on BitLocker”.
Enable System Protection
The system protection was disabled on my destination disk (not sure if this is by design). System protection allows Windows to create restore points, which is an important method to recover from operating system failures. So I would want it to be enabled all the time.
To enable system protection:
- Run “Create a restore point” to open up the “System Protection” tab under the “System Properties” dialog.
- Select the main “C:” drive under “Available Drives” and click on the “Configure…” button.
- Check “Turn on system protection” and click on the “Apply” button.
Performance Comparison
I used CrystalDiskMark to benchmark the two SSD drives. I found that the NVMe SSD was 3-4 times faster than the SATA SSD. That is a pretty good improvement. (FYI, the SATA SSD was 3-5 times faster than the old mechanical hard drives.)
Hope the above helps you with your disk cloning needs.
did you need to install the nvme driver on C disk before?
Hi Bobby,
Sorry for the delay. Just got back from vaca. I did not need to install an NVMe driver. Windows 10 automatically handled it for my Dell Optiplex 3050 desktop.
Regards, Chan
Chanh thank you, this is precisely what I was looking for.
256GB SATA to 500GB NVMe, just like your description.
I did my SATA to NVMe Macrium clone the other night and naturally, I wasn’t as prepared as I thought I was. Crazy as it seems, I didn’t have a USB stick handy for the Rescue Media either. Wish I had! I had to buy a 32GB stick–who has a 1GB stick anymore?
Anyway, I think this is going to get it done for me when I get a chance to try later on this weekend.
Thanks again!
Thanks for the guide!
Did everything you said just to make sure I didn’t get stuck.
Went from a 256 GB SATA to 500GB NVMe. For me the transition was seamless, no need for repairs, just booted right up.
It was nice to have the repair boot drive just in case though.
Great Guide!
Went through the steps but the fix boot option doesn’t work. System does not see the NVME because no drivers are installed. Booting into a Win10 install USB says the same thing, but after installing the drivers during the Win10 install it can see the drive. I’m trying to restore/clone Win11 and do not have a Macrium license to use the redeploy option to install the NVME drivers in the Maccrium PE. Any suggestions how to pre load the new NVME drivers into the restore/restore image or install the drivers after?