
I needed to re-image a Google Nexus 5 Android GSM smartphone with its stock factory image. Because I haven’t done this in a long while, I thought I would document what I did.
The instructions below should also work for the Google Pixel phone. I did the re-image using my Windows 10 desktop, but you can also do it on a Mac.
Note: Please backup your data because a factory image flash will destroy everything!
Install ADB and Fastboot
We need to install the software tools necessary to flash an Android phone. These are the Android Debug Bridge (adb), used to communicate with an Android device, and fastboot, used for writing directly to a device’s flash memory.
Thankfully, Google has separated these tools from the Android SDK into a smaller “SDK Platform Tools” package.
- Download the SDK Platform Tools package; I downloaded “platform-tools-latest-windows.zip”.
- Unzip to a directory, say “C:\Program Files\platform-tools”.
- Add that directory to the %PATH% environment variable.
- Launch a Command Prompt window and run “adb version”. I got “Android Debug Bridge version 1.0.39” as the response.
Enable USB Debugging
 Enable USB debugging so adb can talk to the phone:
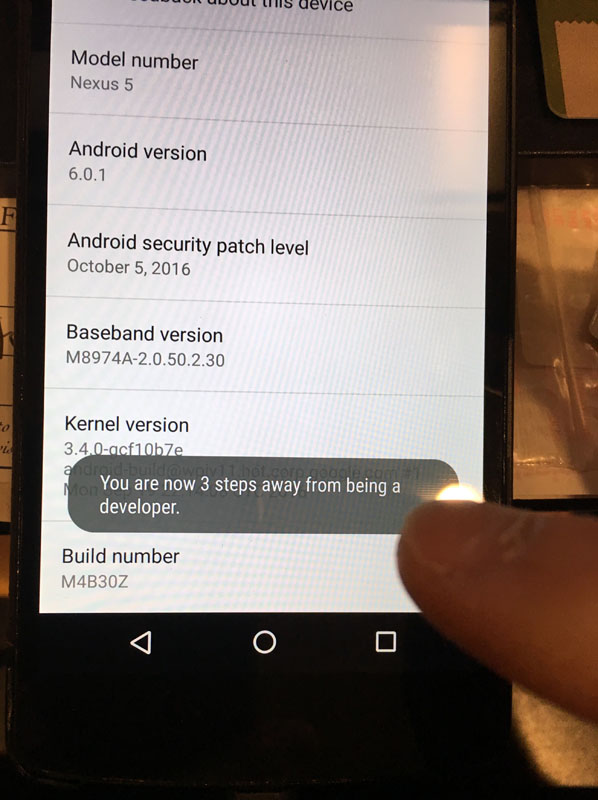
- On the phone, go to Settings, “About phone”, and scroll to the bottom until you see “Build number”.
- Click on the “Build number” seven times. You’ll see popups telling you how many times more to press to enable “Developer options”. (Ex: “You are now 3 steps away from being a developer.”)
- Once done (you’ll see a “You are now a developer!” popup message), go back to Settings and you will see a new menu “Developer options”. Click to go into it.
- Near the top, you will see an option “USB debugging”. Enable it.
- Plug the phone into the computer and answer “OK” when prompted with “Allow USB debugging?”. (Windows 10 was able to automatically find and install the Nexus 5 driver. If your operating system fails to do so, you may need to find and install the driver for your phone manually.)
- Open a Command Prompt window and run “adb devices”. It should list one device.
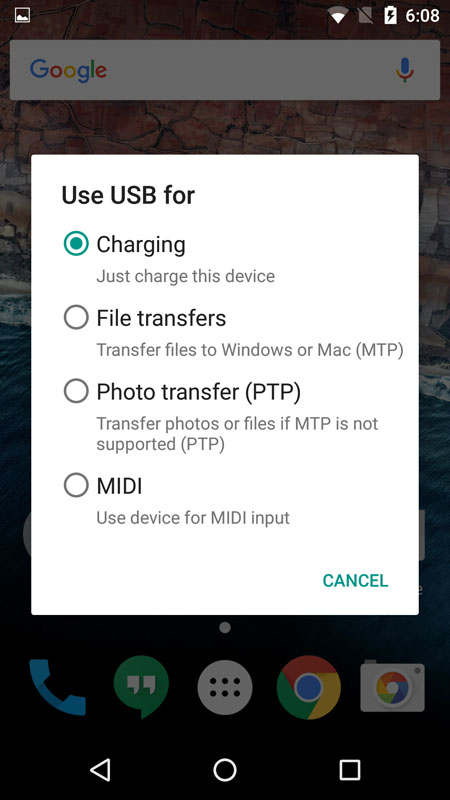 Note: You can see the status of and control how the USB connection behaves. On the connected phone, drag from the top, and you will see a message relating to the USB connection. If USB debugging is enabled, you will see the “USB debugging connected, Touch to disable USB debugging” message. If you disable USB, you will see a new “USB for charging, Touch for more options” message. You can change USB options to “File transfers” if you wish to browse files (such as pictures) located on the phone.
Find Factory Image
The hardest part of this process was finding the correct factory image to download for the Nexus 5. There were so many listed without any helpful instructions as to which image to download.
Here’s what I did:
- Locate Google’s Factory Images for Nexus and Pixel Devices page.
- Find the factory images for the “Nexus 5”, which is code-named “hammerhead”. (The “Nexus 5X” has code-name “bullhead”.)
- Locate the last image, which is the latest and greatest version, “6.0.1 (M4B30Z, Dec 2016)”. (“M4B30Z” and similar are build labels, not model numbers, as I originally thought. So any of them should work with the Nexus 5, though an older Nexus 5 image would prompt you to update the latest.)
- Unzip the downloaded “hammerhead-m4b30z-factory-625c027b.zip” file to any location; I just left the unzipped “hammerhead-m4b30z” folder in the Downloads folder.
Flash Factory Image
This is the easiest step because Google has provided a script with the factory image that does all the work.
- Open a Command Prompt window and change directory to the unzipped factory image folder.
- Run the “flash-all.bat” script. It only took 125 seconds to complete, ending with the message “finished. total time: 125.757s”.
The Nexus 5 then rebooted.
Note: It is recommended to do a data reset after a factory image flash. To do so, go to Settings on the phone, “Backup & reset”, and “Factory data reset”.
Need To Know
For your reading pleasure, below is the output of the “flash-all.bat” script:
target reported max download size of 1073741824 bytes
sending 'bootloader' (3124 KB)...
OKAY [ 0.316s]
writing 'bootloader'...
OKAY [ 0.543s]
finished. total time: 0.863s
rebooting into bootloader...
OKAY [ 0.100s]
finished. total time: 0.101s
target reported max download size of 1073741824 bytes
sending 'radio' (45489 KB)...
OKAY [ 1.748s]
writing 'radio'...
OKAY [ 3.130s]
finished. total time: 4.881s
rebooting into bootloader...
OKAY [ 0.100s]
finished. total time: 0.102s
extracting android-info.txt (0 MB) to RAM...
extracting boot.img (8 MB) to disk... took 0.033s
target reported max download size of 1073741824 bytes
archive does not contain 'boot.sig'
archive does not contain 'dtbo.img'
archive does not contain 'dt.img'
extracting recovery.img (9 MB) to disk... took 0.061s
archive does not contain 'recovery.sig'
extracting system.img (996 MB) to disk... took 6.279s
archive does not contain 'system.sig'
archive does not contain 'vbmeta.img'
archive does not contain 'vendor.img'
wiping userdata...
mke2fs 1.43.3 (04-Sep-2016)
Creating filesystem with 7137786 4k blocks and 1785856 inodes
Filesystem UUID: b6135b46-f5a1-11e7-9dd3-33ea8476e3c7
Superblock backups stored on blocks:
32768, 98304, 163840, 229376, 294912, 819200, 884736, 1605632, 2654208,
4096000
Allocating group tables: done
Writing inode tables: done
Creating journal (32768 blocks): done
Writing superblocks and filesystem accounting information: done
wiping cache...
mke2fs 1.43.3 (04-Sep-2016)
Creating filesystem with 179200 4k blocks and 44832 inodes
Filesystem UUID: b66edade-f5a1-11e7-be2f-2fbe1c3d8ae8
Superblock backups stored on blocks:
32768, 98304, 163840
Allocating group tables: done
Writing inode tables: done
Creating journal (4096 blocks): done
Writing superblocks and filesystem accounting information: done
--------------------------------------------
Bootloader Version...: HHZ20h
Baseband Version.....: M8974A-2.0.50.2.30
Serial Number........: 04a0b345437de8e6
--------------------------------------------
checking product...
OKAY [ 0.100s]
checking version-bootloader...
OKAY [ 0.098s]
checking version-baseband...
OKAY [ 0.099s]
sending 'boot' (9156 KB)...
OKAY [ 0.529s]
writing 'boot'...
OKAY [ 0.780s]
sending 'recovery' (10014 KB)...
OKAY [ 0.587s]
writing 'recovery'...
OKAY [ 0.828s]
erasing 'system'...
OKAY [ 0.988s]
sending 'system' (1020657 KB)...
OKAY [ 35.063s]
writing 'system'...
OKAY [ 69.580s]
erasing 'userdata'...
OKAY [ 14.754s]
sending 'userdata' (4416 KB)...
OKAY [ 0.369s]
writing 'userdata'...
OKAY [ 0.497s]
erasing 'cache'...
OKAY [ 0.580s]
sending 'cache' (428 KB)...
OKAY [ 0.229s]
writing 'cache'...
OKAY [ 0.217s]
rebooting...
finished. total time: 125.757s
Press any key to exit...
For more details, I found this page, How to flash a factory image | Return to stock | Unroot your Nexus 5, very helpful.