
My brother-in-law gave me his huge 65 inch LCD TV. Score! But it was a dumb TV with no Internet capability or apps support. And I didn’t have cable or a digital OTA (Over the Air) tuner. Fortunately, there were many ways to turn a dumb TV into a smart TV. I chose the Roku 2 XS 1080p Streaming Player. Why? Because someone was selling one for $20 on craigslist.
 Once I owned the Roku 2 XS, I started to see why it was the best media player to purchase (mere-exposure effect or familiarity principle). You see, the Roku 2 XS has the best features of the Roku 3 (USB port, Bluetooth remote, SD card) while keeping the backward compatibility of supporting a composite AV (audio/video) output, in addition to HDMI. The USB port allows me to directly connect a USB flash drive or portable hard drive full of videos to the Roku. The Bluetooth remote means I can hide the Roku behind the TV and still be able to control it. Finally, I think the old TV only does 1080p, so the 1080p supported by Roku 2 XS is perfectly fine.
Though the Roku supported wireless Internet, I hooked it up using a wired LAN connection to avoid any possible lag in throughput (can’t hurt when streaming 1080p HD video). Once I finished attaching the Roku to the TV with a HDMI cable, it was time to power it on. Because I did a factory reset on the Roku, I had to pair the remote again by pressing the little purple button inside the remote’s battery compartment for 3 seconds. I created an account with Roku and added channels (Roku’s name for apps); for example, the YouTube, Netflix, and Amazon Video channels are the most popular if you have kids. (If you want to play videos from the SD card or USB port, you will need to install the Roku Media Player channel.)
The Roku has no off switch, so it is immediately ready to use (instead of booting up each time). I read that it will go to sleep after 30 minutes of inactivity. Make sure to always stop playing before turning off the TV though. Or just unplug the Roku.
Cast to Roku
Because Roku supports the DIAL (Discovery and Launch) protocol used by Chromecast, you can cast to it from YouTube on your Windows desktop, Macbook laptop, or smartphone. Just click on the cast icon in the YouTube player and select the Roku.
The YouTube cast function and YouTube Channel are both temperamental. Sometimes when I try to cast, I have to cast twice before the video would actually play on the Roku. Sometimes the YouTube player says it is casting but it isn’t, so I have to manually stop casting and redo the cast. Worse, sometimes the YouTube Channel crashes and I am knocked back to the Roku’s main home page.
On Windows, my YouTube player did not show the cast icon. The problem was caused by the new YouTube layout. To fix it, I had to go to back to the old layout by clicking on my YouTube user icon and selecting the “Restore old YouTube” option. The old layout correctly showed the cast icon. Strangely, when I switched back to the new layout (by browsing to YouTube.com/new), the new layout now showed the cast icon. I saw this behavior using the Chrome browser, so other browsers may not have this issue.
Plex Stream From Desktop
If you have kids, you might prefer to avoid swapping movie DVDs by ripping them all to video files (I recommend using the open source HandBrake utility). Putting the files on a portable USB hard drive and connecting it to the Roku will give you a library of entertainment to choose from.
In my case, I didn’t have a portable USB hard drive, so I decided to just stream the movies from my desktop. The Plex Media Server was the free and simple DIY solution. I downloaded it, install it, launch it, created an account, added a Movies library, and selected the folder where my movie files were. The Plex Media Server scanned the folder (and its sub-folders), added the movie files, and downloaded nice preview images and summaries for each movie. (If you add and remove movie files, you can tell Plex Media Server to rescan by clicking on the options “…” to the right of the Movies library and selecting the “Scan Library Files” command.)
The Plex Media Server runs as a local web server which your browser can connect to. The Plex Media Server’s user interface will appear in the browser when you double-click on the Plex icon in the Windows’ system tray or the Mac’s status menu. In addition, the local Plex Media Server integrates with the Plex website online to allow you to access your videos from anywhere. I didn’t see a need for global access and thought it was a security risk, so I disabled the “Remote Access” option under Settings.
On the Roku, I added the Plex Channel, and signed in. The Roku displayed a 4 character alphanumeric code and asked me to input it into the Plex Media Server’s Link Account page at plex.tv/link. Once that was accomplished, the Plex Channel listed my movies.
Note: When playing .mkv movie files, the Plex Channel may crash randomly. Plex Channel is solid when playing .mp4 or .avi files.
Subtitles For Plex
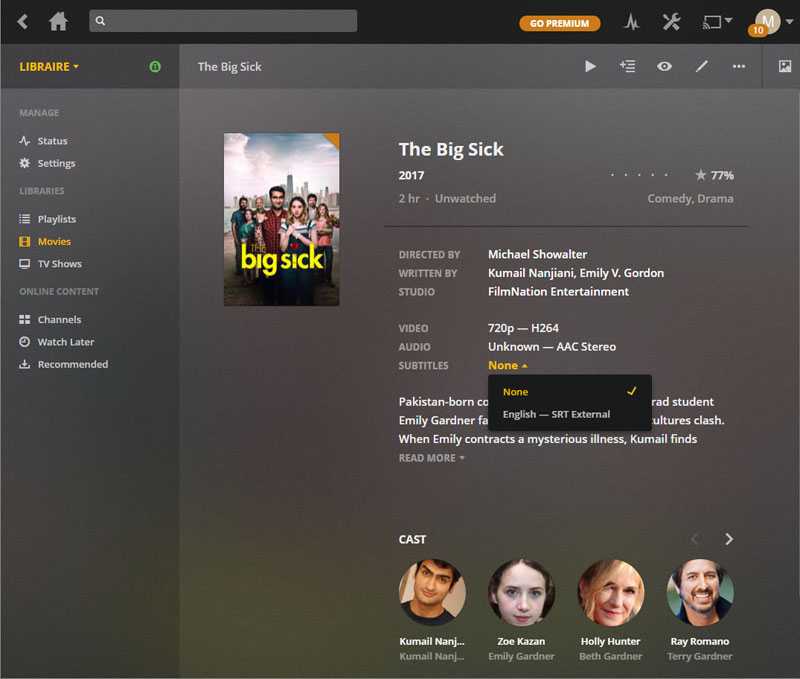 Plex supports subtitle files, such as .srt files. To see the subtitles on your TV, you will need to make two changes:
- Configure the movie to use subtitles. On the Plex Media Server interface, click on the movie to see its details, and select the subtitle file to use.
- Configure the Roku to display subtitles. On the Roku, go to main menu Settings, Captions, Captions mode, and select “On always” (the other choices are Off and “On replay”). This is a global setting affecting all movies.
On the Plex channel, you can enable or disable subtitles (under configuration) after selecting the movie but before playing it.
Note: Unfortunately, subtitles are unreliable. I’ve noticed the subtitles going away after watching some movies halfway through.
Strangely, the Plex Channel interface provides an option to delete the movie. If you select the delete command, the actual movie file on the desktop is deleted (the corresponding subtitle file is not deleted). Thankfully, if you delete by mistake, you can find the movie file in the the desktop’s Trash folder.
Automobile Roku
I thought about setting up the Roku in my sister’s minivan. Instead of dragging all the movie DVDs around and swapping them in and out, my sister could use the Roku and a portable USB hard drive. I could connect the Roku to the car’s composite AV input and power it from the provided outlet.
Unfortunately, I found that the Roku took 45-60 seconds to boot up and about 5-6 button clicks to play a movie file. When you have kids, you can’t afford to take a minute to load the movie. You just want to pop in the DVD, hit play, and start driving. Better yet, start driving and the DVD will automatically continue playing where it left off. The Roku did not have such a hands-off continue playing feature. So it was a no go.