
To perform a clean installation of macOS Sierra (basically, Mac OS X 10.12), I recommend using a bootable USB flash drive containing the macOS Sierra installer. Below are the steps I took to create the bootable USB flash drive and how I used it to install macOS Sierra.
 Note: The macOS Sierra Disk Utility and installer appears to be more buggy and much slower than previous versions. The best advice for installing macOS Sierra is to try again and be very patient (if you expect an operation to complete in 5 minutes, then give it at least 50 minutes).
Download macOS Sierra Installer
The macOS Sierra installer is available from the Mac App Store. Run the “App Store” application, search for “macOS Sierra”, and download it. It will save the installer as an “/Applications/Install macOS Sierra.app” file (about 4.97GB in size).
Note: If you run the macOS Sierra installer to upgrade your Mac, the downloaded file will be deleted automatically after the upgrade is completed. To keep that file, you will want to move it out of the Applications folder so it won’t be deleted after an upgrade. Launch the “Terminal” application and run this command to move the downloaded installer to your user’s “Downloads” folder:
If you are paranoid (doesn’t hurt), you can verify that the installer file was downloaded correctly by verify its checksum. Run the “Terminal” application and this command:
# If successful, the last output line should read:
# hdiutil: verify: checksum of "/Applications/Install macOS Sierra.app/Contents/SharedSupport/InstallESD.dmg" is VALID
Format USB Flash Drive
The macOS Sierra installer takes up 5.1GB of space on the USB flash drive, so you will need a flash drive with a capacity of 8GB or greater.
Note: If the flash drive is mounted under “/Volumes” successfully when you plug it in, you can skip the following steps to reformat the flash drive. This is because the script we run to create the bootable drive will reformat the flash drive as an initial step. Because I am paranoid, I recommend reformatting the USB flash drive manually anyhow.
Format the USB flash drive using these steps:
- Plug the USB flash drive into your Mac.
- Launch the “Disk Utility” application.
- On the left-hand pane, select the USB drive (not the partition under it, if any).
- Click on the “Erase” tab (or button at the top).
- Input a name like “Sierra” (this name will be overwritten later).
- Select “Mac OS Extended (Journaled)” for “Format”.
- Select “Master Boot Record” for “Scheme”.
- Click the “Erase…” button at the bottom. Click the “Erase” button in the warning popup dialog if you get one.
- The format operation may take several minutes to complete. (USB 2.0 and large capacity drives will take longer.) After the format completes, the partition will be mounted under “/Volumes/Sierra” (or whatever name you selected above).
- Note: Under macOS Sierra, the Erase function will fail if the USB drive’s partition is mounted. You can manually unmount the partition before running Erase. Or you can run Erase twice; the first time will unmount the partition and fail, and the second time will actually do the format (which will succeed).
- Close the “Disk Utility” application.
Create Bootable USB Flash Drive Installer
To create the bootable USB macOS Sierra installer, run the “Terminal” application and this command:
sudo /Applications/Install\ macOS\ Sierra.app/Contents/Resources/createinstallmedia --volume /Volumes/Sierra --applicationpath /Applications/Install\ macOS\ Sierra.app --nointeraction
# You will be prompted for your user's administrative password.
Update: For macOS 10.14 Mojave (and its predecessor, macOS 10.13 High Sierra), the createinstallmedia command no longer requires the “–applicationpath” and “–nointeraction” flags, so omit them. The command becomes just “createinstallmedia –volume /Volumes/Mojave”.
Note: If the createinstallmedia command returns a “Failed to start erase of disk due to error (-9999, 0)” error, then your current Mac OS X version does not fully support the createinstallmedia tool. Instead, create the USB installation drive manually using instructions from Bootable USB Flash Drive to Install Mac OS X 10.10 Yosemite.
The “createinstallmedia” program will erase the USB flash drive, create a new partition named “Install macOS Sierra”, and copy the installation files to that partition. The output will look like:
Copying installer files to disk...
Copy complete.
Making disk bootable...
Copying boot files...
Copy complete.
Done.
The program will pause at the “Copying installer files to disk…” output line above. This step took 20-30 minutes with my Kingston 16GB USB 2.0 flash drive. Yours may take a shorter or longer time. I recommend giving it at least an hour, maybe two, before giving up.
Note: Mac hardware is very finicky about USB flash drives. Initially, I used a Corsair 32GB USB 3.0 drive; however, when I held down the Option key to try to boot with it, the Mac would freeze with a black startup screen. The Kingston 16GB USB 2.0 drive did not have this problem. So if you enounter issues (when erasing and copying) or weirdness (when booting), consider changing to another brand of USB flash drive. If you don’t have another drive, consider at least testing the flash drive to make sure it is not bad or corrupted (“First Aid” in “Disk Utility” is the minimum; google for more powerful tools).
Boot With USB Flash Drive
Note: I recommending connecting the Mac to its AC power adapter before beginning the macOS Sierra installation. The installation may take a long time (an hour or more) and you don’t want the battery to die in the middle.
To boot a Mac with the USB flash drive:
- Shutdown the Mac.
- Insert the USB flash drive.
- While holding the “option/alt” key down, turn on the Mac to display the boot Startup Manager.
- You should see one or more icons, one of which should be called “Install macOS Sierra” for the USB flash drive. (The internal hard drive may not be visible if it does not have a valid, bootable partition installed.)
- Note: If you don’t see the USB flash drive’s “Install macOS Sierra”, try removing and re-inserting the USB flash drive while viewing the Startup Manager screen. The USB flash drive should then appear after a few seconds.
- Select the “Install macOS Sierra” (with left/right arrow keys) and hit the “return/enter” key to boot from the USB flash drive.
It may take 5-10 minutes or longer to load the installer from the USB flash drive. Sometimes the progress bar may appear to be frozen… just be patient. I would give it at least 30-60 minutes to load before giving up.
Format the Hard Drive
When the installer finishes loading, you will see a “macOS Utilities” window appear. Do the following to format the internal hard drive:
- Click on the “Disk Utility” option and click the “Continue” button on the bottom to launch the “Disk Utility” application.
- On the left-hand pane, select the hard drive (not the partition under it, if any).
- Click on the “Erase” button at the top.
- Input a name like “macOS”.
- Select “Mac OS Extended (Journaled)” for “Format”.
- Select “GUID Partition Map” for “Scheme”.
- Click the “Erase…” button at the bottom.
- For SSD (Solid State Drive), the format operation may take less than a minute to complete. For mechanical hard drive, it may several minutes to hours, depending upon the size, speed, and condition of your hard drive.
- Note: Again, the Erase function will fail if the hard drive’s partition is mounted. You can manually unmount the partition before running Erase. Or you can run Erase twice; the first time will unmount the partition and fail, and the second time will actually do the format (which will succeed).
- Close the “Disk Utility” application.
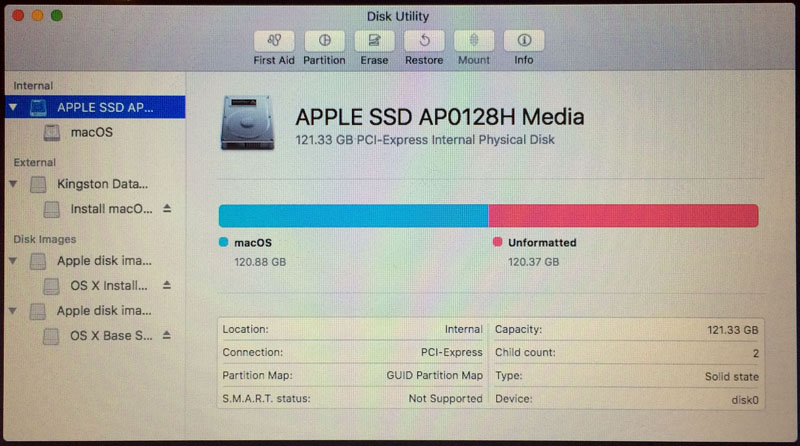 Note: Now and then, I noticed the output of the Erase seems to erroneously double the size of the hard drive. For a 128GB hard drive, the graph shows 120.88GB macOS (in blue) and 120.37 GB Unformatted (in red). I think it is just a user interface bug because when I close Disk Utility and re-open it, the graph then only shows the 120.88GB macOS (in blue).
Install macOS Sierra
Back at the “macOS Utilities” window, do the following to begin the macOS Sierra installation process:
- Click on the “Install macOS” option and click the “Continue” button.
- The “macOS Sierra” installer’s splash screen will appear. Click the “Continue” button.
- Click on the “Agree” button to agree to the license. A popup confirmation window will appear; click on the popup’s “Agree” button.
- Select the hard drive and click the “Install” button.
Note: You may encounter strange hardware behavior. On my 13 inch Macbook Pro Retina, the macOS Sierra installer turned the fan on to maximum for the whole duration of the installation. Thankfully, once it finished and rebooted, the fan turned off and stayed off.
The macOS Sierra installer tries to be helpful by telling you how long it will take. Unfortunately, it lies. You should take whatever remaining time it tells you and multiple by 10 (for minutes) or 100 (for seconds). If it says “6 minutes remaining”, that could mean 60 minutes or one hour remaining. Worse, if it says “6 seconds remaining”, you may be staring at that message for 600 seconds or one hour.
The best solution is to be patient. Go grab a bite to eat and watch a movie. Take a long nap or better yet, sleep your 8 hours. I would wait at least 4 hours before giving up.
Note: You can display the installer’s log window (using the menu or pressing Cmd+L). I didn’t find this helpful at all. Even for a successful install, numerous errors are logged; I don’t know what is a critical or non-critical error. And often, you won’t see a progress/status log output for a long time, easily 20-30 minutes. Not seeing any new log statements does not mean that the installer froze. So the logs didn’t do anything for me.
What Does Giving Up Mean?
Giving up means you have accepted defeat. The next step is to retreat and try again. Some suggestions on how to proceed:
- Reset your Mac by doing the following:
- Reset the SMC (see step 3 under the “Reset the SMC on Mac notebook computers” section).
- Reset the NVRAM (aka PRAM).
- Run the Apple Hardware Diagnostic or Test to make sure you don’t have a hardware failure.
- Finally, retry the macOS Sierra install.
- Use a different USB port on the Mac.
- Use another brand of USB flash drive.
- Delete and re-download the macOS Sierra installer (especially if you downloaded it a long while ago). Even if the checksum is okay, you may want to re-download in case there is a newer version of the installer with a bug fix for your very problem.
- Download an older Mac OS X version, say Mac OS X 10.11 El Capitan, install that, and then upgrade to macOS Sierra. If you know the Mac OS X version which came with your Mac originally, consider downloading (if you still have access) and installing that version first.
- Use the Mac Recovery System to download and install the original OS version that came with your Mac. Then upgrade from that to macOS Sierra.
- Buy a more recent model Mac (at most a couple of years old). It may be that your current Mac is too old or slow to support macOS Sierra. It’s okay to keep running an old Mac OS version. (For example, if I had a Core 2 Duo Mac, I would not run anything later than Mac OS X 10.9 Mavericks on it.)
Hopefully, this post will help you to do a fresh installation of macOS Sierra.
Some info above taken from: