
Update: Cleverloop went out of business late 2019. Because the system uses a cloud service, the app stopped working. I recommend getting a video surveillance system from a large company, like Blink or Ring from Amazon, which won’t die all of a sudden.
Final Verdict: I do not recommend the Cleverloop system. At 1.5 years, the cameras started requiring reboots every few days. At 2.5 years, half the cameras die within 12 hours and the others within a day or two, requiring constant reboots. The base station still works fine, but I haven’t seen any updates to its software or to the mobile app. I believe there are other more reliable solutions which are actively supported than Cleverloop’s.
 My Dad was concerned. He thought he heard noises from the backyard and maybe saw some movement there at night. My Dad grows fruit trees and vegetables, which might attract intruders. His neighborhood is not the safest place; his house had recently been burglarized. He wanted a way to check that the perimeter was safe before leaving the house. The obvious answer, besides moving away, was an outdoor video surveillance system.
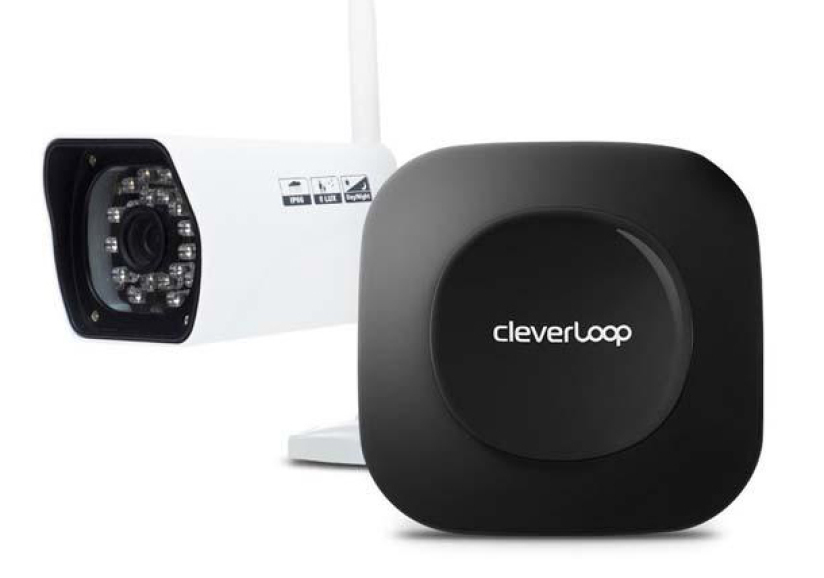
After days of research, I settled on the CleverLoop Smart Home Security System. CleverLoop is expensive. I could get video systems (especially coaxial ones) with more cameras for significantly less. However, my primary concern is usability. My Dad is going to use it so it has to be very easy to use.
CleverLoop’s selling point is usability, implemented by their mobile user interface and smart backend (a base station device is included with the cameras). They admit that their cameras are the same generic ones made in China as the other video surveillance systems use. Hardware is not what CleverLoop is competing on, it is software. CleverLoop’s mobile phone app (for iPhone or Android) looked to be more user friendly and feature rich than the competitors’ versions.
Here is how CleverLoop did against my selection criteria, in prioritized order:
- User-friendly interface – CleverLoop mobile phone app looks easy to use
- Accessible from anywhere over Internet – Dad wanted to check the video feeds when he is away from the house
- Decent video quality – CleverLoop can support 720p HD (High Definition)
- Night vision mode – automatic IR (infrared) night vision
- Motion detection and alerts – CleverLoop’s base station handles this
- No monthly fee – free CleverLoop plan includes multiple users and backs up alerts to the cloud for 7 days
- Wireless – all CleverLoop cameras are wireless, but we ended up not using this function
When I was researching, CleverLoop was selling a kit containing 3 outdoor cameras. At the time, the base station only supported 3 cameras. This was a problem because a house is usually square shaped and I needed 4 cameras to cover the 4 sides. Thankfully, when I was ready to buy, CleverLoop offered a kit containing 4 outdoor cameras. A camera at each corner of the house looking down each side will cover the whole perimeter of the house, albeit with blind spots under each camera. I supposed that they had updated the base station software to support 4 cameras, instead of 3.
What to Buy
Before purchasing an outdoor video surveillance system, you must decide on the type of wiring because that is the hardest part of the installation. I had decided that the most future proof wiring is PoE (Power over Ethernet) Cat6 (Category 6) Ethernet cable. PoE reduces installation to running just one cable conveying both power and data. The Cat6 Ethernet cable will support higher data rates for when more powerful cameras become available. If I use a coaxial or non-PoE Ethernet cable, I would need to run a second cable for the power. Trust me on using a PoE cable, because you don’t want to have to drill a second extra hole through two or more plywood layers (common for exterior walls).
While CleverLoop does not support PoE, there is a way to simulate it. Basically, use adapters, passive PoE injectors and splitters, to feed both data (non-PoE Ethernet cable) and power through the “PoE” Ethernet cable. To protect the PoE adapters from the elements, you can use an outdoor electrical outlet cover box. This very helpful Youtube video, Installing CleverLoop Outdoor IP Camera, was my installation bible. CleverLoop has a support page, Powering an outdoor camera using Power-over-Ethernet (PoE), that references the video along with useful pictures of the PoE injector and splitter wiring.
In addition to ordering the CleverLoop Security System with 4 Outdoor Cameras, I purchased the following for the installation:
- 500 ft of Cat6 Ethernet Cable (from Amazon). I think I used 100-150 feet at best.
- 100 Cat6 RJ45 cable connectors (from Amazon). Maybe used a dozen.
- RJ45 Crimp, Cut, and Strip Tool (from Amazon). Used to cut the Cat6 Ethernet cable and crimp the RJ45 connectors onto the cable ends.
- 4 Passive PoE Injector and Splitter Kits with 5.5×2.1mm DC Connector (from Amazon). Double-check that the splitters and injectors have 5.5×2.1mm DC connectors because that is what CleverLoop cameras use.
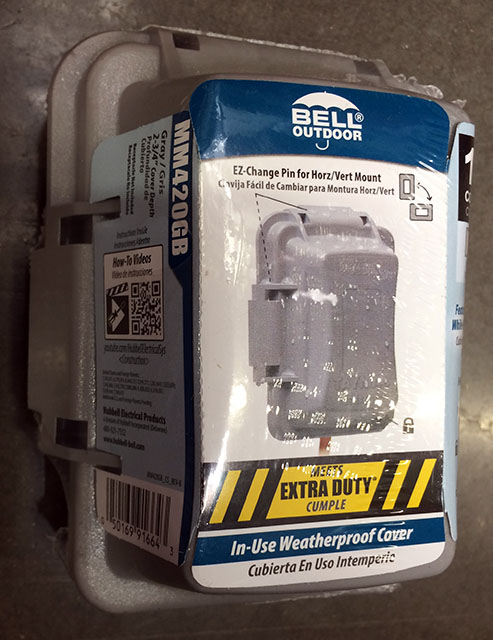
- 4 Weatherproof Outlet Covers (from Home Depot; Bell Outdoor Weatherproof In-Use Cover for $8.44 each). Get the 2 inches thick cover, not the 1 inch thick cover; you’ll need the extra space to hold the PoE splitter, Cat6 Ethernet cable, and CleverLoop Ethernet data and power cables.
 I ordered way more Cat6 Ethernet cable and RJ45 connectors than I needed. You can safely order much less, depending upon the size of your house.
If I had to do the installation again, I would also purchase a Network Cable RJ45 Tester (like this one from Amazon). The tester can determine whether the RJ45 connectors are crimped onto the ends of the Ethernet cable correctly or not. Instead, I used an Internet-enabled router and my Macbook to test the cable, which was very inconvenient.
Besides the above, you will probably need a power drill with a long drill bit (one foot or longer). The external frame on my Dad’s house under the roof line (where we placed the cameras) consisted of two 2×6 planks with an inch spacing between. The long drill bit was necessary to punch an Ethernet cable-sized hole all the way through.
Drill, Baby, Drill
After everything arrived, I reserved a weekend to complete the installation. The idea was to run the Cat6 Ethernet cables in the attic and drill holes from the attic to the outside at each corner of the house. I didn’t look forward to working in the hot and dirty attic. Thankfully, my older brother volunteered to do the cabling and drilling.
It took my brother the better part of the first day to drill the necessary holes and to run the cables, though with a long break in the middle. He had to drive home to get his 1.5 feet long drill bit and disposable coveralls (for getting into tight, dirty corners filled with insulation) once he realized both were necessary.
I crimped the RJ45 connectors onto the ends of the Cat6 Ethernet cables and tested them; I only had to redo 5 connectors. When installing the RJ45 connectors, the sequence of color wires needs to be the same at both ends. I found this page, Making Ethernet Cables – Tricks of the Trade, helpful and followed the sequence of colors that he used to make a straight through Ethernet cable.
On the second day, my brother mounted the cameras and outlet covers (containing the PoE splitters, assorted Ethernet cables, and CleverLoop power cables). Because the drilled holes, cameras and outlet covers were located under the eaves, he did not bother to waterproof the drilled holes (the Ethernet cables fit the holes quite snuggly). He also didn’t bother arranging drip loops for all the cables coming into and leaving from the outlet covers.
Tip: When inserting the cables and adapters into the outlet cover, make sure not to put a bend in the Cat6 cable ends that you made. My brother jammed everything in and within a year, the tension caused two of the four RJ45 connectors to fail. I had to replace them. Thankfully, I had already purchased a Network Cable RJ45 Tester, which made the verification process smoother.
In the attic, the Cat6 Ethernet cables from each camera met at a point above where my Dad’s Internet router was located. We tried to run a Cat6 Ethernet cable down the wall to the router, but a horizonal wood frame member prevented it. (Makes no sense; who would put a solid, horizontal plank of wood in the middle of an interior wall? Even fish tape would not have helped in this scenario!) We ended up drilling a hole in the ceiling close to the wall and running the Cat6 Ethernet cable down the wall to the router. It’s a little ugly, but the alternative, ripping out the dry wall, is even more undesirable.
Good thing I had a spare 5-port Ethernet switch; otherwise, I would have had to purchase one. In the attic, I connected all the camera’s Cat6 Ethernet cables to the switch and then the switch to the Internet router. Thankfully the attic had an outlet sockets nearby because I needed to plug in all the CleverLoop cameras’ power bricks (I used two power strips) and connect them to the PoE injectors, and then the PoE injectors to the Cat6 Ethernet cables. In the end, I ended up with a rat’s nest of cables, PoE injectors, and power bricks. I put the whole pile on a sheet of wood to prevent any contact with the attic’s insulation material.
Tip: I recommend running all the Cat6 Ethernet cables down into your air conditioned house. During the summer, the attic becomes so hot that I’m concerned that the Ethernet switch and power bricks may not last long. (Update: The Ethernet switch survived two summers only.)
Unfortunately, the cameras did not have any power indicators. (Though, if it was at night, I might have been able to see the IR LEDs light up.) Even worse, the camera took up to 5 minutes to come online (for it to be accessible by IP address) and to start streaming video. (The CleverLoop manual says it takes 90 seconds to boot up the camera.) Initially, I thought that the passive PoE injectors and splitters didn’t work because the Cat6 Ethernet cables were too long (one ran over 50 feet in length). I re-tested the longest Cat6 Ethernet cable and double-checked that there were no loose connections. Thankfully, one camera’s IP address appeared on my router’s client list (minutes had past during my debugging) and slowly the rest came online. Everything was fine; I just needed to be patient.
CleverLoop App
I connected the CleverLoop base station directly to the router. I installed the CleverLoop app onto my iPhone, created an account, and scanned the QR code at the bottom of the base station. In the CleverLoop app, I added the four cameras and started seeing their video streams (have to view each camera and click the play icon).
Now that we could see what the cameras were seeing, my brother made final adjustments to the cameras’ positions with my Dad’s input. Be careful when adjusting the positioning screws! Because the camera case is plastic, too much force could easily strip the screw holes. My brother did strip one of the positioning screw holes. He fixed it by screwing in an even larger screw.
When it got dark, the cameras automatically switched to black-and-white IR night vision mode. I was impressed by the night vision; I was able to see pretty far and the video was clearer than expected.
In the morning, one camera had an “Access Denied” error. And a second camera was still stuck in black-and-white IR mode. Rebooting the two cameras, removing and re-adding them did not fix the problem. As common with software, it turned out the cameras needed firmware updates to eliminate these and other bugs.
Tip: To reboot a camera, I can open up the camera’s outlet cover and disconnect the camera’s power cord from the PoE splitter. This is a lot easier than going into the attic, locating the particular camera’s Cat6 Ethernet cable and disconnecting its power plug from the PoE injector.
Per the CleverLoop support page, Check your camera firmware version (For X series indoor camera and outdoor camera only), I upgraded all the cameras’ firmwares to the latest recommended version. Note that you cannot upgrade directly to the latest version, you must upgrade incrementally. For example, I upgraded from version 00.10.01.0037 to 00.10.01.0037P1, and then from 00.10.01.0037P1 to 00.10.01.0039cl (latest version).
Upgrading to the latest firmware fixed both the “Access Denied” and stuck in black-and-white IR mode errors. And then 10 minutes after the upgrades, all cameras went offline (inaccessible by the CleverLoop app or browser). I had to power all cameras off and on to get them back. So, I recommend that you always manually reboot the camera after a firmware update.
Tip: You can browse to the camera’s IP address and view its video feed in the browser. The default username and password is “admin” and “123456”. On my Chrome browser running on Windows 7, I had to select “view video -Mode 2” (which uses Adobe Flash) to see the streaming video feed. Selecting “view video -Mode 1” (which uses “application/x-hyplayer” and QuickTime Player) did not work.
Video Quality
By default, the cameras are set to stream SD (Standard Definition 480p or 640×480 pixels) video quality. On a smartphone’s small screen, SD video looks pretty sharp. I did enable the 720p HD video on the cameras and only saw a slight improvement in quality on my iPhone 5’s tiny screen (it could be my imagination). I was more concerned about overwhelming the Internet connection’s upload bandwidth (for streaming over the Internet) so I changed it back to SD quality. So far, no complaints about video quality from Dad, who uses an iPhone 6 Plus.
Multiple Users
When I first installed the CleverLoop app, CleverLoop allowed multiple users to log in using the same account. So both my Dad and my sister (who lives with our father and has an Android phone) used the same account. A month later, that was no longer allowed. Logging into an account would log out anyone currently logged into that account. My sister had to create a new Cleverloop account and then add the base station (by scanning the QR code at the bottom of the base station). Thankfully, she didn’t need to re-add the cameras.
I think that CleverLoop disallowed account sharing in order to better support the Geo-Fencing function (automatically arms the motion detection system when your smartphone leaves the home location). However, because my Dad wanted alerts regardless of whether he was home or not, I had disabled the Geo-Fencing feature.
Alerts vs Movements
At first, I was confused by the movement and alert notifications. After reading up on it, I learned that we needed to train the base station to distinguished between harmless movements (like a branch waving in the wind) and important alerts (an intruder at the door). We are expected to view the video clip attached to each notification. And if we don’t agree with the classification (movement or alert), we can inform the system so by clicking on the “This should be an alert/movement” text at the bottom of the video feed.
 To eliminate the clutter caused by many notifications, you can manually delete the alerts and movements. There is a delete button that you can press when viewing the movement or alert. Additionally, there is an batch action (the top-right pencil icon when viewing a particular camera) that allows you to select multiple notifications for removal.
You can fine-tune the motion detection by marking areas of the video feed for analysis. Go to camera settings (the top-right gear icon when viewing a particular camera) and select “Fine-tune Smart Detection”. You can create up to 3 rectangular areas (a.k.a. hotspots) for motion detection and analysis. The parts of the video outside of the hotspots are not analyzed.
One major problem I see with the motion detection video clips is that the first few seconds are not shown. So, if you have someone who enters the video feed and exits quickly, the video clip won’t show that person. For example, when someone comes to the front door, drops off a package, and leaves, all I see in the video clip is a part of his back or his shadow as he is leaving. This is a known problem with a known solution called video pre-buffering. Basically, the system records continuously and when motion is detected, the generated video clip includes the previous 5-10 seconds. Hopefully, the CleverLoop base station will be updated to do pre-buffering soon.
Wireless Not Needed
When my Dad first asked about video surveillance for the backyard, he mentioned putting a camera on the detached garage and pointing it at the back of the house. Because I didn’t want to run an Ethernet cable from the house to the detached garage, I decided that a wireless camera was a necessary requirement.
Given a choice, I would prefer to avoid a wireless solution. Having a camera constantly streaming video across a wireless connection does not sound like a good idea, especially if it is 720p HD video. I can foresee complaints about Youtube and Netflix being flaky and having to reboot the wireless router frequently. Besides, if you’re wiring for power (which the camera needs regardless), you might as well wire for data too.
Thankfully, we managed to avoid using the camera’s wireless function. I asked my Dad to wait, to use the existing four wired cameras first. If he still wishes to have a camera on the detached garage, we can buy another CleverLoop base station with one or more outdoor cameras. So far, no requests for additional cameras from Dad.
Progress Report
After a month of operation, the CleverLoop base station stopped working (no alerts sent and CleverLoop app showed blank video feeds) and had to be rebooted. This is normal. I remember when cable modems and wireless routers first came out, I had to reboot them once a week. Then as they were improved, once a month. Now, several months go by before a reboot is necessary. I expect the same progress for the CleverLoop base station.
Because the CleverLoop app showed blank video feeds, I thought the cameras had stopped working. But it was the base station that had gone kaput. The base station pulls video from the cameras, analyzes the video for motion, and sets alert notifications. The CleverLoop app, in turn, pulls video from the base station. So, if the base station stops working, you get no video and no alerts in the CleverLoop app. Browsing directly to the cameras show all four video feeds working. Surprisingly, all cameras continue to function flawlessly without requiring any reboots.
Tip: The base station is responsible for doing the motion detection and sending the alert notifications. If you don’t get motion detection alerts after arming the system, check that the base station is powered on and connected (blinking LEDs in the back right on top of the ethernet jack).
After 1.5 years, half the cameras would die after a few days and would need to be rebooted. Unfortunately, access to the attic (or going outside to each camera) is required to power cycle the cameras. I thought about pulling wires from the attic down to the house, but that would have been a lot of work. Instead, I installed a Defiant Wireless Indoor/Outdoor Remote Plug in the attic, which allowed us to remotely power cycle the cameras.
Feature Requests
Below are my improvement and feature requests for CleverLoop:
- The alert and movement video clips to include the previous 5 seconds. The video clips are missing the first few seconds immediately after the motion was detected. (See “pre-buffering” reference above.)
- CleverLoop app to have a user-only mode where administrative functions like add/remove base station, add/remove camera, and camera settings are not accessible. In the current user interface, my Dad could easily remove the base station, remove a camera, or modify a camera’s settings with some accidental touches.
- Camera list screen to update snapshot images of all four cameras once per second (or even once per 5-10 seconds). Currently, outdated snapshot images are shown.
- Like the above, camera screen to update camera’s snapshot image once per second.
- CleverLoop app to disallow adding a 5th camera to a base station. Even though I have added the maximum 4 cameras, the camera list screen still shows the “Add a New Camera” option.
- Install CleverLoop app on an iPad. Currently, the iPad’s App Store does not list the CleverLoop app. It would be nice to see a bigger video feed on the iPad.
One feature that I think my Dad might like is to display all four video feeds on his large LED TV. If he ever asks for it, I think I can create an HTML page that shows the video feeds from all four cameras (using Adobe Flash). Run it on a laptop (or tiny desktop) attached to his TV and voila, a security guard’s dream come true!
I agree with your verdict wholeheartedly! These are the worst cameras I’ve ever used. All the software is buggy, one base station (1 have 2) never would record to the hard drive, and the company is off to the races with my money! I’m not happy.
I only wished I had some reliable information on how to turn these useless cameras into a DIY home surveillance system so that it did not feel like I completely got scammed for $1000. If you hear of anything, please let me know.
Thanks!
John, sorry to hear that you also had problems with Cleverloop.
Good news. The cameras are standard IP cameras (Cleverloop sources them from China) so they should be usable by most CCTV recording software. In addition, you could browse to the camera’s IP address directly to view the video feed and change settings.
I did a quick search and found several CCTV software that supports IP cameras. Some free ones are ZoneMinder, iSpy, and CameraFTP. If you desire more support, a paid commercial one is Blue Iris (check this support page, First Time Cameras Setup and BlueIris, which has a link to a $58 sale price at the top).
Good luck with your DIY solution.