
I had tried out Windows 10 by installing it on a second, bigger 500GB SSD (Solid State Drive) than my existing Windows 7’s 240GB SSD. Having determined that I wanted to permanently move to Windows 10, I decided to move Windows 10 to the smaller drive, overwriting Windows 7.
 First, to clone from a bigger to smaller drive requires that the bigger drive not contain more data than can fit into the smaller drive. Second, the bigger drive must not have data stored at a location beyond the maximum supported location on the smaller drive. The safest way to satisfy both requirements is to shrink the source partition to ensure that it will fit 100% onto the hard drive.
Disable BitLocker
Before doing anything, I decided to decrypt the drive by turning Bitlocker off. I had tested cloning a Bitlocker-protected Windows 7 drive but it failed with a blue screen on startup, after getting past the annoying Bitlocker recovery procedure (because the hard drive signature had changed). So, I decided that it would be best to decrypt, clone, and then re-encrypt. Turning Bitlocker off didn’t take too long (about 20 minutes) because my Windows 10 was a fresh install with just Office and some other apps (about 35GB in size).
To turn BitLocker off, run “Manage BitLocker” and select the “Turn off BitLocker” option.
Resize Source Partition
So, here’s how to resize the Windows 10 source partition:
- Run Window 10’s “Create and format hard disk partitions” application (aka “Disk Management”).
- Right-click on the Windows 10 partition and select “Shrink Volume…”.
- Adjust the “Enter the amount of space to shrink in MB” until the “Total size after shrink in MB” is significantly smaller than the target hard drive size. (Because my target hard drive is 240GB, I tried to get the partition below 200GB to be on the safe side. Make sure to account for Windows 10’s two system partitions, a 300MB recovery partition and a 500MB EFI partition.)
There may be an upper limit to how much you can shrink the volume. You will see a text, “You cannot shrink a volume beyond the point where any unmovable files are located”, that explains why. Disk Management cannot move files used by system hibernation, paging, and protection (aka system restore) so it cannot shrink the volume past the furthest located of these files.
Note: If you have a non-SSD hard drive, you will want to run “Disk Defrag” (aka “Defragment and Optimize Drives”) first to consolidate the file locations to the head of the hard drive, before shrinking the partition.
Disable System Services
The solution to allow you to shrink the volume further is to disable system hibernation, paging, and protection first.
- Disable Hibernation
- Click on Start, type “Command Prompt”, right-click on it and select “Run as administrator”.
- In the Command Prompt, type “powercfg /h off” to turn Hibernation off.
- Disable Paging
- Run “View advanced system settings” to open the “System Properties” dialog, make sure the Advanced tab is selected, and click on the “Settings” button in the Performance section.
- Under the Advanced tab in the “Performance Options” dialog, click on the “Change…” button.
- Select “No paging file” and click the Set button. (We will need to reboot for this change to take effect.)
- Disable System Protection
- Run “View advanced system settings” to open the “System Properties” dialog and select the “System Protection” tab.
- Select the C:\ drive and click on the “Configure…” button.
- Check the “Disable system protection” box and click OK. Answer Yes.
Once you have disabled the system services above, reboot (so the paging change can take effect), and repeat the Disk Management steps above to shrink the Windows 10 partition. You should be able to shrink the volume smaller than the destination drive’s size. (If you have more data on the source drive than can be contained by the target drive, you will need to uninstall and/or delete things from the source drive.)
CloneZilla the Drives
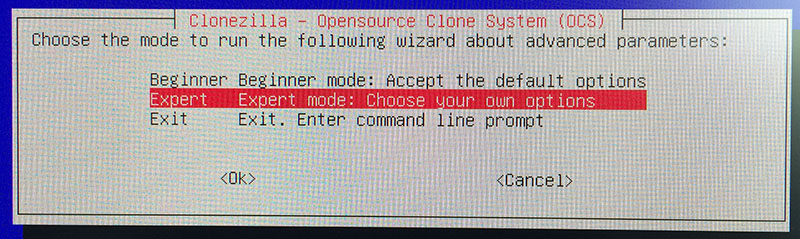
We have to use CloneZilla in expert mode (instead of beginner mode) in order to configure it to allow cloning from a bigger to a smaller drive.
Follow the first set of instructions at Clone a Hard Drive Using Clonezilla Live to create a bootable USB flash drive containing the latest version of Clonezilla Live.
Then follow the revised instructions below to clone the drives. (Steps 1 thru 7 are the same. In Step 8, we select “Expert mode” instead of “Beginner mode”.)
- Attach the destination drive to the same machine containing the source drive.
- Start the machine and boot from the USB flash drive. You may need to press a particular function key to load the boot menu (F12 on my Lenovo desktop) or you may need to adjust the BIOS setup to boot from a USB drive before the hard drive. (If you get offered Legacy or UEFI bootup options for the USB flash drive, choose UEFI.)
- On Clonezilla Live’s startup screen, keep the default “Clonezilla live (Default settings, VGA 800×600)” and press Enter.
- Press Enter to accept the pre-selected language, “en_US.UTF-8 English”.
- Keep the default “Don’t touch keymap” and press Enter.
- Make sure “Start_Clonezilla” is selected and press Enter to start.
- Because I am copying from one hard drive to another, I select the “device-device work directly from a disk or partition to a disk or partition” option. Press Enter.
- Change to “Expert mode” option and press Enter.
- Keep the first “disk_to_local_disk” option and press Enter.
- Select the source drive and press Enter.
- Select the target destination drive and press Enter.
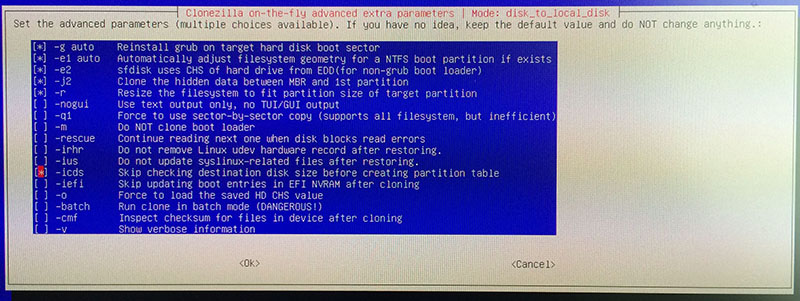
- Check the “-icds Skip checking destination disk size before creating partition table” flag and press Enter.
- Keep the default “Skip checking/repairing source file system” selection and press Enter.
- Select the “-k1 Create partition table proportionally” flag and press Enter.

- Type “y” and press Enter to acknowledge the warning that all data on the destination hard drive will be destroyed.
- Type “y” and press Enter a second time to indicate that you are really sure.
- In answer to the question “do you want to clone the boot loader”, type uppercase “Y” and press Enter. (I need to clone the boot loader so the destination hard drive will be bootable like the source hard drive.)
- The hard drive cloning will occur.
- When the cloning completes, press Enter to continue.
- Select “poweroff” to shut down the machine.
- Once the machine is off, remove the source drive and boot from the destination drive. (Or use the boot menu to select the destination drive.)
Thankfully, CloneZilla automatically increase the size of the Windows 10 partition on the destination drive to take up the remaining available free space. (If CloneZilla didn’t increase the partition size for you, you can use the “Extend Volume…” function in “Disk Management” to grow the partition size manually.)
Re-enable System Services
Once you are certain that Windows 10 is working successfully off the smaller drive, you can re-enable the system hibernation, paging, and protection.
- Enable Hibernation
- Click on Start, type “Command Prompt”, right-click on it and select “Run as administrator”.
- In the Command Prompt, type “powercfg /h on” to turn Hibernation on.
- Enable Paging
- Run “View advanced system settings” to open the “System Properties” dialog, make sure the Advanced tab is selected, and click on the “Settings” button in the Performance section.
- Under the Advanced tab in the “Performance Options” dialog, click on the “Change…” button.
- Select “Automatically manage paging file size for all drives” at the top and click the OK button. (We will need to reboot for this change to take effect.)
- Enable System Protection
- Run “View advanced system settings” to open the “System Properties” dialog and select the “System Protection” tab.
- Select the C:\ drive and click on the “Configure…” button.
- Check the “Turn on system protection” box and click OK.
Re-enable BitLocker
If you want to, re-encrypt the hard drive by turning Bitlocker on. Run “Manage BitLocker” and select the “Turn on BitLocker” option. (I don’t recommend choosing the option to encrypt the entire drive, instead of the used disk space only, unless you want to make sure that no one can recover deleted files. Encrypting the entire drive takes significantly more time, depending upon the amount of free disk space.)
If BitLocker didn’t already ask you to reboot, do a reboot to ensure that the paging change above takes effect.
Note: If you leave the source drive attached, it won’t show up in Windows 10’s File Explorer. Run “Disk Management” and you will see that the source drive’s status is “Offline (The disk is offline because it has a signature collision with another disk that is online)”. To make the source drive visible and accessible, right-click on the source drive’s label (“Disk 1” in my case) and select Online.
CloneZilla Didn’t Work!
I tried using CloneZilla to clone my laptop’s HDD (Hard Disk Drive) to a smaller SSD. Unfortunately, CloneZilla threw an error, “Write block error: no space left on device”. Even though it then completed the cloning process, my laptop was not able to boot off the resulting SSD.
Instead, I attached the laptop HDD and SSD to my desktop and ran the free version of EaseUS Partition Master on my desktop to successfully clone from the laptop HDD to the SSD. Here is what I did:
- Install EaseUS Partition Master Free Edition, run it, and click “Launch Application”.
- Select the source disk (in the right-hand panel listing all the disks), right-click and choose “Copy disk”. (Alternatively, you can run menu Wizard, “Clone disk wizard”, and select the source disk.)
- After the wizard finishes analyzing the source disk, click Next.
- Select the destination disk. Next.
- Choose the “Delete partitions on the destination hard disk” option. Next.
- The wizard should select the same sizes for the destination partitions as the source partition’s (except for the last partition, which should be the Windows partition, if the hard drive sizes are different).
- On a MBR (Master Boot Record) disk, you should have two partitions, a tiny System partition and a large Windows partition. On a GPT (GUID Partition Table) disk, you will have one or two other tiny system or reserved partitions.
- Note: The wizard had a problem selecting the destination partition sizes for my laptop’s SSD. It increased the 1GB System partition to 100GB. I had to drag to resize the System partition to a value closed to 1GB (couldn’t get it exactly the same) and increase the Windows partition size accordingly (to eliminate the Unallocated space).
- If you drag the partition to a small enough size, you won’t be able to see the text inside showing the size. Just rest your mouse pointer on the partition and a popup text will appear with the size info.
- Once you are satisfied with the sizes, click Next and Finish. The Partition Master’s disk info will change to reflect the changes you made.
- Click the top-left Apply button to make those changes take effect.
If you don’t have a second Windows machine to do the above, you can do a self-migration of Windows 10 from the current disk to another disk using the EaseUS Todo Backup Free Edition. Run it and click the top-right Clone button. More instructions can be found at How to Migrate Windows 10 from HDD to SSD?
Most info above derived from:
Thanks, Man, for posting this nice article! It worked OK for me for test-cloning WinServer 2012 R2 from 120 GB SSD to an old 40GB IDE HDD, i.e from BIG to SMALL drive. I used “disk_to_local_disk” option. Still want to figure how to clone a bootable partition using “partition_to_local_partition” option. So far whatever I clone using “partition_to_local_partition” option does not boot up.
Hi Sergei, glad it worked for you. For the future, I would recommend using the free “home use” version of Macrium Reflect. It supposedly can handle cloning to/from drives (SSD or HDD) of different sizes. Also, has a nice looking user interface. I will use it the next time I need to clone a hard drive and then post about it.