
 I recently got a new macbook with Mac OS X 10.7 Lion. I did not like some of the useability changes made (more on that below), but thankfully did not experience the slowdown, crashes, or bad battery life that others had reported. I upgraded to Mac OS X 10.8 Mountain Lion in the hope that those useability changes would be improved. My hopes were dashed, but I was determined to create an unholy combination of the old and the new which I will call Mac OS X Mountain Leopard. Grrr… meow.
Here are the tweaks that I made:
- Disable natural scrolling. The reverse scroll seems so unnatural to me. Because I will be switching between Mac OS X and Windows often, adapting to natural scrolling would also cause confusion on Windows.
- To disable natural scrolling, go to System Preferences->Trackpad->Scroll & Zoom, and uncheck the “Scroll direction: natural” box.
- Enable tap-click, two-finger-tap-2nd-click and two-finger-tap-drag in addition to the new three-finger-drag. My fingers are trained to do a two-finger tap or drag so I wanted to enable it and use it alternatively with the three-finger-drag. The three-finger drag is still useful for rearranging icons on the dock; whereas, the two-finger-tap-drag would launch the application instead. I was expecting a three-finger scroll inside an application window in addition to the two-finger scroll, but it wasn’t supported.
- To enable tap-click and two-finger-tap-2nd-click, go to System Preferences->Trackpad->Point & Click, check the “Tap to click” and “Secondary click” with “Click or tap with two fingers” boxes.
- To enable two-finger-tap-drag, go to System Preferences->Accessibility->Mouse & Trackpad->Trackpad Options…, check the “Enable dragging” box and leave the default “without Drag Lock” selection.
 Globally disable application restore. This feature was very confusing and a bit annoying. For example, when I would run the TextEdit application to open up a new document, I would get 3 or 4 of the previously opened documents also and would have to hunt for the new document. I’m sure that others may find this useful but it wasn’t for me.
- To disable application restore, go to System Preferences->General and check the “Close windows when quitting an application” box.
- On OS X Lion, this option is labeled “Restore windows when quitting and re-opening apps” and you would uncheck it to disable the application restore.
- Change Gatekeeper to allow installation of programs from anywhere, not just only from the Mac App Store. I ran into this issue when attempting to install GNU Emacs, which I had to download separately because it is not in the App Store.
- To allow installation from anywhere, go to System Preferences->Security & Privacy and select the “Anywhere” option under the “Allow applications downloaded from:” section.
- Disable notifications from programs like gfxCardStatus or Game Center. I’m okay with the Notification Center but too many non-critical notifications can train me to ignore all notifications (like ignoring the boy who cried wolf too many times).
- To disable specific notifications, go to System Preferences->Notifications, select the application, and then uncheck any or all three options: “Show in Notification Center:”, “Badge app icon”, and “Play sound when receiving notifications”.
- FYI, the “Badge app icon” is a red circle with a number inside that appears on the top-right of the application icon in the dock . The best example is the Mail program showing the number of unread emails.
- There does not seem to be any option to only display the banner (which appears in the upper-right of the screen briefly and then disappears) without leaving at least the last notification message in the Notifcation Center.
- Disable automatic system updates during sleep. I don’t trust automatic updates and want to be asked if I wish to install them or not.
- To disable automatic updates, go to System Preferences->Software Update and uncheck the “Install system data files and security updates” box.
- Turn on indicator lights on the dock to show that an application is running. This was checked already on my macbook (maybe because I upgraded from Snow Leopard and it persisted that setting).
- To enable indicator lights on the dock, go to System Preferences->Dock and check the “Show indicator lights for open applications” box.
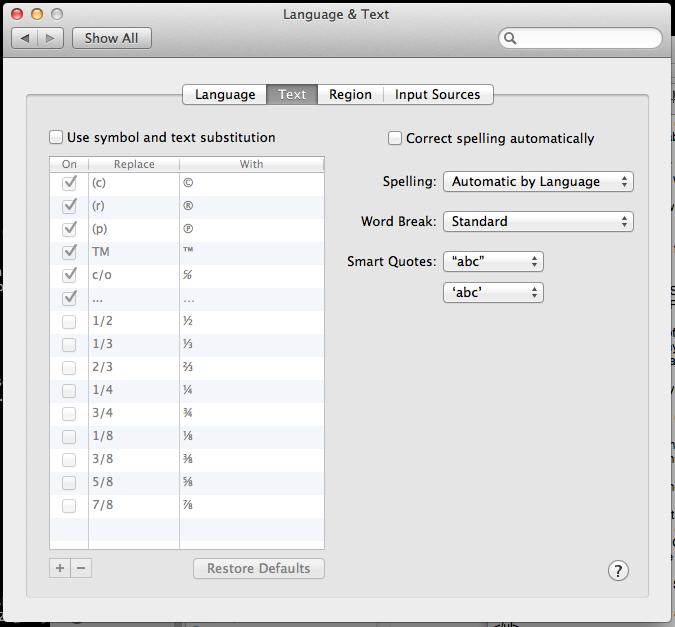
 Turn off Auto Correct. I usually make sure to disable automatic correction in programs like Outlook, Mail, and Word because most of the time, the corrections are wrong. I hated having my technical words replaced by common words because the dictionary used didn’t have those words, or having an acronym re-capitalized. On Mac OS X, I noticed that disabling Auto Correct in the applicatons’ Preferences did not stop all auto corrections from occurring. It turns out I have to disable it at the system level also.
- To disable Auto Correct, go to System Preferences->Language & Text->Text and uncheck the “Use symbol and text substition” and/or “Correct spelling automatically” boxes.
- I do uncheck the “Use symbol and text substitution” box because when I type a), b), and c), it is annoying when the c) ends up as a copyright symbol.
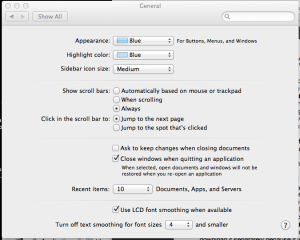
- Make scrollbars visible all the time. Hiding the scroll bars was a bad idea for two reasons. One, I can’t see the vertical scroll bar until I do a two-finger scroll. Hovering over the location of the vertical scroll bar does not show it; but strangely, doing the same for the horizontal scroll bar will show it. Two, the horizontal scroll bar appears, overlaps an item, and prevents selection of that item. For example, when attempting to move a file that is in the last display line of the Finder’s list mode, the horizontal bar will appear and prevent the selection of that file.
- To make the scrollbars visible all the time, go to System Preferences->General and select the “Always” option for “Show scroll bars:”.
- Show Finder status bar. I like the Finder’s bottom status bar because it provides useful info at a glance.
- To show the Finder status bar, go to the Finder’s View menu and click the “Show Status Bar” option.
- Make hard drives visible in Finder’s left-hand navigation pane. I think the reasoning behind hiding the hard drives is to force the usage of the favorites folder to access files. Unfortunately, I organize my files differently than Apple imagines I would, so I do need a way to quickly view the root folder of my hard drive.
- To make the hard drives visible in Finder, go to Finder’s Preferences menu, Sidebar tab, and check the “Hard disks” box under DEVICES.
- Make the ~/Library folder permanently visible in the Finder. I could use Finder’s “Go->Go to folder” menu and input “~/Library”, but that’s slower than just clicking on the Library folder.
- To make the ~/Library folder permanently visible, launch the Terminal application and run the following command:
sudo chflags nohidden ~/Library
Note: If you use Disk Utility’s Repair Permissions function, it will re-hide the ~/Library folder and you would need to do the above again.
- To make the ~/Library folder permanently visible, launch the Terminal application and run the following command:

The information above was mostly derived from:
I had trouble to disable the autocapitalization in apple mail and some other application (such as textedit). I’d rather to press shift to capital the sentense beginning.
Could you help? Thanks!
Hi Leo,
I tried with Apple Mail and made the following changes to prevent such automatic edits as auto capitalization.
1) Go to System Preferences->Language & Text->Text and uncheck both “Use symbol and text substitution” and “Correct spelling automatically” options.
2) Go to Apple Mail->Preferences->Composing and select “never” for the “Check spelling” dropbox near the top.
Hope that works for you.
Regards, Chanh