
 I recently got a mid 2012 Macbook Pro 15in laptop. It came with Mac OS X 10.7 Lion which I promptly upgraded to Mac OS X 10.8 Mountain Lion. I then installed Windows 7 Boot Camp on it. I thought I had the perfect setup.
To my dismay, I found that while the Macbook lasted 6 hours or more while running Mac OS X, the Windows 7 lasted at best 3 hours. The reason for the short battery and heat (the laptop got very hot under Windows) was that under Windows, the discrete graphics card was active all the time! The Boot Camp 4.0 drivers for Windows did not support switching graphics between the integrated and discrete video cards, but instead used discrete all the time.
I decided to use Mac OS X as often as I could to take advantage of the battery life and only switch to Windows when I needed to. Under Mac OS X, there is an neat application called gfxCardStatus which allows me to force Mac OS X to use only the integrated graphics card. This is useful because I found that unlikely applications, like Powerpoint, would switch the Mac OS X to use discrete graphics.
Update: Mac OS X 10.10 Yosemite uses a new Core Storage volume manager which does not support merging or re-sizing. The solution is to revert the Core Storage volume back to a plain HFS+ (aka Mac OS Extended) partition before following any of the instructions below. See my followup post on Revert Mac OS X Yosemite Core Storage Back to Mac OS Extended HFS+ for details.
Unfortunately, sharing information between the two operating systems is inconvenient because while Mac OS X can read NTFS, it can’t write to it. And while Windows can read HFS+, it cannot write to it. There is a commercial product called NTFS for Mac that allows Mac OS X to write to NTFS, but some reviews indicated that the NTFS partition might get corrupted. Alternatively, I could use a cloud service like DropBox but I would have to pay for more storage space, there would be duplicated files on both the Mac OS X and Windows partitions, and there would be a dependency on having Internet access to sync those duplicated files. The best solution (free, non-wasteful, and fast) would be to have a shared FAT32 partition which both Mac OS X 10.8 Mountain Lion and Windows 7 can read and write to.
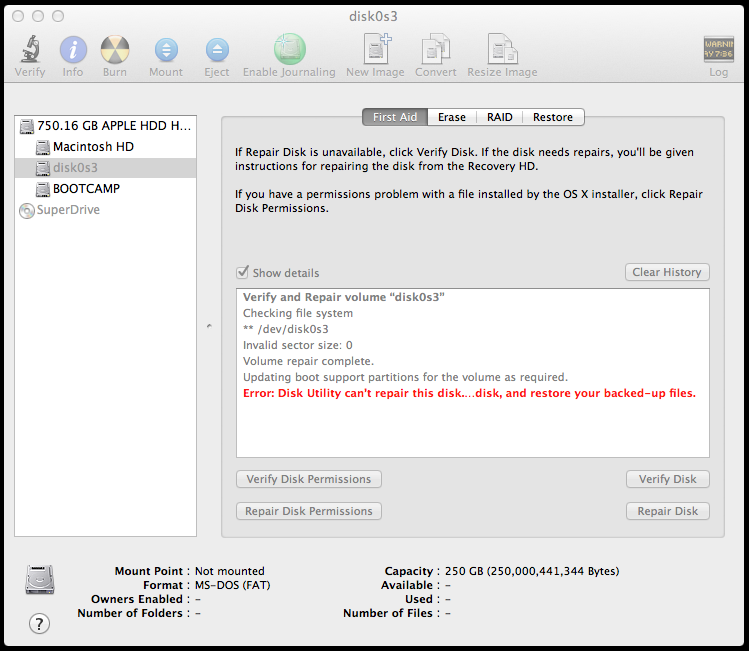 Update: Initially I used an exFAT partition, instead of FAT32. (exFAT is an enhancement of FAT32 that removes the 4GB file size limitation.) However, after copying back my data to the shared exFAT partition and accessing it from both Mac OS X and Windows 7 under VMware, the shared partition got corrupted within a day. I did some research and found that exFAT on Mac OS X often got corrupted and would disappear. Disk Utility was not able to repair the exFAT partition. I decided to reformat the shared partition as FAT32 using Disk Utility with “MS-DOS (FAT)” format; I can live with the 4GB file size limit, but I can’t live with corrupted data. FAT32 is older (less buggy and more reliable) and uses two file allocation tables (while exFAT uses just one) so it should be more recoverable. I’ve updated this post to refer to FAT32, instead of exFAT.
To create the shared FAT32 partition would require me to re-size the existing partitions. The Mac OS X Disk Utility supports re-sizing the Mac OS X’s HFS+ partition without destroying its contents. Under Windows 7, there are 3rd party tools to re-size the NTFS partition but success was not guaranteed and there was a chance that the Windows Boot Camp partition might become unbootable.
Because I also had an issue with running the Windows 7 Boot Camp under VMware 4 and 5 (I couldn’t figure out why), I decided to start from scratch with a new Boot Camp. After backing up the data on Windows 7, I ran the Boot Camp Assistant to delete the existing Boot Camp partition.
Maximum of Four Partitions
My original Mac OS X Lion came with 3 partitions on the hard drive using the GUID Partition Table (GPT) schema, which we can see by running “diskutil list” under the Terminal command line:

The Extensible Firmware Interface (EFI) partition contains the boot software, the Macintosh HD partition contains the Mac OS X 10.8 Mountain Lion, and the Recovery HD partition contains the Mac OS X Lion Recovery.
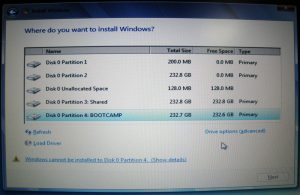
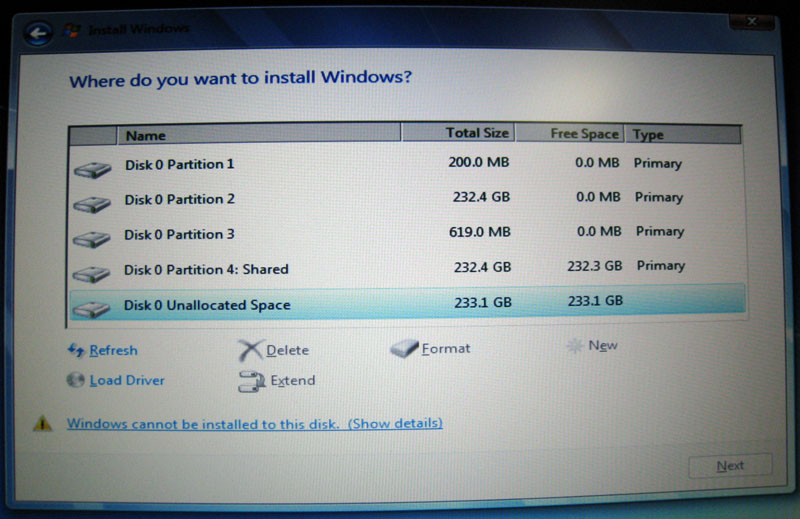 Windows 7 uses Master Boot Record (MBR) which allows a maximum of 4 primary partitions (or 3 primary and 1 extended partitions) that Windows 7 can be installed on. Because Boot Camp requires that Windows be the last partition, we have an issue because adding a Boot Camp and a shared partition will result in 5 partitions, rendering the last partition as uninstallable by Windows 7. How do I know? I attempted it and ended up with the resulting Windows 7 install screen to the right. Clicking on Show Details informed me that Windows 7 needed to be installed on a Primary partition, which the last partition wasn’t.
To get this to work, we have to sacrifice the Mac OS X Lion Recovery partition. Then when we add the Windows and shared partition, the total will be 4 partitions. Deleting the Recovery partition was not a problem because I plan to make a bootable USB key containing the Mac OS X Mountain Lion install. Unfortunately, because the Recovery partition is a hidden partition, we cannot use Disk Utility to delete it. Instead, we will use the Terminal command line to erase and merge it with our Mac OS X partition.
Update: There is a way to avoid deleting the Mac OS X Recovery HD partition. I found a post, MBA13/2012: OSX + Win7 + Shared exFAT, which uses a tool called gptsync to avoid deleting the Recovery HD partition by hiding it from the Windows MBR table.
Here’s how to erase and merge the Mac OS X Lion Recovery partition:
- Launch the Terminal application.
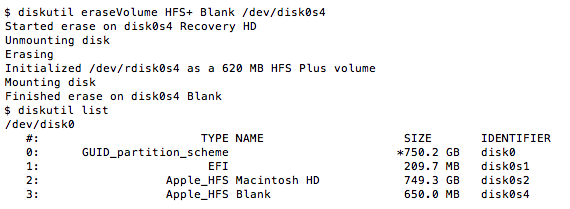
- Run “diskutil list” to see the 3 existing partitions: EFI, Macintosh HD, and Recovery HD. (See the “diskutil list” results above.)
- Look for “Apple_Boot Recovery HD” partition and note its identifier, which in the above is “disk0s4”. Likewise, note that the “Apple_HFS Macintosh HD” partition’s identifier is “disk0s2”.
- Erase the Recovery HD partition by running “diskutil eraseVolume HFS+ Blank /dev/disk0s4”. (Format: “diskutil eraseVolume format name device”)
- Reclaim the erased space by merging the now blank Recovery HD partition with the Mac OS X HFS+ partition by running “diskutil mergePartitions HFS+ Lion disk0s2 disk0s4”. (Format: “diskutil mergePartitions format name fromDevice toDevice”. This is non-destructive on the first partition because the force flag is not set; and in this case, the format and name are ignored.)
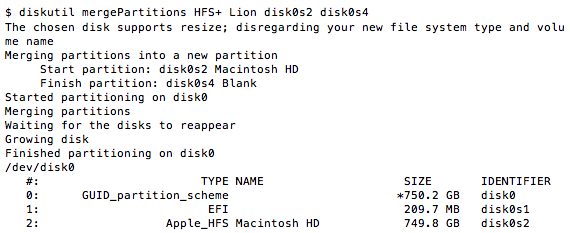
- Note that the above steps result in 2 existing partitions: EFI and Macintosh HD.
Create Boot Camp and Shared Partitions
We are ready to create a Boot Camp partition for Windows 7 and the shared FAT32 partition. Before we start, there are two important points to keep in mind:
- We will introduce a new step in the Boot Camp process, between the Boot Camp partition creation and Windows 7 installation. The new step involves creating the shared FAT32 partition.
- Any change to the partition tables after Windows 7 is installed will break the Boot Camp partition. So make sure you are certain about how to size each of the partitions.
I decided to split my 750GB hard drive into 3 equal 250GB partitions for Mac OS X, Windows 7, and Shared. Here are the steps I took to create a Boot Camp with the Shared partition:
- Insert the Windows 7 Install DVD. Boot Camp Assistant won’t create the Windows partition without the DVD inserted.
- Run the Boot Camp Assistant and select only the “Install Windows 7” task.
- If you don’t already have the latest Boot Camp 4.0 Drivers for Windows 7 available, then also select the “Download the latest Windows support software from Apple” task to create a DVD or USB flash drive containing the Boot Camp Drivers for windows.
 On the next screen, drag the slider to size the Windows partition; 249GB was the closest I could get to 250GB. The resulting Mac OS X partition would be the size of both the final Mac OS X and Shared partitions; in my case, 500GB. (We are short 1GB because it is used by the EFI partition. Partition sizes are not an exact science so I’m not concerned.)
- Note: Before hitting the Install button, be prepare to hold the Option key when the Mac reboots so we can boot from the Mac OS X partition, instead of the Windows 7 DVD.
- Hit the Install button. The Mac will create the Windows partition (takes a couple of minutes) and then reboot (screen goes grey and then black).
- Hold the Option key down during bootup and select the Mac OS X “Macintosh HD” icon when the Launch Manager appears.
- Back in Mac OS X, run “Disk Utility”, select the hard drive, and go to the Partition tab.
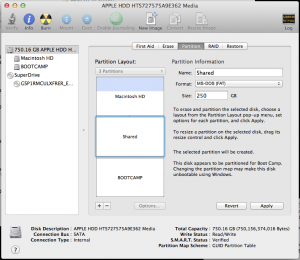 Select the “Macintosh HD” partition, click the plus button to add our shared partition. A new partition is created with the name “Macintosh HD 2” which is half the size of the original “Macintosh HD” partition; which are the sizes I wanted. You can move the slider to adjust the sizes.
- With the “Macintosh HD 2” partition selected, choose “MS-DOS (FAT)” for the Format and “Shared” for the Name. Hit the Apply button to create the shared FAT32 partition.
- Restart and the Macbook will boot from the Windows 7 Install DVD to install Windows.
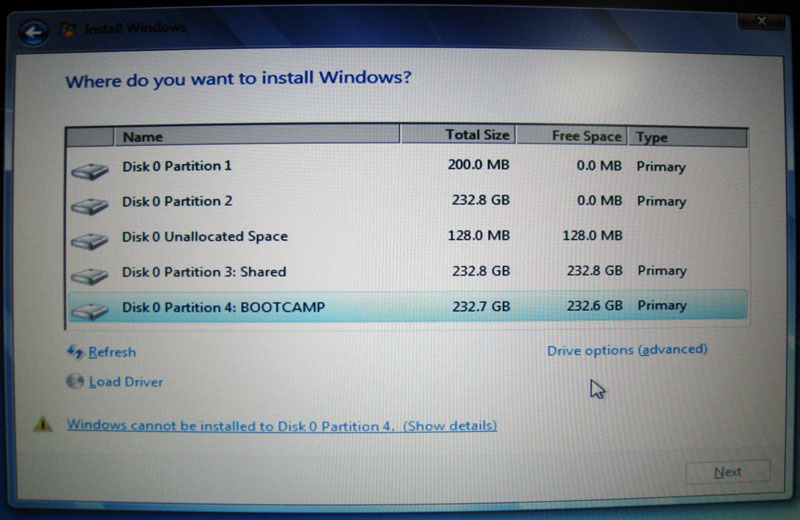
- For the Windows 7 install, hit the Next button, hit “Install now” button, check the “I accept the license terms” box, click Next button, click “Custom (advanced)” option, and select the Boot Camp partition; for me, that partition is named “Disk 0 Partition 4: BOOTCAMP”.
- You might notice a “Disk 0 Unallocated Space” partition of 128MB. There isn’t any way to reclaim and use it.
 Because Boot Camp Assistant used FAT32 for the Windows partition, the Windows 7 install will disable the Next button and show an error “Windows cannot be installed to Disk 0 Partition 4” at the bottom. Clicking on “Show details” will display “Windows cannot be installed to this hard disk space. Windows must be installed to a partition formatted as NTFS.” To resolve this issue, reformat the Boot Camp partition as NTFS.
- With the Boot Camp partition selected, click on “Drive options (advanced)”, click on Format, click OK on the warning, and the Boot Camp partition will be formatted as NTFS. Its name will be blanked out, resulting in a “Disk 0 Partition 4” label. The error at the bottom will disappear and the Next button will be enabled.
- Click Next and Windows 7 will start installing itself to the Boot Camp partition. The installation took me about 30 mins, including an automatic reboot.
- Once Windows 7 is running, open “My Computer”, select the DVD drive, and click on Eject in the top menu to remove the Windows 7 Install DVD.
- Insert the Boot Camp 4.0 Drivers for Windows 7 DVD (or USB flash key) and run “setup.exe” on it to install the Boot Camp drivers. This took me about 10 minutes including another reboot.
- Open the Boot Camp Control Panel and select “Macintosh HD Mac OS X” as the system to start the computer with. Or you can leave it set to Windows and use the Option key when booting to select which OS to run.
- Double-check that you can access the “Shared” partition on Windows 7; it will show up as an additional hard drive.
- Restart and run Mac OS X.
- Check that the Shared partition is accessible. If you don’t see it in the Finder, go to the Finder’s Preferences, Sidebar, and check the “Hard disks” box under DEVICES. Alternatively, from the Terminal, you can type “cd /Volumes/Shared”.
- FYI, here is the final “diskutil list” output:

- As a last step, I launched VMware and it was able to load the Windows 7 Boot Camp successfully. Sweet.
- Note: On startup, VMware Fusion will display a warning message “VMware Fusion is not compatible with gfxCardStatus”. You can quit gfxCardStatus or remember not to manually switch the graphics device while VMware is running.
- Note 2: When running Windows 7 Boot Camp under VMware, the Boot Camp and Shared partitions will be unmounted from Mac OS X. When you shutdown Windows 7 Boot Camp, those partitions will be re-mounted under Mac OS X.

Most info above derived from:
- Macbook Air + Lion + Windows 7 Boot Camp + shared partition. Look for the first answer by HuzZz. Note that I skipped his first step which involved creating a blank 1GB partition; it wasn’t necessary.
- Deleting the Mac OS X 10.7 Lion “Recovery HD” Partition.
how can i use it for my computer install mac v 10.8
Hi Sinsang,
Do you mean to install Mac OS X 10.8 Mountain Lion on a Mac computer which has no OS installed (basically, doing an install, not an upgrade)? If so, you can create a bootable DVD or USB key containing the Mountain Lion OS installer which you can then use to install 10.8 on a computer.
Regards.
run this:
sudo fsck_exfat -d disk0s4
to recover any corrupted exfat disks..
undocumented recover feature 😉
Also always format extfat using windows, as microsoft has a better implimentation and quality.
= less corruptions, but use above if you do get one (usually on osx system updates)
Dawesi, Thanks for the helpful suggestions for those who use exFat. – Chanh