
Have you ever imported movies and TV show episodes into your Apple iPad and have them show up as generic videos, not movies or TV shows? Worse, these videos show up without a preview image, just a totally black square? And are the episodes nicely grouped under the TV show’s name? Finally, when you play a movie, can you skip to later chapters?
 Well, I have had all of the above problems until I discovered Subler. Subler is available only for Mac OS X. It is used to add meta-info to the movie or TV episode files so they will show up in iTunes and iPad correctly as movies or TV shows. In addition, Subler supports adding chapters, subtitles, and secondary audio tracks (like for other languages). Below are my notes on how I used Subler.
Before anything else, you will need to convert your movie or TV episode into the iPad supported format (usually an MPEG4 file ending in .m4v or .mp4 extension). There are several resources on the Internet about how to do the conversion. Here is a nice tutorial using the free Handbrake tool to convert a movie DVD. If you use this tutorial, before importing the movie into iTunes, make sure to run Subler on it to add a preview image and chapters.
Apple iPad Supported Formats
A quick google search identifies that the iPad supports the following video formats:
- H.264 video (up to 720p 1280×720, 30 frames per second) with AAC audio (main profile level 3.1 with AAC-LC audio up to 160 Kbps, 48kHz, stereo) in .m4v, .mp4, and .mov file formats.
- MPEG-4 video (up to 2.5 Mbps, 640 by 480 pixels, 30 frames per second) and AAC audio (simple profile with AAC-LC audio up to 160 Kbps, 48kHz, stereo) in .m4v, .mp4, and .mov file formats.
- Motion JPEG (M-JPEG) video (up to 35 Mbps, 1280 by 720 pixels, 30 frames per second) and PCM audio (ulaw, stereo) in .avi file format.
For simplicity, I always encode movies and TV episodes using the first format: “H.264/MPEG-4 AVC” video and “MPEG-4 AAC” audio.
Using Subler for Movies
I use Subler to add a preview image and chapters to a movie file. Subler will also add meta-info to indicate that the file is a movie type so that iTunes and iPad will recognize it accordingly. Here are the steps:
- Launch Subler. Subler won’t open a default project window so the only change you will see is that the top menu title changes to Subler.
- (Do this once) Go to menu Subler->Preferences and check the “Create Preview Images” for Chapters. This will cause Subler to generate chapter preview images when you save. Without this option, chapters will show up as black squares on the iPad. (QuickTime player and iTunes will generate the chapter previews on the fly if they don’t exist, but the iPad won’t.)
- Go to File->Open to find your mp4 or m4v iPad supported movie file. The project window will appear.
- In the project window, you will see a line for the “Video Track” for video and “Sound Track” (or sometimes “Stereo” track) for audio. Optionally, you may see a second audio track, a “Subtitle Track”, or a “Chapter Track”. Tracks with a check are enabled by default.
- If you don’t select any of the track line items (just click on any blank area in the project window), you should see the following appear at the bottom: Metadata, Artwork, and Other Settings.
- Go to menu “File->Import->Search metadata online” to find the movie description and artwork (preview image).
- The Movie search tab will be selected by default.
- Input the Movie Title, click the Search button, select the movie, and click the Add button.
- Select a picture and click the “Set as artwork” button. Note that I could not find a way in Subler to change the artwork once it has been selected!
- The Metadata and Artwork content at the bottom will be populated.
- Go to menu “Edit->Insert a Chapter Every X minutes” to add the chapters. I recommend selecting the “5 minutes” interval. (See below for how to add your own custom chapters at specific times.)
- A “Chapter Track” will appear.
- Make sure to check the chapter track to enable it.
- Commit your changes by going to menu File->Save. Subler will generate the chapter preview images and store them in a new “Video Track” with format “Photo – JPEG”. Leave this new video track unchecked.
Using Subler for TV Episodes
Adding meta-info to TV episodes is very similar to the above. The difference to keep in mind is that episodes have seasons and are numbered. iTunes and iPad will use the seasons and episode numbers meta-info to group TV episodes together (usually episodes together under a season). If you end the TV episode file names with the season and episode number like “S02E15” (Season 2, Episode 15), Subler will automatically pre-populate the search form. Here are the steps:
- Open the TV episode file using menu “File->Open”.
- Go to menu “”File->Import->Search metadata online”.
- If you have named your file with the season and episode number, Subler will select the TV Episode search tab and fill in the TV Show, Season #, and Episode # fields. If this didn’t happen, manually make the selection and inputs.
- Select the TV episode and artwork like above. (The first option for artwork is usually a screenshot from the episode. I recommend you select this so that each episode will have a unique preview image.)
- Verify the info in the Metadata tab content at the bottom. Make sure that the TV Season, TV Episode #, and Track # (aka episode number) is correct. The “Track #” will consist of the episode number and the total number of episodes in the season; for example, “5/21” meaning episode number 5 out of 21 episodes. Usually the Metadata will not have the total number of episodes; when you save without specifying it, the Track # will default to zero for total number of episodes. (I don’t think missing the total number of episodes will affect iTunes or iPad, but I have not tried it.)
- I don’t believe that the “TV Episode ID” is used by iTunes or iPad; however, it doesn’t hurt to make sure it is correctly filled-in. Basically, it is the season followed by the episode number; for example, “203” meaning season 2 and episode 3.
- I believe you can add chapters to TV episodes if you wish to. I don’t think it hurts and I’m not sure if iTunes or iPad will make use of chapters for TV episodes.
Use Subler to Increase Sound Volume
Subler has other functions which allow you to scale the video resolution or increase/decrease the sound volume. To double the sound volume:
- Select the “Sound Track” in Subler.
- In the Sound Settings that appear below, drag the Volume marker to the maximum “+6 db” setting. (From a quick google seach, “+6 db” effectively equals to double the sound volume.)
If you need to increase the sound volume further, you may wish to use a tool like AACGain.
Finally, import your movies and TV episodes to iTunes and/or iPad. They will show up under the correct Movies or TV Shows section, instead of the generic Videos section. Good luck!
Adding Custom Chapters to Subler
Adding custom chapters to Subler involves creating a raw text file, inputting the chapter times and names into it, and then dragging it into Subler. Subler will automatically recognize it as a Chapter Track.
The Subler documentation indicates that there are two formats for the chapter text files; I chose the more compact mp4v2 format. Here’s an example:
00:00:53:000 Robot Monkey Hullabaloo
00:13:56:000 Curious George, Spy Monkey
00:27:00:000 Curious George Rides a Bike
00:40:03:000 Curious George vs. the Turbo Python 3000
00:53:06:000 Monkey Fever
01:06:10:000 The Lucky Cap
01:19:14:000 Candy Counter
01:32:17:000 Gutter Monkey
Some comments about the above:
- The file should contain a space between the time and the name, not a tab character.
- The file extension should be “.txt”.
- The first chapter must be at zero time. (If you don’t have a zero time chapter, then the rest of the chapters won’t be placed at the specified times.)
- If you use TextEdit on Mac OS X, be sure to set plain text format by going to menu “Format–>Make Plain Text”. When saving, select the default “Unicode (UTF-8)” plain text encoding.
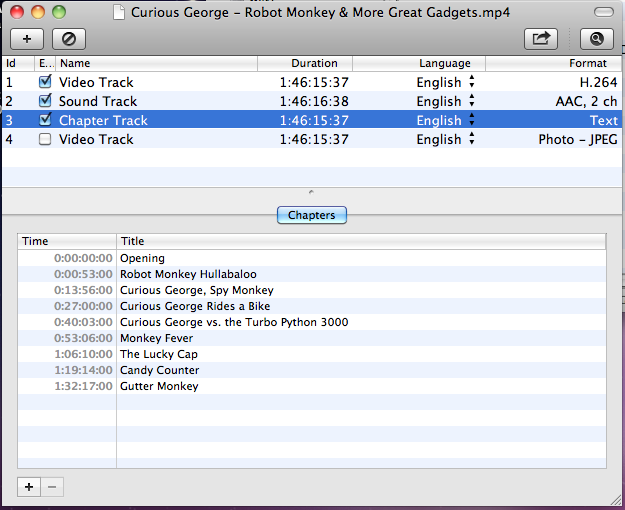
Before dragging the chapter file to Subler, make sure that Subler does not have any existing Chapter Track entry (you can delete the Chapter Track if it already exists). After dragging the chapter file to Subler, enabling it by checking the Chapter Track, and saving, you should see the following:
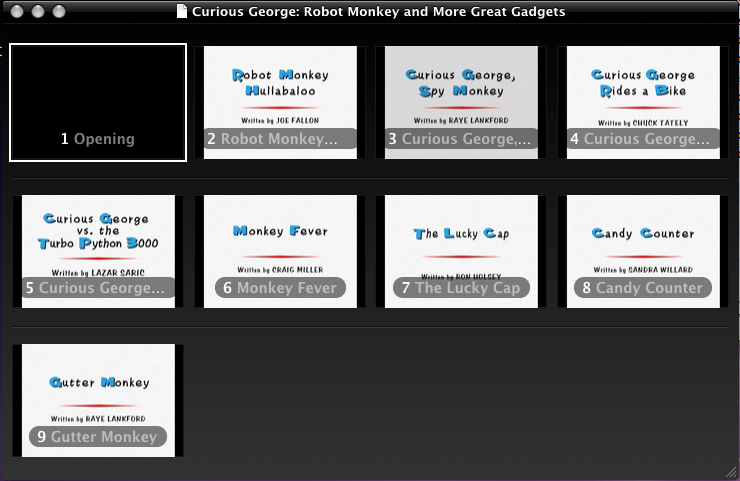
To verify the generated chapter images, open the movie file in QuickTime Player and select the “Show Chapters”. You should then see the following:
If there are any mistakes, just open the movie with Subler, delete the Chapter Track and “Photo – Jpeg” Video Track (which contains the generated chapter images), and start over with a corrected chapter text file.
For more info and advanced tips, see the following web forums and websites:
- The second response from Lagranger at iPad Video Chapters.
- The last, largest response from c.n.s@hotmail.com at iTunes Movie Store like chapter markers with pictures.
- Alternatively, you can learn how to use iTunes to modify the movie and TV episode’s meta-info at The Complete Guide to Managing iTunes Videos.