
After connecting my newly-purchased Mac mini 2018 to my Dell U2410 24 inch 1920×1200 LCD monitor by HDMI cable, I notice that the text is a little blurry and pixelated. The lines aren’t smooth, but jagged. The text looks like it would on an old analog TV.
The problem is caused by the Mac choosing to talk to the Dell monitor using YPbPr, an input color format previously used by S-Video and composite video for analog TVs. The Dell monitor supports two input color formats, RGB (digital computer standard) and YPbPr (analog TV standard). I am not sure why the Mac defaulted to using YPbPr, instead of the superior RGB color format.
Note: I did not see this problem when connecting my MacBook Air 2015 to the Dell monitor using the Apple Mini DisplayPort to DVI adapter. Online comments seem to indicate that this issue only occurs with the 2018 (and probably later) Macs.
The solution is to force the Mac to use the RGB input color format for my Dell U2410 monitor. This is accomplished by creating or overwriting the macOS’s EDID (Extended Display Identification Data) configuration file for the Dell monitor. The details are documented by this webpage, Fixing the External Monitor Color Problem with My 2018 MacBook Pro.
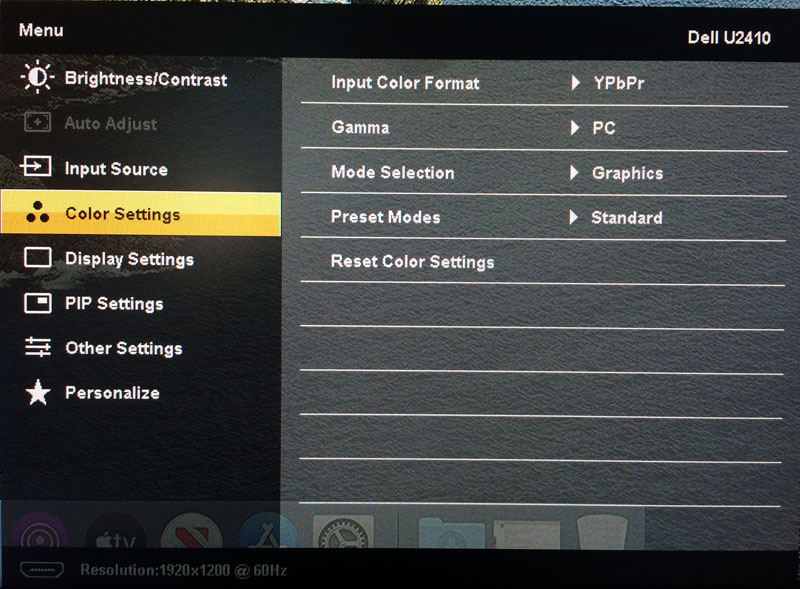 Tip: To verify that YPbPr is being used by your monitor, check the “Input Color Format” in the monitor settings. On my Dell monitor, I go to the monitor’s settings Menu and select “Color Settings” to view the “Input Color Format” field.
Because the EDID override files are located in a protected system directory, “/System/Library/Displays/Contents/Resources/Overrides/”, we will need to use the macOS Recovery Mode to write to it.
Here are the steps I took:
- Download the “patch-edid.rb” script file from GitHub’s adaugherity/patch-edid.rb project. This script will create an override EDID file to force RGB usage. Look for the “Download ZIP” button near the top-right. The archive file will be downloaded to “~/Downloads/7435890-00ff3ead17ae77d2f1c376e90831c037b7dea7ed.zip”.
- Unzip the downloaded archive file by double-clicking on it. (My Safari browser automatically unzipped the archive file after downloading.)
- Launch the Terminal app and run these commands:
# Rename the unzipped folder to a nicer name, "patch-edid"
mv ~/Downloads/7435890-00ff3ead17ae77d2f1c376e90831c037b7dea7ed ~/Downloads/patch-edid
# Change directory to the "patch-edid" folder
cd ~/Downloads/patch-edid
# Ruby should be pre-installed; double-check by getting version info
ruby -v
# Execute the script
ruby patch-edid.rb- The script outputted the following on my Mac:
Found display 'DELL U2410': vendor ID=4268 (0x10ac), product ID=61462 (0xf016)
Raw EDID data:
00ffffffffffff0010ac16f04c5055310914010380342078ea1ec5ae4f34b1260e ...
Setting color support to RGB 4:4:4 only
Number of extension blocks: 1
removing extension block
Recalculated checksum: 0x38
new EDID:
00FFFFFFFFFFFF0010AC16F04C5055310914010380342078E21EC5AE4F34B1260E ...
Output file: /Users/chanh/Downloads/patch-edid/DisplayVendorID-10ac/DisplayProductID-f016 - Take note of the output file, “/DisplayVendorID-10ac/DisplayProductID-f016”. We will need to put the ProductID file with its VendorID parent folder under the EDID overrides folder like so: “/System/Library/Displays/Contents/Resources/Overrides/DisplayVendorID-10ac/DisplayProductID-f016”.
- On my Mac, the “DisplayProductID-f016” file did not exist in the system “Overrides” folder. However, the “DisplayVendorID-10ac” folder did already exist there.
- The script outputted the following on my Mac:
- Reboot into the macOS Recovery Mode. When the Mac starts up, hold down “Command-R” (hold down both the “Command ⌘” and “R” keys) and release when you see the Apple logo.
- Tip: An easier alternative is to hold the “Option/Alt” key on boot to launch the Startup Manager. Then just click and release “Command-R” keys to launch into the recovery mode.

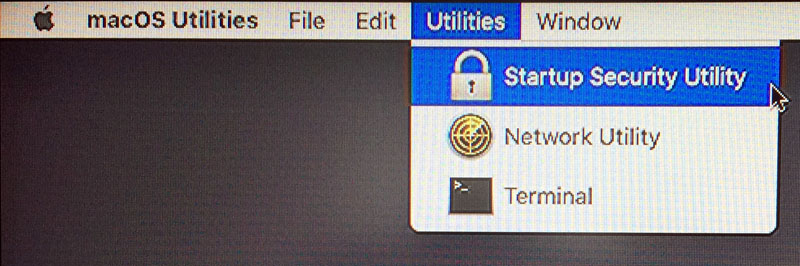
- Once in recovery mode (you will see “macOS Utilities” in the top menu bar), click on the “Utilities” menu and select “Terminal” to launch the Terminal application.
- On my Mac, the main “Macintosh HD” drive is automatically mounted. If it isn’t on your system, launch the “Disk Utility” first (before the “Terminal”), select the “Macintosh HD” disk (or whatever you named it), and click the “Mount” button. Quit the “Disk Utility” when done in order to launch the Terminal application.
- Run these commands in the Terminal:
# Change directory to your "patch-edid" directory
# Note: Change the "username" string below to your actual username
cd /Volumes/Macintosh\ HD/Users/username/Downloads/patch-edid/
# Copy your override subfolder+file into the EDID overrides system directory
# Note: Change the "DisplayVendorID-XXXX" to your actual DisplayVendorID
# Do not include ending forward-slash at end of "DisplayVendorID-XXXX"
cp -R DisplayVendorID-XXXX /Volumes/Macintosh\ HD/System/Library/Displays/Contents/Resources/Overrides/ - Quit the “macOS Utilities” to reboot.
Note: macOS 11.0 Big Sur has made the “/System” directory read-only so the above command will fail. However, according to this thread How to make root volume writeable in Big Sur?, the fix above still works if you copy to the “/Library” directory, instead of the “/System/Library”. So the command should be modified to look like this:
You may need to create any subdirectory that doesn’t already exist. Unfortunately, I don’t have Big Sur so I can’t verify if the above works or not.
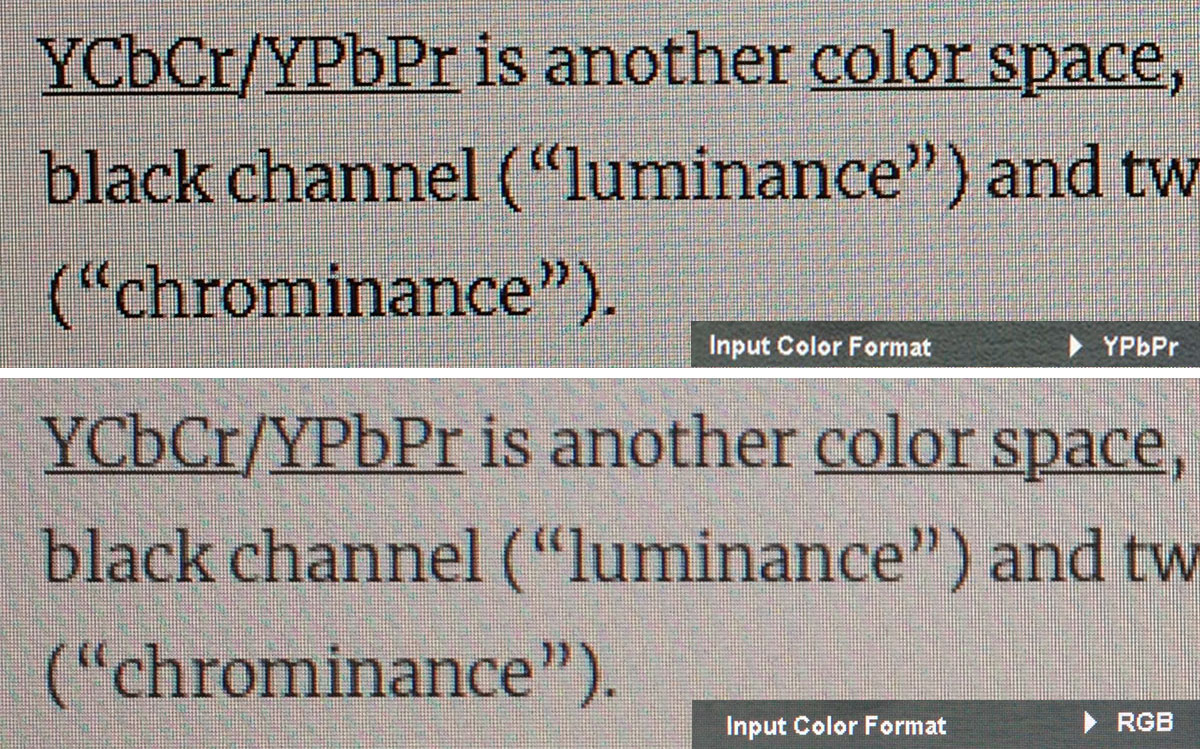 After reboot, the text on the Dell monitor is no longer blurry and pixelated. The text looks sharper and the lines are smoother. (Unfortunately, the photo to the right does not show the blurry/pixelated text very well.) When I check the monitor’s “Input Color Format”, it now says “RGB”. Success.
Does not help in Catalina (10.15.2), maybe somebody knows any new fix?
Thanks for the update about it not working under macOS 10.15 Catalina, Andrei. I only did it on macOS 10.14 Mojave with the Dell U2410 monitor. (On a side note, I have an older Dell 2407WFPb monitor which puts itself into “Mac mode” when connected to a Mac. So, Dell used to support Macs correctly.)
Thanks for the guide – I followed it verbatim today and it works fine in MacOS Catalina 10.15.3 with a Dell U2410.
It worked just fine! Thanks a lot!
MacOS Catalina 10.15.6 with DELL U2913WM
Hey Chanh,
I’ve got a 32” samsung curved monitor hooked up to my 2016 MacBook 12” and pretty much the same problem. I did everything in the instructions but in my case no Override file was created in the Display folder, so when i tried out the last steps, nothing happened. Any advice?
Hi Roy,
Sorry to hear that it didn’t work for you. Unfortunately, I don’t have any solutions that I can think of, without owning the same monitor and testing.
From reading all the forums related to blurry text, it looks like there are several solutions that people try including: (1) switching to a different type cable (ex: from HDMI to DVI), (2) changing screen resolution, (3) switching display mode type (HiDPI), (4) turning off font smoothing, (5) factory resetting the monitor, etc. Unfortunately, all solutions do not work 100% for all users.
Chanh
thanks so much. It fixed my problem. There needs to be an easier way for Macs to select the color mode. MacBook Pro (Retina, 15-inch, Late 2013) 10.13.6 (17G8030)
Unfortunately, this didn’t solve my problem. Any other idea?
MacBook Pro Retina 2019
Dell S2719DC
Not sure. I found this page, 2018 MacBook Pro blurry displayport output, which suggests that the issue is related to using the USB-C to DisplayPort cable. The workaround was to use a USB-C to HDMI cable instead.
I have followed your instructions above. I did force the monitor to have RGB connection. I used patch-edid method that you have described. I am using USB-C cable for connecting the display to the laptop. I also tried HDMI to USB-C cable… same blurry result.
Idea?
Thanks for letting us know the results. Unfortunately, I don’t have any other idea.
Have you find any solution?
Hello! I’m having trouble with this part on #6:
When I typed in this command on the terminal, I get “command not found.”
I’m not really sure why.
-R DisplayVendorID-XXXX /Volumes/Macintosh\ HD/System/Library/Displays/Contents/Resources/Overrides/
^I literally copied the same code you provided and replaced the “XXXX” with “10ac”
Any ideas? Thanks!
Hi, two guesses:
Didn’t work for me 🙁
Macbook pro 2017
Benq EX3203R
I’ve nearly tried all the solutions on the internet, none of it works
Thanks. Worked for my MBP 2015 with Catalina and Lenovo monitor…
Thanks a lot for this tutorial : I just bought a Mac Mini 2020,
running Catalina of course, and this works like a charm for
a Dell U2410.
Hi, thanks for sharing. I have Dell P2419H projector and Catalina 10.15.4. on my Macbook Air. I downloaded and ran the file in Terminal, but it failed to create a DisplayVendorID file. it said “No display data found! Are any external displays connected?” Any idea?
When you connect the Dell projector to your Macbook, does the projector display your screen? It sounds like the Macbook doesn’t recognize or use the projector as a secondary screen. You may need to download drivers from Dell to get the projector working. Once the projector works and if the image projected is blurry, you can try the fix above to sharpen the text quality.
Thank you very much for getting back to me Chanh. yes. the projector displayed my screen when i connected Dell to Macbook. think it was because I installed a beta driver from Dell for Catalina.. now that Dell released a new driver, i am able to create the file now. but the problem right now is that i can’t paste the commands in Terminal in recover mode (keep saying the commands not found) and i can’t paste the newly created display folderunder Overrides (the system forbids me from doing so even i already used “csrutil disable” in recover mode). any idea?
Glad you got the file generated.
For the command not found, which command are you trying to run?
Not sure why it won’t let you overwrite since you are in recovery mode already.
If you use “csrutil disable”, I think you have to reboot for it to take effect and then even in non-recovery mode, you should be able to write to “/Volumes/Macintosh HD/System/Library/Displays/Contents/Resources/Overrides” folder.
Thanks Chan, I think the problem right now is that i can’t write to “/Volumes/Macintosh HD/System/Library/Displays/Contents/Resources/Overrides” folder. (i have rebooted the Macbook) Is it because Catalina 10/15/4 has higher security settings? are there any ways that i can paste the new display folder to Overrides? thank you!
oh that worked now… (don’t know why though).
and i was able to activate the forced RGB mode (Edid override) but it did not seem to have solve the blurry problem. but applying HiDPI seems work better but it only supports 960 x 540 (HiDPI) on my laptop, which is not enough… i’ll need higher resolution for my external display. do you know if there is other way to activate higher resolution HiDPI? thanks !
Unfortunately, I don’t know another way to activate higher resolution HiDPI. If I ever find out, I will contact you again. Good luck!
Thank you so much! This fix worked for me on a 2018 MacBook Pro. I was worried the issue was incompatibility with an older HDMI monitor, but updating the EDID per your instructions corrected the issue.
cd /Volumes/Macintosh\ HD/Users/username/Downloads/patch-edid/
im having trouble on this part. It always says “No such file or directory even I typed correctly the path.
Sorry for the slow response.
Did you replace the “username” with your specific username? To find your username, try the following commands:
ls
# This should list a directory folder named by your specific username (there may be more than one folder if you have more than one user account).
# So, if your username is "bob_vila", then adjust the troublesome command accordingly like so:
cd /Volumes/Macintosh\ HD/Users/bob_vila/Downloads/patch-edid/
Hope that helps.
Hi everyone,
I’m using Catalina 10.15.5, my external monitor is Dell 2419H and I’ve met this blurry problem. After taking lots of time to search for the solution, this is how I actually solve this problem:
1. I have done all steps guided by Chanh, but I stuck at pasting DisplayVendorID-XXXX to /Volumes/Macintosh\ HD/System/Library/Displays/Contents/Resources/Overrides
2. Despite having disabled SIP, Apple has restricted Catalina’s system volume is read-only.
3. Therefore, in order to paste the DisplayVendorID-XXXX file to the Overrides folder, after disabling SIP from Recovery Mode, restart to the normal macOS (my Mac version is Catalina 10.15.5).
4. Open Terminal, paste and run this: sudo mount -uw /
5. Enter your user password
6. Now, you can paste the DisplayVendorID-XXXX file to the Overrides folder by using command lines as Chanh has mentioned above. After that, restart your Mac.
However, there’s an easier way to copy and paste this file.
1. After running sudo mount -uw /, type killall Finder
2. Now, you can copy and paste the DisplayVendorID-XXXX file to Overrides folder as the usual way you do to copy and paste a normal file.
*sudo mount -uw / is used to remount the system volume read-write, but it only applies to the current session – when you reboot it will again mount as read-only.
3. Restart your Mac and enjoy the result – the external monitor’s blurry has disappeared as the Input Color Mode has been forced to change into RGB instead of YBpPr.
Hi Phu,
Thanks for providing such detailed instructions!
Chanh
I have followed step by step, but, unfortunately, it did not work for my MacBook Pro 2020 (Catalina 10.15.4) using a Dell Monitor 21”. The color format changed to RGB but the quality remained the same – blurry. Any other potential solution? Many thanks anyways 🙂
Ana, sorry, I don’t know of any other method.
Unfortunately, the appearance of the display issue and the effectiveness of the solution depends upon the model of the Mac and the model of the display.
Thanks for the instructions!
I used an alternative script on Catalina, that requires neither disabling SIP, nor booting in Recovery mode: https://github.com/mbruggmann/osx-edid-overrides
It helped to switch my Dell P2416D to RGB mode.
I also recommend to play with various text antialiasing options, as documented here:
– https://medium.com/@nvucuong/macos-blurry-texts-on-an-external-full-hd-monitor-d2a955c25607#e14f
– https://osxdaily.com/2018/09/26/fix-blurry-thin-fonts-text-macos-mojave/
It’s funny when a monitor works on Linux way better than on an MBP.
John,
Thanks for the extra info.
Chanh
Thanks a lot, it worked like a charm! 2xDell U2518D and 10.15.7 (19H2)
Just updated to Big Sur and my mac reverted back to YPbPr…
When I tried to do the same procedure again, I’m having permissions issues when copying the file over to the Overrides folder. Read-Only File System.
Any idea why?
Thanks!!
Hi Yuri,
Big Sur has made the /System directory read-only. However, according to this thread How to make root volume writeable in Big Sur?, the fix above still works if you copy to the “/Library”, not “/System/Library”. So the command would look like:
Unfortunately, I don’t have Big Sur so I can’t verify if the above works or not.
Chanh
Hi there, anyone tried this successfully on mac OS Big Sur 11.0.1
On mac OS Big Sur, I followed the instruction above and everything is OK until the last step:
cp -R DisplayVendorID-10ac /Volumes/Macintosh\ HD/System/Library/Displays/Contents/Resources/Overrides/
When running the above command in Recovery mode, I met the following error from the system:
“cp: /Volumes/Macintosh HD/System/Library/Displays/Contents/Resources/Overrides/DisplayVendorID-10ac/DisplayProductID-d0da: Read-only file system”
I understand that the destination folder is still read only and I cannot write
Anyone know how to fix it on mac OS Big Sur? Pls help
I tried to use “csutil disable” to disable SIP, reboot already but not successful
Hi NVN,
Here’s the reply I made to Yuri who had the same problem with Big Sur.
Big Sur has made the /System directory read-only. However, according to this thread How to make root volume writeable in Big Sur?, the fix above still works if you copy to the “/Library”, not “/System/Library”. So the command would look like:
Unfortunately, I don’t have Big Sur so I can’t verify if the above works or not.
Chanh
Sorry to say, but this does not work at all running on a MacMini M1 with Big Sur. Looks like the ioreg setup is completely different on an M1 computer. Running the script as is returns nothing. Changing line 7 to ioreg -l -d0 -w 0 -r -c AppleCLCD2 find the relevant data. But since it’s setup is new the latter part of the script fails. For example there’re no
IODisplayEDID, DisplayVendorID or DisplayProductID
The vendor ID and product ID can be deducted but the EDID can’t. It is no longer a base64 encoded string. Instead there’re EDID UUID (that’s aGUID) and a whole lot of other params.
My knowledge profile ended about here. I could get the information, but I don’t know how to apply that into the script or the final XML.
Thanks for the detailed information, Jolle.
Does this work with MacOS Big Sur 11.0.1?
According to Jolle (see comment prior to yours), this fix does not work for MacOS Big Sur unfortunately.
THE REAL QUESTION IS WHY TF AM I GOING THROUGH ALL THIS HOOPS ON A MAC????
Any update for Big Sur?
[…] Fix Blurry Text on Mac Using External Non-Apple Monitor […]
I just upgraded to Big Sur and it worked in that it sets monitor to RGB but it really didn’t do anything to the blurriness. Not sure where to go next except the store for a 4K monitor.
I have found this post because I bought my husband a Samsung M5 monitor for his Mac Airbook (as he has been hunched over it for the past year and NEEDS to get a monitor, I liked the look of it and the Airplay feature). I am ok with computers but not going to go in and overwrite code on his computer – that is beyond me, plus he is running Catalina. The text pixelation is ridiculous and at least after reading this thread, I know why.
Questions to you – will returning the M5 monitor and buying a 4K monitor solve this problem with the pairing with the Airbook? I am fine to throw more money at it, just want it to work! Anyone have a suggestion as to a monitor that would be appropriate – not a gamer, needs it to look at images occasionally and unfortunately I have a new iMac he is comparing it to.
Hi Leslie,
I recommend returning the Samsung M5 and buying a monitor which is compatible with your husband’s Macbook. There’s no way to get the Samsung M5 to work with Catalina, so it makes sense to do the above.
I found a page which lists the 4K monitors that are compatible with the Macbook Air at Best 4K monitors for Mac 2021. If you do choose another monitor than the ones listed, I suggest checking the description and comments for hints as to whether the monitor works with the Apple Mac or not.
Cheers, Chanh
I just got this working on Big Sur 11.5.1 and an Intel Mac (late 2013 retina MacBook Pro). I looked in the Library folder and noticed there is no Displays directory there, so I created the directory, moved my script in there, and it worked.
Here’s the folder structure you need to create:
/Library/Displays/Contents/Resources/Overrides/
Great! Thanks, Victor, for the fix.
I can confirm this works on Big Sur.
I can confirm that Victor’s solution works on Big Sur. The path /Library/Displays/Contents/Resources/Overrides/ did not exist for me so I just created it and it worked.
Same prob with blurry text. Upgraded to Monterey but no improvement.
Maybe I misunderstood the fix above… I opened library and created Displays folder then inside that, created Contents…then inside that, Resources…then inside that, Overrides. Then what exactly do you do next? I tried moving Scripts folder into it but when I rebooted the original scripts folder was where it was originally in Library.
Did I mess up something there?
Hi Jeffro,
Next, you will want to copy the “DisplayVendorID-XXXX” (replace “XXXX”) directory generated by the script to that Overrides subfolder.
Also, replace “Macintosh\ HD” with whatever your system volume name is.
Hope that helps.
Confirmed working on Catalina 10.15.7 with a Dell P2419H.