
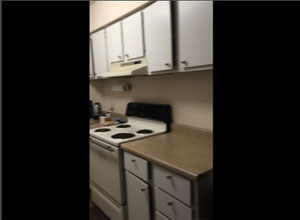
 Have you ever taken a vertical portrait video using your iPhone, import it to your computer, find that Windows Media Player will play it horizontally, and gotten a neck crick from holding your head sideways? Since the beginning, vertical portrait videos (tall and skinny) have been unwanted and unsupported, living in the shadow of the horizontal landscape videos (short and wide). Portrait videos were usually shoehorned into a widescreen frame, resulting in ugly black bars on the left and right. (Using free video editors, like Windows Movie Maker or Mac OS X iMovie, to rotate videos will result in such travesties.)
Thankfully, things have gotten better. Recent smartphones will embed the rotation information into the video file. Some video players, like VLC and QuickTime Player, will act on that rotation data to show the video correctly on computers. (Unfortunately, Windows Media Player does not make use of the video rotation data.) In addition, VLC allows manual adjustment of the playback video orientation (menu “Tools->Effects and Filters->Video Effects->Geometry->Transform->Rotate by 90 degrees”), but does not permanently change the video file’s rotation data. QuickTime Pro has a rotate video function which does not really rotate the video, but does adjust the video file’s rotation data permanently instead.
I read that some online services, such as YouTube and Google Plus, do support video rotation on imported videos, but have not tried them myself yet. (Supposedly, the new Google Photos does not support video rotation yet, but should eventually. In the meantime, the workaround is to rotate the video using the Google Plus interface.)
If you must rotate a video file (perhaps because you wish to use Windows Media Player), you will want to use a commercial video editor. To rotate a video without introducing black bars requires a program that can rotate the video, change the resolution (to avoid black bars), and re-encode with minimal video quality loss. All three functions are usually only found in commercial video editing software such as Adobe Premiere.
Instructions on how to rotate a video file using Sony Vegas Pro 10 and Adobe Premiere Pro CS5 on Windows 7 follow. I am only a beginner with both programs, so there may be better ways to do what I am attempting to do below.
Sony Vegas Pro 10
Though Sony Vegas is less powerful than Adobe Premiere, I find it much simpler to use. Here’s how to rotate a video using Sony Vegas Pro 10:
 Launch Sony Vegas Pro.
- Go to menu “File->Import->Media…”, browse to the video file, select it, and click Open.
- Surprisingly, Sony Vegas Pro supports the rotation data and displays the video correctly. Because we want to actually rotate the video, we need to tell Sony Vegas Pro not to use the rotation data. To do so:
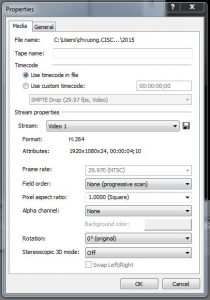
- Right-click on the top-left thumbnail image of the imported video file and select Properties.
- Under the Media tab, in the “Stream properties” section at bottom, select “Video 1” in the “Stream” drop-down list .
- Change the Rotation field from “90 degrees clockwise” to “0 degrees (original)”. Click OK and the video file thumbnail will rotate to the true orientation.
- Double-click on the video file thumbnail to populate the timeline panel at the bottom.
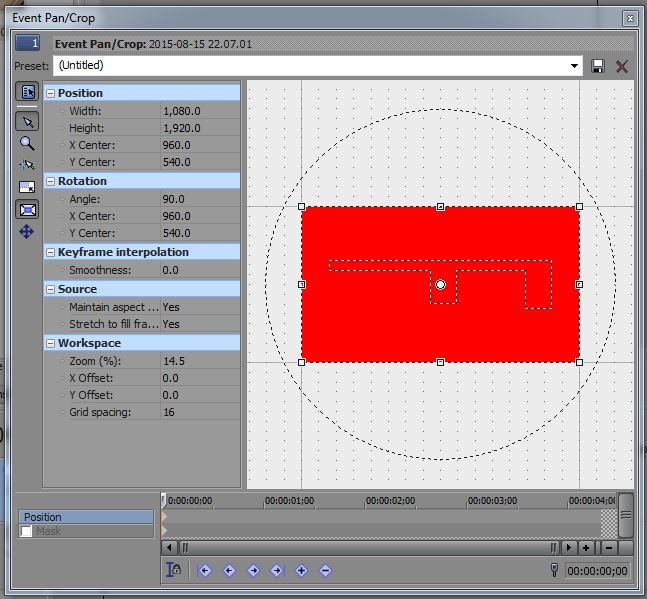
- In the timeline panel, right-click on the video track thumbnail image and select the “Video Event Pan/Crop…” item.

- In the Event Pan/Crop dialog:
- Disable the “Lock Aspect Ratio” option by clicking on that icon if it is depressed (third icon from the bottom on the left toolbar).
- Under Position, switch the values for the Width and Height fields.
- Under Rotation, change the Angle field from “0.0” to “-90.0”. (Not sure why but I had to use -90 instead of 90.)
- Close the dialog by clicking on the tiny top-right “x” icon.
- Go to menu “File->Render As…” to open the “Render As” dialog. In that dialog, do the following:
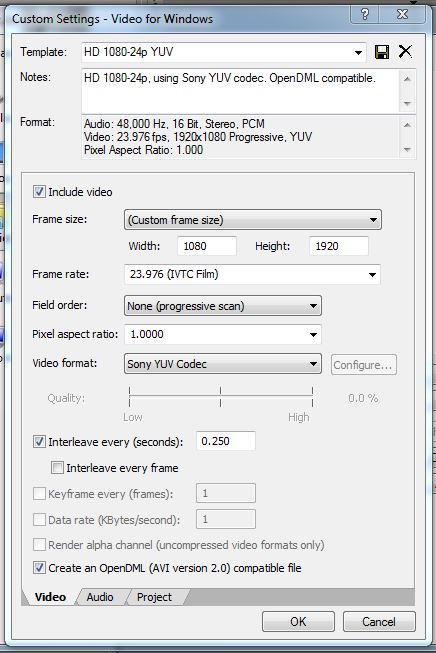
 The “Save as type” and dependent Template fields determine the quality of the rendered video, specifically the resolution. Because our rotated video will have a height of 1920, one “Save as type” option that allows such a height is “Video for Windows (*.avi)”. (Other options will allow different maximum widths and heights.)
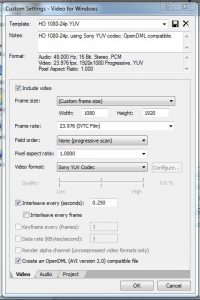
- Select “HD 1080-24p YUV” in the Template field, which is the closest match to our imported video.
- Click on the “Custom…” button to configure a portrait resolution (ex: 1080×1920).
- In the “Custom Settings” dialog, inside the Video tab, select “(Custom frame size)” in the “Frame size” field, and switch the Width and Height values. Click OK to close the dialog.
- Back in the “Render As” dialog, make sure “Render loop region only” is not checked because we want the whole video to be exported. (The “Render loop region only” box will be disabled if no selection is done on the video track.)
- Click on the Save button.

Adobe Premiere Pro CS5
Adobe Premiere is very powerful and thus, not simple to use. Definitely, it is overkill for just rotating a video file. But if you ever need to rotate a video, here’s how to do it in Adobe Premiere Pro CS5:
- Launch Adobe Premiere Pro, choose a “New Project” and click Ok to accept the defaults. When the “New Sequence” dialog appears, click Cancel to skip creating it.
- Right-click inside the top-left Project panel and select “Import…” (or go to menu “File->Import…”). Browse to your video file, select it, and click Open.
- Note: If you are opening a QuickTime .mov file and Adobe Premiere displays a “no audio or video streams” error message, rename the .mov file to .mpg file and try again.
- When you select the imported video file in the Project panel, the mini-preview on top of the panel will show information concerning the video. Take note of the resolution (ex: 1920×1080), frame rate (ex: 29.97 fps), and audio sample rate (ex: 44100 Hz).
- Right-click inside the Project panel and select “New Item->Sequence…” (or go to menu “File->New->Sequence…”) to create a sequence. In the “New Sequence” dialog, do the following:
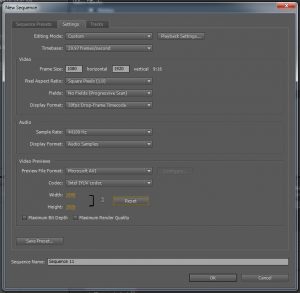 Open the Settings tab.
- Swap the horizontal and vertical field values for the “Frame Size” (ex: 1080×1920).
- Select a matching Timebase (ex: 29.97 fps) and Audio “Sample Rate” (44100 Hz).
- Under the “Video Previews” section, select “Microsoft AVI” for the “Preview File Format”. We want to select the highest-quality codec that we can. Unfortunately, the high-quality “V210 10-bit YUV” and “Uncompressed UYVY 422 8bit” codecs support a maximum resolution of 607×1080. For 1080×1920, I recommend using the “Intel IYUV codec”. (The “Microsoft RLE” and “Microsoft Video 1” codecs will degrade the video quality noticeably.)
- Click the Reset button and the Width and Height fields will be updated to match the “Frame Size” (ex: 1080×1920) or as close to it as possible (depending on the codec selected).
- Click OK to create the sequence.
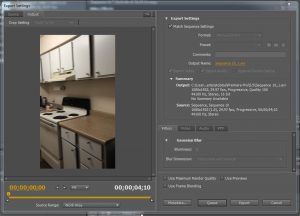
- The sequence will appear as a tab in the Timeline panel at the bottom-middle. To populate it, drag the imported video from the Project panel to the very beginning of the “Video 1” track in the timeline. The Preview panel at the top-right will show the sequence video frame with the video data and top/bottom black bars. (We will get rid of those black bars in the steps below.)
- Select all the video data in the Timeline panel. This action will populate the “Effect Controls” tab in the top-middle “Source, Effect Controls, Audio Mixer, Metadata” panel.
- In the Effect Controls pane, expand the Motion selection under “Video Effects”. Input a value of 90 in the Rotation field to rotate clockwise (or -90 to rotate counter-clockwise). The Preview panel will show the rotated video which fits the sequence frame perfectly without any black bars.
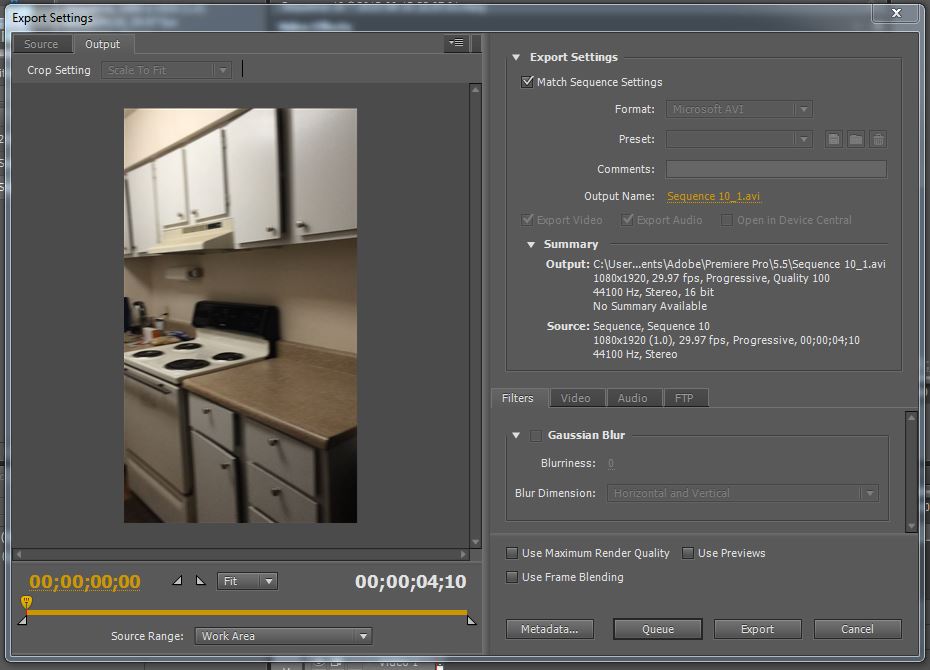
 With the sequence selected in the Project panel, go to menu “File->Export->Media…”. Check the “Match Sequence Settings” box. Click on the Output tab to double-check that the exported video will not contain black bars.
- Click on the Export button. By default, the exported .avi video file will be created in the documents directory at “C:\Users\your_username\Documents\Adobe\Premiere Pro\5.5”.

Tip: If you want to easily create a sequence that matches the video file exactly, just drag the imported video file to the “New Item” icon on the Project panel’s bottom toolbar. (The “New Item” icon is immediately to the left of the Clear/trash icon.) This action will create a sequence that matches the imported video as close as possible and populate the sequence’s timeline with the video data automatically.
The exported video files may be significantly larger in size than the original video files. In most cases, re-encoding video will result in loss of quality or increase in file size. I think the best thing to do is to leave the original video file untouched and use a video player that is aware of the embedded rotation data. If the rotation data is wrong or missing, it might make more sense to use a program, like Sony Vegas Pro, to modify or add it without re-encoding the video.
Some info above derived from:
This works for me:
HandBrakeCLI\
–deinterlace\
–input=IMG_xxxx.MOV\
–optimize\
–output=rotated.mkv\
–preset=Normal\
–rotate=4