
Surprisingly, I found that a Hostgator shared web hosting account supports secure shell (SSH) access and a shared secure sockets layer (SSL) certificate. For those who might not be familiar with them, SSH provides interactive terminal access to your account and SSL supports secure HTTPS browsing to your website.
Note: Most instructions below are not specific to a Hostgator shared web hosting account. They may work with your shared web hosting account also.
Enable SSH Access
To enable SSH access for your Hostgator shared web hosting account, do the following:
- Browse to Hostgator’s Billing/Support System page.
- Log in using your billing/support email address and password (this may be different from your cPanel administrative password).
- Click on the “View Hosting Packages” link under “Hosting Packages”.
- Click on the “Enable Shell Access” link near the top of the middle content pane.
Note: Hostgator SSH uses port 2222, instead of the standard SSH port 22. So when running the SSH client, make sure to use port 2222.
SSH Into Your Hostgator Account
Mac OS X comes with a built-in SSH client. To connect to Hostgator, launch the Terminal application and run ssh with port 2222 with this command:
Windows does not come with a built-in SSH client, so I recommend using the free Putty SSH client. Browse to the PuTTY Download Page and download the “putty.exe” file. Run it and input the following:
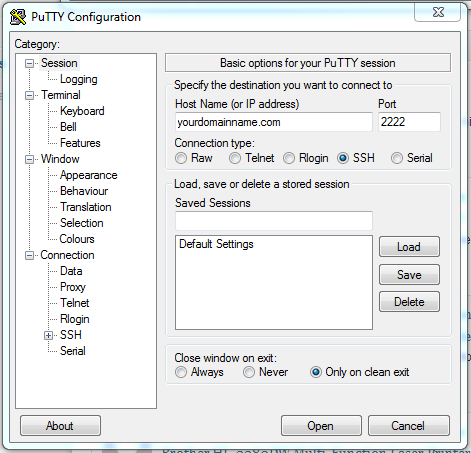
- Under Session (selected by default under the Category panel on the left), input the “Host Name” and the Port 2222.
- Under Connection and then Data, input your username in the “Auto-login username” field.
- Optional: To avoid having to re-input these values the next time you run Putty, go back to Session, input a name in the “Saved Sessions” field, and click the Save button. The next time, just select the session you saved and click Load to automatically re-populate the fields.
- Click on the Open button to make the SSH connection.
Your website files are located under the “~/www” directory which is soft-linked to the “~/public_html” directory.
SSH With Public Key Authentication
If you SSH into Hostgator often, it may be worthwhile to use public key authentication to avoid having to input your password. Public key authentication consists of two steps: (a) generate a public and private key pair on the client and (b) copy the public key to the server into a trusted location. After those steps, instead of asking for a password, the server will authenticate the SSH connection by matching its trusted copy of the client’s public key against the client’s private key.
Before we start, SSH into your Hostgator account and make sure that the “~/.ssh” directory exists on the server by running these commands:
chmod 700 ~/.ssh
The mkdir command above will create the “~/.ssh” directory if it does not already exist. The “~/.ssh” directory is the server’s default location for trusted public and private key files. The chmod command sets the permission on the “~/.ssh” directory to only allow access for the user and no one else. We will copy the client’s public key to this “~/.ssh” directory on the server.
SSH Public Key Authentication on Mac OS X
Mac OS X comes with the built-in “ssh-keygen” and “scp” (secure copy) utilities which we can use to generate a public and private key pair, and to copy the public key to the server.
scp -P 2222 ~/.ssh/id_rsa.pub myusername@mydomainname.com:~/.ssh/authorized_keys
ssh -p 2222 myusername@mydomainname.com 'chmod 600 ~/.ssh/authorized_keys'
The ssh-keygen command above will generate a public and private key pair using RSA protocol 2 with 1024 bits. It will prompt you to input a passphrase (to protect access to the private key) which I recommend you leave blank; otherwise, you will be prompted for the passphrase each time you connect, which would defeat the purpose of avoiding password input. The private and public key files are created in the client’s “~/.ssh” directory as “id_rsa” and “id_rsa.pub” respectively. The scp command copies the public key to the server as “~/.ssh/authorized_keys”, which is the server’s default trusted public key file. The chmod command sets permission on the “~/.ssh/authorized_keys” file to only allow access for the user and no one else.
To test, run the SSH command and you should automatically be authenticated using the public key. You should not be prompted to input the password.
If you are tired of having to input the port 2222, you can set it as the default by creating the “~/.ssh/config” file with the following content:
Port 2222
PreferredAuthentications publickey,password
When connecting to your hosting server, the SSH client will use port 2222 by default and either public key authentication (publickey) or password authentication (password).
Once the file above is created, you should be able to SSH without having to input the port 2222:
SSH Public Key Authentication on Windows
Because Windows does not have the built-in “ssh-keygen” and “scp” utilities, you will need to download the following files from PuTTY Download Page: “puttygen.exe” (ssh-keygen), “pscp.exe” (scp), and “plink.exe” (SSH command line).
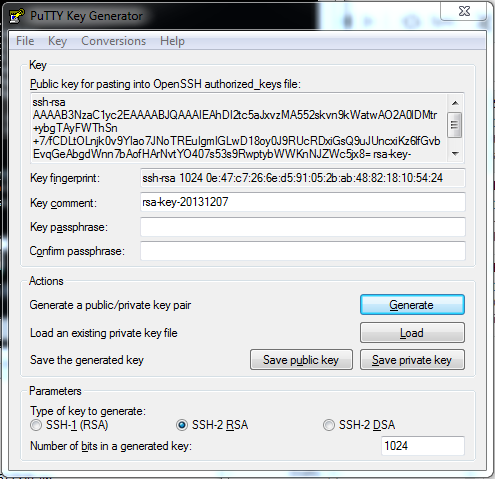
Then, launch “puttygen.exe” to generate the public and private key pair:
- RSA Protocol 2, “SSH-2 RSA”, should be selected by default.
- Leave the “Number of bits in a generated key” as 2048 or change it to 1024. (I used 1024 bits which is adequate for my purpose.)
- Click the Generate button.
- Move the mouse inside the dialog window until the key pair is generated.
- I recommend that you leave the “Key passphrase” blank; otherwise, you will be prompted for the passphrase every time you connect.
- Copy the contents of the “Public key for pasting into OpenSSH authorized_keys file” textfield to a file named “id_rsa.pub”.
- Click the “Save private key” button and name the private key file “id_rsa.ppk”.
- Click the “Save public key” button and name the public key file “id_rsa.publickey”. Note that the contents of this public key file is different from that of the “Public key for pasting into OpenSSH authorized_keys file”.
Finally, copy the the “Public key for pasting into OpenSSH authorized_keys file” to the server using the Window’s Command Prompt shell and the Putty versions of scp and SSH command line utilities:
plink -P 2222 myusername@mydomainname.com chmod 600 ~/.ssh/authorized_keys
Configure the Putty SSH client to use public key authentication:
- Per the previous Putty instructions, input the server’s hostname, port 2222, and your username. Or if you have a saved session, under Session, select your session name, and click the Load button.
- Under Connection, SSH, and Auth, click on the “Browse…” button at the bottom and locate the private key file “id_rsa.ppk”.
- Optional: You can update your saved session by going to Session, selecting your named session, and clicking the Save button.
- Click the Open button to connect to your server by SSH. You should not be prompted to input the password.
Troubleshoot SSH Public Key Authentication
If the above does not work (you are still prompted for the password), then it may be that the server has its own generated public and private key pair installed. For my Hostgator account, I found that the public key authentication failed because my server had its own public and private key files in the “~/.ssh” directory.
To fix this issue, SSH into your Hostgator account and delete all files under the “~/.ssh” directory except the “authorized_keys” file. Try to SSH from your client again and hopefully you won’t need to input the password.
Using Shared SSL Certificate
SSL certificates are used to encrypt the web traffic between your browser and the server. On your browser, the URL will start with “https” (instead of the unsecured “http”), with perhaps a lock icon visible, when SSL is in use. Normally, you would buy a SSL certificate that is linked directly to your domain name; if the domain name doesn’t match the name in the SSL certificate, the browser would display a warning. Purchasing a SSL certificate can be expensive because you must renew it every year; for example, a SSL certificate costs $69/year from GoDaddy.
Hostgator provides a free shared SSL certificate for your use. It is less secure than your own personal SSL certificate because it is shared by all accounts hosted on the same Hostgator server. (Conceivably, another account holder on the same Hostgator server could decrypt the encrypted web traffic to your server, but that requires a lot of know-how and a ton of trouble.)
Because the shared SSL certificate is tied to the Hostgator server’s hostname, you cannot use it when browsing to your domain name. Instead, you would browse to the Hostgator server’s hostname with a relative path to your username, which corresponds to your primary domain website directory.
To find the hostname of the Hostgator server which your account is hosted on, do the following:
- Browse to Hostgator’s cPanel interface using “http://mydomainname/cpanel”.
- Log in using your Hostgator administrative username and password.
- Look for the “Account Information” panel in the bottom-left corner.
- The “Server Name” field contains your hosted server’s hostname (ex: “gator3141”). To get the secured hostname, replace “gator” with “secure” (ex: “secure3141.hostgator.com”).
Instead of using the cryptic secured URL above, you can create a more friendly redirect from your website. You could browse to your domain name and automatically be redirected to the secured URL. I don’t recommend redirecting from your website’s root address (unless that is what you want); instead, I suggest creating a directory called “secure” under the website’s root directory, which will hosts the content to be accessed by SSL.
To create the redirect, SSH into your Hostgator account and create a file with this path and name, “~/www/secure/.htaccess”, and the following content:
RewriteCond %{SERVER_PORT} 80
RewriteCond %{REQUEST_URI} register
RewriteRule ^(.*)$ https://secureXXXX.hostgator.com/~myusername/secure/$1 [R,L]
Please make sure that the “.htaccess” file has 644 permission. When you browse to any file under “http://mydomainname/secure/”, you will be redirected to “https://secureXXXX.hostgator.com/~myusername/secure/”.
If you wish to use SSL with an add-on or sub domain, just append the add-on or sub domain name to the end of the secured URL:
Some info above derived from How can I force users to access my page over HTTPS instead of HTTP?.