
The Boot Camp software on my Macbook Pro allows me to dual boot between Mac OS X 10.6 and Windows 7. However, I also wanted the option to boot into Windows XP because I test software that needs to run under both Windows XP and 7. Unfortunately, Boot Camp does not support more than one Windows OS. Thank goodness the open source movement provided the solution in the form of rEFIt.
rEFIt is Da Bomb!
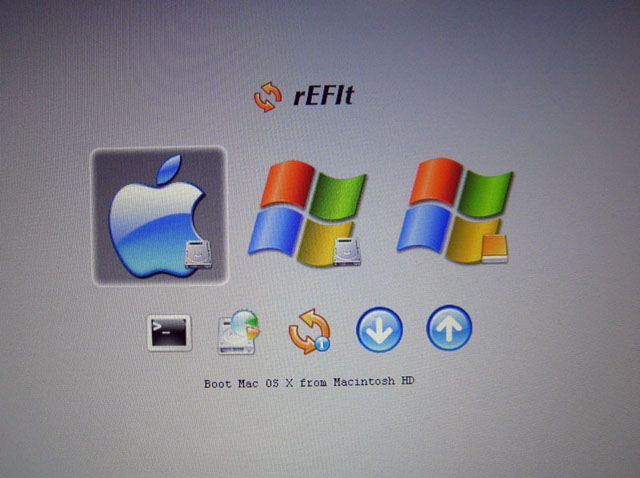 rEFIt is a boot menu tool which allows you to triple boot on Intel Macs. If you have ever activated Boot Camp by holding the Option key on startup and have been offered a selection of two icons (for Mac OS X and Windows), rEFIt can provide a similar menu but with three icons.
I managed to get the triple boot working by following instructions found in a forum post named Triple Boot Mac OS X + XP + 7 (search for the reply from “simscada”). I did not follow the sequence of steps exactly because I wanted to save my existing Windows 7 Boot Camp installation. I was unsuccessful but still got the triple boot working in the end.
The first thing I did was to download and install rEFIt under Mac OS X. I then had to reboot twice before I saw the rEFIt menu on bootup. The rEFIt boot menu will always appear on startup by default. During the process of setting up the triple boot, sometimes I saw extraneous boot icons for the hidden EFI partition (aka Mac OS X system boot partition), a “Boot Legacy OS” (don’t know what that is), and the DVD-ROM drive. At the end, those extraneous boot icons went away. So just ignore them if you see them.
Note: The hidden EFI partition is really the first partition. The Mac OS X partition is the second partition. However, to avoid the confusion (or maybe to add to it), I will ignore the hidden EFI partition and will refer to the Mac OS X partition as the first partition.
Epic Failure: Attempt To Save Existing Windows 7 Boot Camp
Even though the post stated that Windows XP needed to be installed in the last partition, I decided to see if it would work otherwise. I shrunk the Mac OS X partition to make space for Windows XP between the Mac OS X partition (first partition) and the existing Windows 7 Boot Camp partition (last partition). I then installed Windows XP and after rebooting, found that neither the new Windows XP or the existing Windows 7 would successfully boot.
- Windows XP gave me this error: “Windows could not start because the following file is missing or corrupt:
\system32\ntoskrnl.exe. Please re-install a copy of the above file.” - Windows 7 gave me this error: “NTLDR is missing”.
Supposedly, some commercial partition tools for Mac OS X would have allowed me to free space at the end for Windows XP (without destroying the existing Windows 7), but I didn’t want to spend the money.
First: Create Windows 7 and XP Partitions
To prepare the hard drive for triple boot, I had to shrink my Mac OS X partition (first partition) and delete my existing Windows 7 Boot Camp partition in order to create two new partitions, one for Windows 7 (second partition) and the other for Windows XP (third and last partition).
My Macbook Pro had a 320GB hard drive and I decided to size them like so:
| Partition | Size | OS |
|---|---|---|
| 1 | 140GB | Mac OS X 10.6 |
| 2 | 140GB | Windows 7 |
| 3 | 40GB | Windows XP |
The above size allocations reflect my predicted usage pattern and accounts for the minimal installation size for each OS. A bare installation of Windows 7 takes 25GB and a bare installation of Windows XP takes 5GB. Microsoft Office 2007 takes an additional 15GB. I will be using Windows XP mostly for testing so don’t plan to install much software on it. I plan to use Windows 7 and Mac OS X equally.
 Note: Per simscada’s instructions and my experiment, you must install Windows XP in the last partition on the hard drive in order for the triple boot to work.
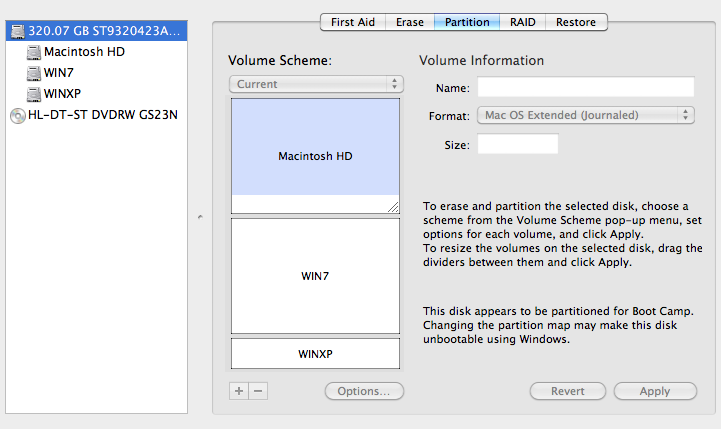
I created the partitions using the Disk Utility which comes with Mac OS X. I did not need to re-install Mac OS X (per simscada’s instructions) because Disk Utility allowed me to resize the existing Mac OS X partition without destroying the OS on it.
Here’s how I added the Windows 7 and XP partitions:
- Run the “Disk Utility” application under Mac OS X. Select the hard drive on the left and click on the “Partition” tab on the right. You will see a nice graph of the hard drive with the Mac OS X partition as a rectangle.
- Delete the existing Boot Camp partition if you have one. The Mac OS X partition rectangle in the graph will grow to reclaim the unused space.
- Note: We will be doing resize and add partition operations using the graph. Changes are not applied until you hit the Apply button to the bottom right. You can revert changes at any time by hitting the Revert button. However, if you remove an existing partition (like a Boot Camp partition) by selecting it and hitting the minus sign (at the bottom of the graph), the remove operation will be applied immediately!
- Select the Mac OS X partition and click the plus sign under the graph to create a new partition. This new partition will take up portions of the free space or unused partition space.
- Select the new partition and click the plus sign again to create another new partition. Both new partitions will have the same size.
- Resize the three partitions by clicking on the right-bottom corner of their rectangles and dragging up/down. Alternatively, you can just select the partition and input the desired size (in GB) in the “Size” field to the right of the graph. Note: Adjusting the second partition size will re-adjust the third partition size accordingly.
- For the new Windows partitions, I updated the “Name” field to be “Win7” or “WinXP” (make sure Windows XP is the last partition) and the “Format” field to be “MS-DOS (FAT)”. The names will help later to identify the partitions. When installing Windows, we will reformat the MS-DOS format to NTFS.
- Once you are satisfied with the partition sizes (make sure to leave some free, non-purple space in the Mac OS X partition), click on the Apply button. Input your admin password when prompted for.
- The Mac OS X partition resize took a while to apply (like 20-30 minutes). The new partition creations were very fast (a few seconds).
Second: Install Windows 7
Here are the steps I took to install Windows 7:
- Inserted the Windows 7 Installation DVD and reboot the Mac computer. On restart, hold down the “C” key to boot from the DVD. You will see a brief message “Press any key to boot from CD” appear and disappear, and then the Windows 7 startup screen.
- During the Windows 7 installation, I was prompted with the following partitions:
Partition Size Type Note Disk 0 Partition 1 200.0MB Primary This is the hidden EFI partition. Disk 0 Partition 2 130.4GB Primary This is the Mac OS X partition which we confusing refer to as the first partition. Disk 0 Unallocated Space 128.0MB This is some leftover space from creating the partitions. Disk 0 Partition 3: WIN7 130.3GB System The Windows 7 partition which we refer to as the second partition. Disk 0 Partition 4: WINXP 37.0GB Primary The Windows XP partition which we call the third partition. - Prepare the Windows 7 partition by formatting it as NTFS: Select the WIN7 partition, click on “Drive options (advanced)”, and click “Format” to format the WIN7 partition as NTFS. The format will cause the partition to lose the “WIN7” label.
- When the format is done, the Next button will then become enabled. Click Next to finish the install.
- Windows will reboot once and maybe twice.
- Note: When rebooting, in the rEFIt menu, choose the Windows icon to boot with. The Windows icon will be named “Boot Windows from Partition 3” (don’t forget that because of the hidden EFI partition, our second Windows 7 partition is actually the third partition… confused yet?). If you don’t select anything within 20 seconds, rEFIt will boot the Mac OS X automatically. If that happens, just restart manually and make sure to select the Windows 7 partition to boot from.
In order to fully use the Mac hardware under Windows, I had to install the Boot Camp drivers, the outdated version of which are conveniently located on the Mac OS X installation DVD (…what, download the drivers from the Internet? That is so not the apple.com way). While running Windows 7, do the following:
- Oh my gosh, I can’t insert the Mac OS X DVD because the Windows 7 DVD is in the hard drive and the Mac slot drive has no Eject button (well, there is an Eject button on the Mac keyboard but that doesn’t work without the Boot Camp driver).
- Don’t worry, Microsoft has you covered under Windows 7: open Explorer, select the DVD drive, and click Eject on the top action menu. (Unfortunately, this doesn’t work under Windows XP. Read on to find how to do it under Windows XP. This is how I use suspense to keep you riveted.)
- Insert the Mac OS X Install DVD, run the “setup.exe”, and accept the default install options to install the Boot Camp drivers for the Mac hardware.
- If you like to tap instead of click (and two fingers tap for right-click), here’s how to configure the trackpad to accept taps:
- Run “Boot Camp” (you can run it directly or click on the dark grey diamond Boot Camp icon in the system tray and select “Boot Camp Control Panel…”).
- Click the Trackpad tab.
- Check the “Tap to Click” and “Dragging” options under the “One Finger” section.
- Check the “Secondary Tap” option under the “Two Fingers” section.
- Note: One issue I noticed is that when I double-tap to drag, I have to double-tap, wait a half second before I am able to drag. It is a Boot Camp driver issue that Apple hasn’t fixed yet (if ever).
- You can run the “Apple Software Update” to update the Boot Camp software now or later.
The last and very important action is to use Windows 7 to mark the last Windows XP partition as bootable (aka make it “Active”):
- Run “Computer Management” (or right-click on Computer and select Manage).
- Go to “Storage->Disk Management” tab.
- Select the WinXP partition, right-click, and select “Mark Partition as Active”. You will see the label “Healthy (Primary Partition)” change to “Healthy (Active, Primary Partition)”. You are basically marking the partition as a bootable partition containing an operating system.
- While you are here, you can rename the label for the Windows 7 partition (look for “C:” drive) to be something like “Win7”. (You might notice that the Boot Camp driver installation had renamed the partition as “Boot Camp” previously.)
Third: Install Windows XP
Finally, install Windows XP into the last partition.
- Before rebooting, remove the Mac OS X Installation DVD and insert the Windows XP Installation CD.
- On bootup, hold the “C” key to boot from the Windows XP CD. You will see a brief message “Press any key to boot from CD” appear and disappear before the Windows XP installation screen displays.
- During Windows XP installation, I was prompted with the following list of partitions:
Drive Label Partition Size Note G: Partition1 [Unknown] 200 MB Hidden EFI partition H: Partition2 [Unknown] 133514 MB Mac OS X Unpartitioned space 129 MB Leftover space E: Partition3 (WIN7) [NTFS] 133513 MB Windows 7 C: Partition4 (WINXP) [FAT32] 37889 MB Our target Windows XP partition - Select the “Partition4 (WINXP)”, hit the Enter key, and then select “Format the partition using the NTFS file system (Quick)” option. Per another reply in the forum post, do not select the “Leave the current file system intact (no changes)” option.
- Once the Windows XP installation completes and reboots, I now see two Windows icons (in addition to the Mac OS X icon) in the rEFIt menu. I selected the second Windows icon (named “Boot Windows from Partition 4”) to start up Windows XP. It booted into Windows XP successfully! Yippee! After some configuration, Windows XP will reboot a second time.
- On the second reboot (or if you miss it, just manually reboot), select the first Windows 7 icon so you verify that Windows 7 can still be started and also, so you can eject the Windows XP CD. (I couldn’t find a way to eject a CD under Windows XP because I couldn’t access the right-click menu with the one-button Mac trackpad. And I didn’t have a normal USB mouse available. Bummer.)
- Reboot into Windows XP, insert the Mac OS X Installation DVD, and install the Boot Camp drivers so you can configure the Mac hardware. Follow the instructions under the Windows 7 section above to configure right-click tap functionality for the Mac trackpad.
You can use “Computer Management” under Windows XP (or Windows 7) to rename the Windows XP partition to something like “WinXP”.
Fourth: Prevent Windows 7 chkdsk From Breaking Windows XP Permissions
I found this out the hard way. If any file gets corrupted (say from a power outage), Windows 7 will do a chkdsk (check disk) operation on its own partition and the Windows XP partition. Unfortunately, Windows 7 chkdsk does not like the Windows XP permission settings on files in the XP partition and will “correct” them, breaking the Windows XP installation. This will happen if on Windows 7 startup, you were unable to cancel the chkdsk in time and you see a bunch of chkdsk messages like “Deleting an index entry with id 311 from index $SDH of file 9” and “Replacing invalid security id with default security id for file filename #1093”; the latter message could occur from 10,000 to 100,000 times and will take 15-20 minutes to complete.
To prevent Windows 7 from automatically running a chkdsk command on the Windows XP partition, do the following:
- Start Windows 7.
- Run “Command Prompt”.
- Type this command:
chkntfs /X D:
(where D: is the drive letter assigned to the Windows XP partition)
I suggest doing the same under Windows XP to prevent Windows XP chkdsk from being run on the Windows 7 partition (not sure if anything bad will happen but let’s not find out).
If you were affected by this chkdsk issue, there is a way to recover. Just let the Windows 7 chkdsk complete. Once chkdsk is done, follow these steps to reset the Windows XP permissions:
- Start Windows XP and log in as the “administrator” user.
- If you see only the mouse cursor and an empty desktop, do the following:
- Hit Ctrl-Alt-Del (with the Macbook keyboard, you will also need to hold down the Fn key) to launch the Task Manager.
- Go to menu “File->New Task”, type in “explorer”, and hit Ok. The start bar and desktop icons should appear.
- Open “My Computer”.
- Go to menu “Tools->Folder Options->View” and uncheck “Use simple file sharing (Recommended)”. This is necessary so you can see the Security tab in the properties for drives and folders. Hit Ok.
- Back in “My Computer”, right-click on the C: drive and select “Sharing and Security…”.
- Click on the Security tab and then the Advanced button near the bottom-right.
- Double-check that the “Administrators” group has “Full Control” permission set. If not, then set it. (If your normal user account is not an administrator account, you may need to recreate it once these steps are completed.)
- Check the “replace permission entries on all child objects with entries shown here that apply to child objects” box.
- Hit Apply and say Yes to the security warning popup dialog. The permissions on all the folders and files on the C: drive will now be reset to give full control to Administrators.
- Once the permission reset is complete, test that permissions are valid by right-clicking on “My Computer”, selecting Manage and then Disk Management. It should show you the drives and partitions.
Windows 7 may also break the Windows XP Recycle Bin. If this occurs, on startup, Windows 7 will prompt you with “The Recycle Bin on D:\ is corrupted. Do you want to empty the Recycle Bin for this drive?” Answer yes or no. The fix for this is to delete the Windows XP Recycle Bin (Windows XP will re-create it):
- While running Windows 7, launch the Command Prompt.
- Type the following commands to delete the Windows XP Recycle Bin, supposing that the D: drive is the Windows XP partition.
D:
rmdir /s /q $RECYCLE.BIN
rmdir /s /q RECYCLER
You can also do the above while running Windows XP in Safe Mode; just don’t switch to the D: drive because that would probably be the Windows 7 partition under Windows XP.
Leftovers
Surprisingly, Mac OS X 10.6 can read the NTFS drives and Windows XP and 7 can read the Mac’s HFS+ (aka Mac OS Extended) drive. The latter is enabled by the Boot Camp driver installation on Windows. Unfortunately, write access is not allowed for either case.
If you are using VMware Fusion and was able to load the old Windows 7 Boot Camp installation (which we deleted as part of the triple boot process) previously, you can load the new Windows 7 partition with a simple change. Before running VMware Fusion, delete the outdated subfolder (which has a strange name like “%2Fdev%2Fdisk0”) under the “~\Library\Application Support\VMware Fusion\Virtual Machines\Boot Camp” folder. When VMware Fusion next runs, it will regenerate the necessary info to be able to load the new Windows 7 partition. (I’m not sure if there is a way for VMware Fusion to load the new Windows XP partition also.)
I found a hint that the rEFIt boot icon labels can be renamed. So instead of “Boot Windows from Partition 3”, the icon could say “Windows 7”. And instead of “Boot Windows from Partition 4”, the icon could say “Windows XP”. Unfortunately, I couldn’t find the specific instructions anywhere on how to accomplish this.
I wish you success in getting your Mac computer to triple boot.
Hey,
i made till installing WIN XP , but failed on first time , got disk load errer.
Then after second try i lost my WIN 7 (win XP took it over) . And got NTLDR is missing.
So i dont know what to do. 🙁
Hi Marky,
Sorry to hear.
Which step in the Windows XP installation did you get to?
You might be able to repair Windows 7 by booting from the Windows 7 install DVD and selecting the recovery option. Windows 7 recovery could restore the missing NTLDR and make the partition bootable again.
Regards.
“Which step in the Windows XP installation did you get to? ”
First reboot in installation protcess.
I didnt have any WIN 7 boot drive. I think WIN XP writed on the WIN7 befroe it formated it.
On the second try WIn XP installation protsecc was refusing to understand that i had Win XP CD in my drive.
Bottom line:
1. Try ended with disk read error.
2. Try with no WIN 7, NTLDR error and WIN XP installtion was refuing to accept on first boot CD.
Does drive letter affect Win XP installation ?
Currently is Win XP D: drive.
The C: drive is usually the boot drive of whatever Win OS you run. So if you boot into Win7, the C: drive is Win7 and the D: or E: drive is WinXP. Likewise, if you boot into WinXP, the C: drive is WinXP and the D: or E: drive is Win7.
It sounds like when installing XP, the wrong partition (Win 7) might have been selected; which would explain how the Win7 partition got overwritten. In this case, you might need to restart and re-install the Windows 7 onto the Win7 partition again.
After many trial and errors I would like to share my successful triple boot install.
you need to start from fresh and clean install
===== OSX Install and setup =====
using disk utility
create a first full partition ( in my case a 320GB ) as a mac osx journaled with option for GUI.
click apply
now click the plus sign and create a new partition – make it FAT and 140 GB – click apply
*** important *** now click the FAT partition and click the plus sign in order to create a new partition
make it FAT as well and 40GB – click apply.
so now you have 3 partitions:
1) 140GB Mac journaled
2) 140GB FAT ( to be used for install of win7 )
3) 40GB FAT ( to be used for install of XP )
Now install OSX ( in my case Snow Leopard 10.6 ) in the Mac partition
Update to 10.6.8
Install RefiT
Restart OSX two times to make sure that Refit shows up properly
====== Win 7 Install and setup =====
In OSX insert win7 CD and restart. Hold C button after boing boot sound to start directly from CD.
Install Win 7 ( you must format the 140GB FAT partition in order to procede with the install )
*** important *** you must see the partitions as indicated by Chanh under the win7 install section
At restart Refit will show to boot icons: mac and win
select win icon and then install bootcamp drivers for win7
*** important *** under win7 make the 40GB FAT partition as active using the “manage” option.
Now time to restart and install XP holding the C button as start to boot from winXP CD
you need to format the 40GB partition to NTFS (quick) in order to proceed
*** important *** if you upgrade to OSX Lion 10.7 it is possible that you will not see the refit boot page.
In order to get it back follow this instructions:
open terminal and type this command: sudo /efi/refit/enable-always.sh
That’s it !
ZX8i, thanks for sharing your detailed instructions!
Hi,
I know this post a bit old, but I’m still interested. I own an old MacBook from 2007 (the first alu), and I’m trying to configure this triple boot. I followed everything you said (I think), but When I finished to install Windows XP, Windows 7 doesn’t start anymore. I repaired Windows 7 with the CD, and now Windows XP doesn’t start, same problem (NTDLR missing). I’ll try to fix the MBR with the XP CD, but I’m pretty sure Windows 7 won’t start…
What am I doing wrong?
My mistake… Mark the partition as active from Windows 7 is not a definitive thing. I did it before restarting W7 after having installed BootCamp, and I forget to mark the XP partition as active again.
Loutch, Thanks for the update. Glad you figured it out.