As a Gen X’er, I started life without Internet and mobile phones (oh my gawd!) and was already an adult when social media took off. As a result, I am not smartphone dependent and will not be constantly checking my phone. I only check my phone when I need to text or call someone. If I want to read or watch something, I pull out a desktop or laptop. I don’t pull out a phone with a tiny screen. I’m older now and my eagle eyes are malfunctioning. Needless to say, I don’t check the phone when I’m bored or when I’m on the toilet (I have an old iPad for that).
This phone avoidant behavior is bad because I often miss text messages. Unfortunately, more than a decade ago, someone “super smart” decided to remove the phone’s blinking “you have an unread text message” LED. So, there is no visual indicator to tell me that there are messages waiting for me. However, this is a moot point because current phones are inundated with app notifications, so the LED would be blinking all the time and therefore useless.
Have you heard of DINK (double income, no kids)? Well, Gen Xers’ parents are not those enlightened beings. Our parents are DISK (double income, solo or self-regulating kids) meaning we were forced to be independent from a young age. (Yeah, I just came up with that acronym. This is the way.) If we’re lucky, one of our parents would be present when we get home from school. We were forced to manage our own time and get things done. As adults, when we are hungry, we go out to find that animal, go to the supermarket to buy the pre-packaged meat corresponding to that animal, and then go to a second supermarket because the first was out of stock. We don’t Uber Eats or Grubhub it, even though we wish we had extra money to do so.
Over the years of owning Apple iPhones, I’ve adjusted the settings to fit my needs: more security and privacy, less intrusive notifications, and better battery life. I’ve documented the settings (not comprehensive) and other tips below.
Currently I have an Apple iPhone XR which can only run iOS 18, not the latest iOS 26. Apple skipped iOS versions 19 through 25 so 18 is just one version before 26. The settings for iOS 26 should be 90% similar.
Why not upgrade to a new iPhone to get the latest iOS 26? Don’t need it. Almost all my iPhones were gotten from family members who had foolishly upgraded… shh! I use the phone mainly for voice calls, text messages, and navigation (Google Maps). I rarely browse the Internet or check emails on the phone; I prefer a desktop or laptop for that. Gen Xers are just built that way; we are independent and frugal (not cheap) so won’t fall for the latest gadget or fad. Wearing sneakers and bell-bottoms until they fall apart. Using hardware like rice cookers hard until they stop working even after multiple self-attempted fixes (and possibly, fire hazards). In a way, Gen Xers are minimalists, very cheap minimalists… I mean hardcore minimalists. Hardcore all the way, baby. ‘Merica!
More Security and Privacy
The Apple iPhone comes with many features and permissions enabled by default; potentially, causing security vulnerabilities.
Use Settings app to disable unnecessary features:
AirDrop
#Turn off by selecting "Receiving Off" if don't use.
AirPlay & Continuity
#Turn off by selecting "Never" for "Automatically AirPlay" if don't use.
AutoFill & Passwords
#Disable "AutoFill Passwords and Passkeys" if don't use.
Siri
Talk to Siri
#Select Off if you don't want Siri to listen.
#Disable "Press Side Button for Siri" if don't use.
Face ID & Passcode
#Setup at least the Passcode. Setup Face ID at your own risk.
#Face ID can falsely recognize another person's face.
#Face ID is especially bad with Asian faces because it once recognized both my Indian neighbors (husband and wife).
ALLOW ACCESS WHEN LOCKED:
#Disable Siri so it won't listen when the screen is locked.
#Disable any option you don't wish to access from the locked screen.
Privacy & Security
Location Services
#For each app, set to Never or "While Using" if you must.
#For apps like Google Photos and Life360, set to Always so they will function correctly.
Bluetooth
#Disable any apps that should not have access.
Camera
#Disable any apps that should not have access.
Local Network
#Disable any apps that should not have access.
#This is different from Internet access.
Microphone
#Disable any apps that should not have access.
Speech Recognition
#Disable any apps that should not have access.
#This will send your voice samples to Apple.
Analytics & Improvements
#Disable "Share iPhone Analytics".
Apple Advertising
#Disable "Personalized Ads".
Game Center
#Disable "Game Center" if you don't game or don't need social gaming services.
Wallet & Apple Pay
ALLOW WALLET & APPLE PAY TO ACCESS
Live Activities
#Disable because it can display your flight or transit status without requiring an unlock.
Apple Cash
#Disable if don't use.
Double-Click Side Button
#Disable if don't use. It can bypass an unlock.
Note: On iOS, you must run the Google Photos and Life360 apps and leave them running. Don’t exit them by swiping them away in the pulled-up App Switcher. Google Photos needs to run in the background to backup photos. Life360 needs to run in the background to update your location.
Less Intrusive Notifications
The iPhone comes with many notifications enabled. Also, when you install apps, the apps have notifications enabled by default. This results in tons of notifications that are intrusive and annoying.
Use Settings app to disable unnecessary notifications:
#Turn off all options under SUGGESTIONS.
Notifications
Siri Suggestions
#Disable "Allow Notifications" if don't use.
#For each app, disable "Allow Notifications" if you can.
#Otherwise, I recommend only enabling Badges
#and disabling Sounds and ALERTS for Lock Screen, Notification Center, and Banners.
#For GOVERNMENT ALERTS, leave at least "Emergency Alerts" enabled.
Apps
Phone
Silence Unknown Callers
#Enable "Silence Unknown Callers". I don't know you!
Messages
Notifications
Customize Notifications
#Disable "Unknown Senders" to prevent alerts from unknown message senders.
Filter Unknown Senders
#I don't recommend enabling this because it is buggy and adds an extra step (select filter) to view messages.
#Bug: Messages sent to a group with every member known may still be filtered under "Unknown Senders".
 Better Battery Life
We can improve battery life by disabling features, especially background processes. Disabling unnecessary features also improves performance.
Use Settings app to disable unnecessary features:
#Disable if you don't use.
Cellular
#Click "Show All" under "CELLULAR DATA" section to view all the installed apps.
#Turn off cellular data access for apps which do not need to access the Internet while not connected to Wi-Fi.
#Usually, games and apps like Camera and Clock do not need cellular data access.
Personal Hotspot
#Disable if you don't use.
Battery
#Enable "Battery Percentage" because it is nice to have.
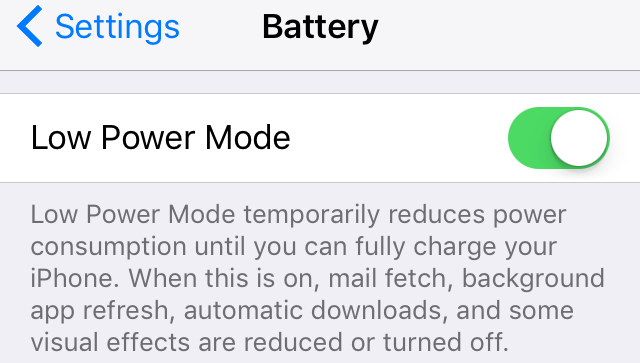
#Enable "Low Power Mode". This will disable background operations, like Mail fetch and "Hey Siri", and reduce visual effects.
#When charging, Low Power Mode will be disabled so you will need to manually re-enable after.
General
Background App Refresh
#Turn "Background App Refresh" off if don't use.
#Or only turn on for important apps like Google Photos and Life360 which need to run in the background.
#Turning this off does not prevent push notifications (for Mail and other apps) from occurring.
Note: Using the pull-down Control Center to turn off Bluetooth and “Personal Hotspot” will not disable the two features, but disconnect any devices connected to them. Eventually the devices may automatically reconnect. Use the Settings app to disable the two features permanently. Also, updating the iOS version may re-enable these features.
Backup to iCloud and Google
Apple encourages iPhone owners to setup iCloud for backups (and other services) by providing 5GB storage for free. 5GB is enough for settings, but insufficient for backing up photos, videos, and music.
If you don’t wish to pay for more iCloud storage and you have less than 15GB’s worth of photos and videos, I recommend backing up to Google Photos, which provides 15GB of storage for free. Actually, Google Photos provides a “Storage saver” mode which allows for unlimited photos and videos, but I don’t recommend it because Google will reduce the image and video quality. When setting up Google Photos, make sure to select “Original quality” mode to keep the original photo and video size.
Because my primary email address uses Google Mail, I configured the iPhone to back up the Calendar and Contacts to my Google account instead.
Run Settings app to configure iCloud backup:
Saved to iCloud
#Click on "See All" to see all the settings and apps that are backed-up.
Saved to iCloud
#Recommend disabling everything except Passwords and Keychain, Notes, Messages in iCloud, and Reminders.
#Enable iCloud Calendar and Contacts if you don't plan to use Google Calendar and Google Contacts.
iCloud Backup
#Enable "Back Up This iPhone".
Run Settings app to configure Google backup:
Mail Accounts
#iCloud will be visible with the selected backup data.
#Select "Add Account" and "Google" to add your Google account.
#After setup, enable Contacts and Calendars so they will be backed-up to Google.
#Enable Mail if you want the built-in Mail app to use the Google mail account.
To backup photos and videos to Google, install the “Google Photos” app and sign into your Google account. Remember to select “Original quality” mode and leave the Google Photos app running in the background.
For the Elderly
Some tips for the elderly or the old at heart.
Emergency Contact and Medical ID
Set emergency contact and medical ID so in the event that you are unconscious, a first responder can look up your contact info on your iPhone.
- Run the Health app.
- Locate the “Set Up Your Medical ID” section and click on the “Get Started” button. Alternatively, you can click on the top-right user icon, select “Medical ID”, and then “Get Started”.
- Make sure that the “Show When Locked” option is enabled.
- Follow the instructions to input your name, birthdate, and emergency contact. Of course, include any helpful info like medications and allergies.
A first responder can view your Medical ID from the Lock Screen by swiping up, tapping Emergency on the passcode screen, and tapping Medical ID. The info you provided will be displayed. FYI, your age is shown instead of your actual birthdate.
Blinking Message LED
Remember how I lamented the missing message LED? Well, you could simulate it with the camera’s LED flash. I’m not sure but constantly triggering the camera flashes might adversely affect the battery life.
Use Settings app to configure LED flash for alerts:
Audio & Visual
LED Flash for Alerts
#Enable "LED Flash for Alerts".
#Enable "Flash While Unlocked" and "Flash in Silent Mode" per your needs.
Prevent App Deletion
 My dad accidentally deleted the WeChat app on his iPhone. He doesn’t understand English well and is used to clicking on any popups without regard to consequences. Unfortunately, his fingers are unsteady so accidents occur frequently.
Even more unfortunate, the WeChat app does not backup messages online to its own service or iCloud. WeChat claims that it can copy old messages from another device’s WeChat local storage; this function sounds like it is used when migrating to another phone. My Dad only has WeChat on his iPhone and now, all the old messages are gone.
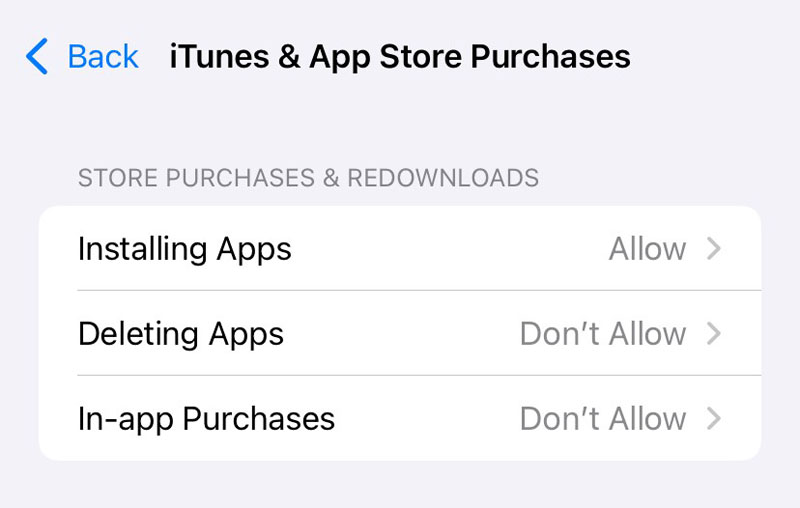
To prevent the above, use Settings app to set a restriction to block app deletion:
Content & Privacy Restrictions
#Enable "Content & Privacy Restrictions".
iTunes & App Store Purchases
Deleting Apps
#Select "Don't Allow".
In-app Purchases
#While here, disable the insidious in-app purchases so kids and elderly won't waste money!
Once the above restriction is created, the option to delete apps (remove the app) will no longer appear when you long-press an icon on the home screen or in the app library.
iPhone Annoyances
Some iPhone features are annoying.
Do After New App Install
After adding a new app, you should check the settings for Background App Refresh, Notifications, Cellular data access, and Privacy & Security to disable the newly-added app-specific permissions. For example, I just installed the Peztio dashcam app which required a lot of permissions to operate. But there is no need for it to run in the background, nor a need for it to notify me, and definitely, no need for it to use cellular data access. Ideally, the only feature it should use is Wi-Fi for when I update the app!
Default to Speaker When Picking Up Call
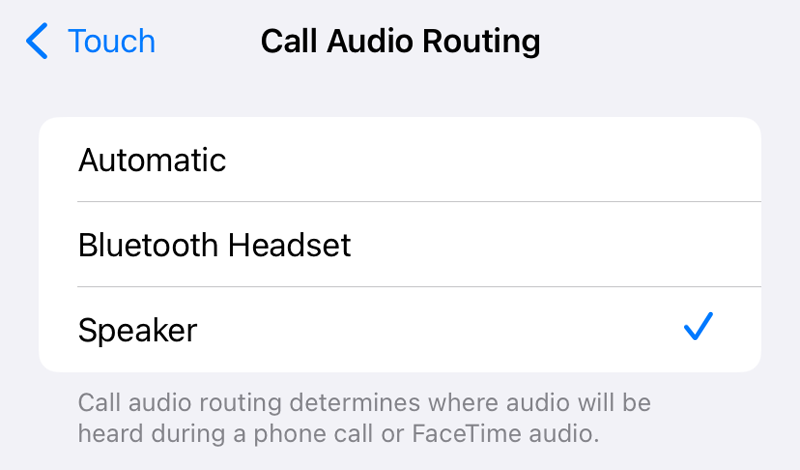 When I pick up a call and want to use the speaker, I have to hit the speaker icon and then select speaker as the output. This is very annoying because Bluetooth Headset is offered as an alternate option, even though I don’t have a Bluetooth headset configured. Thankfully there is a fix for this.
Use Settings app to default to speaker when selecting audio output on a call:
Touch
Call Audio Routing
#Select Speaker.
Update: I don’t recommend using this setting. When making an outbound call, the audio will default to speaker. I disable the speaker mode and hold the phone to my ear to use the earpiece speaker; but when the callee picks up, the audio switches to speaker automatically and my ear gets a blast of loud speaker audio! After resetting the “Call Audio Routing” to Automatic and rebooting the iPhone, it defaults to earpiece and no longer prompts me to select the non-existing Bluetooth headset. Looks like both the initial prompting behavior and the non-automatic “Call Audio Routing” are Apple software bugs.
Disable Lock Screen Swipe to Open Camera
Have you ever put your iPhone into your pocket while accidentally swiping to open the camera? Minutes later, your leg is being burned by the very hot iPhone. Worse, the iPhone’s battery life has gone to shit.
There is an option in iOS 26 to disable the swipe to open camera feature. In iOS 18, we would need to restrict camera access using Screen Time to disable this feature, but this would totally disable (and hide) the Camera app.
Use Settings app to disable swipe to open camera (only on iOS 26 or later):
Lock Screen Swipe to Open Camera
#Toggle it to off, unless you like being burnt alive!
Some info from above referenced from: