
The instructions below will create a bootable system partition on a USB flash drive, which is exactly the same as creating such a partition on a hard drive. Specifically, I will be using Windows 7’s built-in DiskPart (Disk Partition) command-line utility to create a bootable USB flash drive containing a Windows 8.1 Setup image.
 If you are interested, here’s the technical reason why our bootable USB flash drive will use the MBR layout and FAT32 format: Computers, including both Windows and Macs, boot using a standard called UEFI (Unified Extensible Firmware Interface), which is based upon the EFI specification (Extensible Firmware Interface). (When folks say EFI, they are usually referring to UEFI because all modern computers use UEFI.) UEFI is a replacement for the previous BIOS method of booting up, but UEFI still supports the older BIOS method. The BIOS boot method uses the MBR (Master Boot Record) layout. In addition to BIOS+MBR, UEFI also supports the new GPT (GUID Partition Table) layout. The UEFI specification requires bootable removable media (such as a bootable USB flash drive) to use the MBR layout and FAT32 format.
To create a bootable USB flash drive, do the following:
- Insert a USB flash drive with sufficient capacity. (The 64-bit Windows 8.1 Professional ISO image I had is 4.5GB in size and requires at least an 8GB USB flash drive).
- Launch the “diskpart” or “diskpart.exe” utility from the Windows Start/Run menu or the Command Prompt. You will be prompted with a popup message asking “Do you want to allow the following program to make changes to this computer?” Answer Yes.
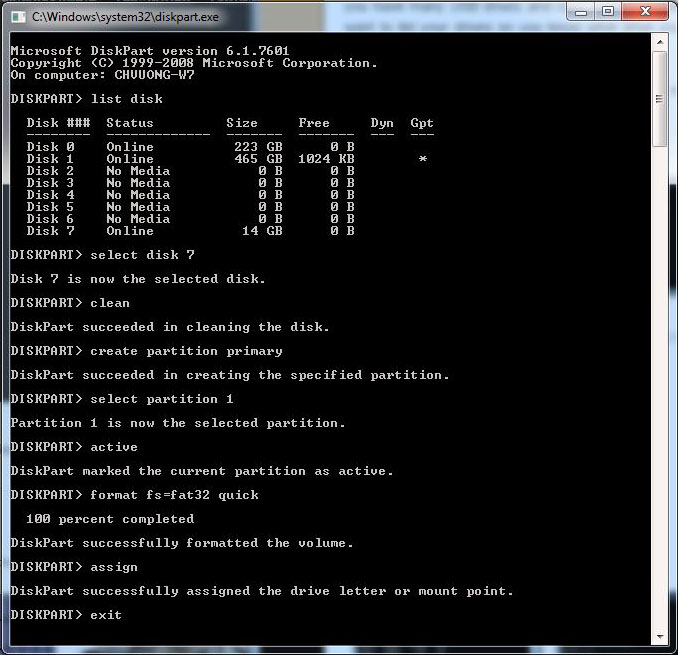
- Run the following commands in the DiskPart utility (ignore the comment lines marked by the pound # character):
# Show all disks (aka drives, like hard drives or removable media).
DISKPART> list disk
# Select a disk to operate on.
DISKPART> select disk [number identifying USB flash drive]
# Delete all partitions, resulting in a blank disk.
DISKPART> clean
# If the USB drive is using the GPT layout, the "list disk" command output
# above will show an asterisk in the last "Gpt" column. If this is the
# case, issue this command to change it to the MBR layout.
DISKPART> convert mbr
# Create a primary partition (using MBR).
DISKPART> create partition primary
# Show all partitions (should just be the one newly-created partition).
DISKPART> list partition
# Select the primary partition to operate on (only 1 partition exists).
DISKPART> select partition 1
# Make the primary partition active (aka bootable).
# This command will fail if the USB drive is using the GPT layout.
DISKPART> active
# Format the active primary partition using FAT32.
# To do a full format, instead of a quick format, omit the "quick" flag.
DISKPART> format fs=fat32 quick
# Assign a drive letter to the primary partition
# (just in case Windows didn't already do it).
DISKPART> assign
# Quit DiskPart.
DISKPART> exit - Test by opening the contents of USB flash drive using Windows Explorer. If you get an inaccessible error when accessing the drive, unplug and re-plug it back into the computer. You should then be able to access it.
- Insert the Windows Setup DVD or mount the Windows Setup ISO file (I recommend using the free Slysoft Virtual CloneDrive utility to perform the ISO mount).
- Copy all the Windows Setup content to the USB flash drive by running the xcopy command from the Command Prompt:
# Supposing USB flash drive is K: drive and Windows is L: drive,
# copy all files and directories from the latter to the former.
# /e = Copies directories and sub-directories, including empty ones.
# /f = Displays full source and destination file names while copying.
xcopy L:*.* /e /f K:
And we are done. The resulting USB flash drive should be bootable on both Windows and Macs. I tested the USB flash drive on my Macbook Pro Retina and it booted fine.
Info above derived from Install Windows 7 From a USB Flash Drive.
Nice Boot Information
Thanks
The latest Windows 7 SP1 Professional ISO image from Microsoft has a file “sources\install.wim” (size 5.3GB) which is too big for FAT32 (file size limit 4GB). Thus, the file copy command in the last step failed.
I tried formatting as NTFS but the computer was too old and didn’t recognize the USB flash drive as bootable. Both MBR+NTFS and GPT+NTFS were unsuccessful. Looks like I need to find a Windows 7 ISO that is compatible with FAT32.
FYI, I found a free tool called Rufus which supports creating bootable USB flash drives with a nice user interface. To use Rufus is simple: run it, click SELECT to choose the ISO file, select options like MBR/GPT or FAT32/NTFS, and click START.