
 Normally, to replace a hard drive with a larger hard drive, you would just install the replacement hard drive, copy the data over, and remove the old drive. Very simple. Unfortunately, if the drive you are replacing is the system drive (where the Windows operating system is installed), it gets more complicated.
After living with an 80GB system drive for many years and running out of space repeatedly, I decided to replace it with a 500GB drive. The goal was to do the replacement without re-installing my Windows XP operating system. The secret weapons are BartPE (to generate a bootable CD) and Ghost (to clone the system hard drive).
Create a BartPE bootable Windows XP CD which includes Ghost
- Pre-requisites:
- Symantec/Norton Ghost 8.x (the version I have is 8.2)
- Windows XP Installation CD
- CD or DVD Burner drive
- Download BartPE builder. I picked the latest “PE Builder v3.1.10a – zip package”.
- Unzip the archive (ex: pebuilder3110a.zip) to a directory like “c:\temp\pebuilder”.
- Copy the ghost 8.x files to the “c:\temp\pebuilder\plugin\ghost8\files” folder. From my Ghost 8.2 distribution, I copied the following files: ghost32.exe, Ghostexp.exe, Ghostsrv.exe, and GhostCast.chm.
- BartPE builder expects a file called “Ghostcdr.dll” which did not come with my Ghost 8.2 distribution. I managed to download it from the internet; you can download it from here.
- Put “Ghostcdr.dll” into the same “c:\temp\pebuilder\plugin\ghost8\files” directory.
- Insert the Windows XP installation CD into your CD-ROM drive (say D: drive).
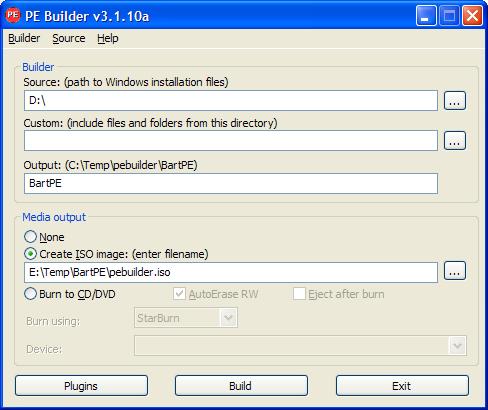
- Run “”c:\temp\pebuilder\pebuilder.exe”.
- In the first field, “Source: (path to Windows installation files)”, enter the CD-ROM drive letter which contains the Windows XP CD (ex: input “D:\”).
- Select “Create ISO image” or “Burn to CD/DVD”. In my case, I selected “Create ISO image” and then later burned the image to a CD using Nero Burning ROM.
- Click on the “Plugins” button. BartPE builder will verify that your Windows XP CD is accessible and then show a dialog window.
- If you want a startup option to boot from the CD or not, then click to select “Boot Fix (Enabling “Press any key to boot from CD”)” and hit the “Enable/Disable” button. The Enabled column value for that entry will change from No to Yes.
- Click to select the “Symantec Ghost 8.0” entry at the bottom and hit the “Enable/Disable” button. The Enabled column value will change from No to Yes. If any required Ghost files are missing, clicking the Enable/Disable button will throw an error message.
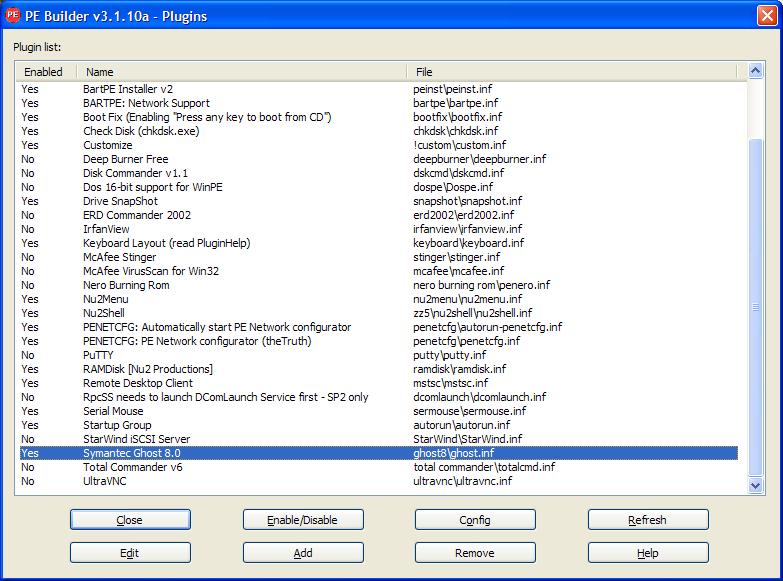
- Hit Close to close the dialog.
- Hit the Build button to create the ISO image or burn to CD/DVD.
Replace the System Hard Drive
- Shutdown the computer and install the replacement hard drive. Feel free to re-arrange the drives to connect the replacement hard drive to the first SATA or IDE interface.
- If you have extra drives, to be on the safe side, you might want to connect only the system drive and the replacement hard drive.
- Take note of the hard drive sizes so you can distinguish them later on.
- Boot the computer with the BartPE bootable CD that was created above.
- As BartPE loads, answer No to the “Start Network Support” prompt.
- Once BartPE has finished loading, select menu “Go->Programs->Symantic Ghost v8” and launch “Ghost32”.
- In the Ghost program window, select menu “Local->Disk->To Disk”.
- Select the Source Disk/Drive by clicking it and hit Ok. You can distinguish the source hard drive from the replacement drive by the smaller size information.
- Select the Destination Disk/Drive and hit Ok. The destination drive will be your replacement hard drive which should have a larger size information.
- Keep the default size selection and hit Ok.
- Double-check the source and destination drive info and click Yes to proceed with the disk cloning. Ghost will start cloning the hard drives. (It took 30 minutes for Ghost to clone my nearly full 80GB drive to the replacement 500GB drive.)
- Ghost will complete the process with a “Clone Completed Successfully” message.
- Hit Continue, Quit, and select menu Go->Shutdown to shutdown the computer.
- Remove the old system drive and make sure that your new replacement system drive is connected to the first SATA or IDE interface (which the BIOS will use as the boot drive). Or simply, connect the replacement hard drive to the interface cable that the old system drive was attached to.
- Start the computer and everything should work exactly the same as before, except now you have a lot of free space. Good luck!
Some content above derived from Setup Bart PE and Ghost How to.