
I purchased a used Nexus 5 recently. When I used the built-in Settings app to upgrade it to the latest Android version, it got stuck at the bootloader screen on reboot. The previous owner had rooted the Nexus with a custom bootloader which broke the stock upgrade process. Because I am planning to develop apps on the Nexus 5, I needed a stock device. Below are the steps I took to unroot the Nexus 5 and upgrade it to the latest stock Android 5.0 Lollipop version using my Macbook.
Note: Actually, there are no special steps to unroot the Nexus 5. Re-imaging the phone with the latest stock Android version will automatically do the unroot (by overwriting the custom bootloader and/or android OS with the stock version).
Install Android SDK Tools
To prepare, I downloaded the stand-alone Android SDK Tools . The latest version for Mac OS X was “android-sdk_r24.3.3-macosx.zip”. (Alternatively, you could install the Android Studio, which includes the SDK Tools and a graphical IDE equivalent to Eclipse.)
I extracted the Android SDK Tools to my “~/Development/android-sdk-macosx” directory (you can choose your own path) and added it to the execution path by inserting the following into my “~/.profile” file:
export PATH=$PATH:$ANDROID_SDK/tools:$ANDROID_SDK/platform-tools
Note: The ANDROID_SDK variable is my own shortcut and is not used by the Android SDK Tools in any way.
 Unlock the Nexus 5
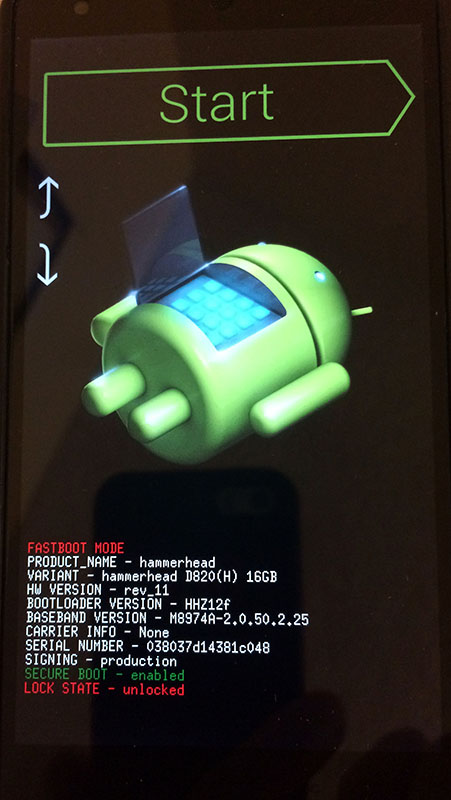
Before we can do the re-image, we need to put the Nexus 5 phone into Bootloader Mode (aka Fastboot Mode) and unlock it.
To put the phone into Bootloader Mode, do the following:
- Power off the phone.
- Power on by holding the volume up, volume down, and power buttons simultaneously.
- When the phone vibrates, let go of the power button while continuing to hold the volume up and down buttons.
- The phone will then display the bootloader screen.
On the bootloader screen, look for the “LOCK STATE” status at the bottom. My Nexus 5 was already unlocked so the display showed “LOCK STATE – unlocked”. If you see a “locked” state instead, connect the phone by USB cable, launch the Terminal and run these Android SDK Tools commands (ignore the comments marked by the pound # symbol below):
fastboot devices
# Unlock bootloader
fastboot oem unlock
Note: When you unlock the bootloader, all data on the phone will be wiped as a security precaution. Also, there is no harm if you run the unlock command on a phone that is already unlocked; you will just get a “FAILED (remote: Already Unlocked)” error.
Re-image the Nexus 5
Download the latest Android 5.0 Lollipop image file for the Nexus 5 from Google’s Factory Images for Nexus Devices. Look for the section named “hammerhead for Nexus 5 (GSM/LTE)”. The latest version when I checked was “5.1.1 (LMY48B)” with a downloaded filename “hammerhead-lmy48b-factory-596bb9c1.tgz” (579 MB in size).
Extract the contents to a directory like “~/Downloads/hammerhead-lmy48b”.
Note: Before doing the steps below, make sure that Nexus 5 phone is connected by USB cable and showing the Bootloader Mode.
The extracted “hammerhead-lmy48b” directory has a script named “flash-all.sh” which you can run to do the factory re-image. It will run several commands with hard-coded 5 second pauses in between. To execute it, launch Terminal and run the following commands:
sh ./flash-all.sh
Instead of using the “flash-all.sh” script, I recommend running its commands manually just in case the phone takes longer than 5 seconds to complete each command. Also, if an error occurs, it would be easier to tell which command had failed. Do to so, run the commands in the “flash-all.sh” script one-by-one, ignoring the “sleep 5” lines.
# Reimage the bootloader
fastboot flash bootloader bootloader-hammerhead-hhz12h.img
fastboot reboot-bootloader
# Reimage the radio firmware
fastboot flash radio radio-hammerhead-m8974a-2.0.50.2.26.img
fastboot reboot-bootloader
# Reimage OS with Android 5.0 Lollipop
fastboot -w update image-hammerhead-lmy48b.zip
The re-image process took about 5 minutes for me. The initial boot up (the screen showed flying colored dots) took another 8 minutes. Be patient because some folks reported that the initial boot up could take up to 30 minutes.
Once the phone has booted up, I recommend doing a data wipe to ensure that everything is consistent. To do the data wipe, go to Settings, under Personal section, Backup & reset, under Personal data, Factory data reset. Reboot the phone.
Lock the Nexus 5
To avoid any security risks, I recommend locking the bootloader. To do so, put the phone into Bootloader Mode and run the following command in the Terminal:
Once done, exit the Bootloader Mode by clicking on the Start button to boot the Android OS.
If you run into issues, some troubleshooting tips are located at How to Unroot Nexus 5! – Complete Stock.