I needed to move music from my sister’s old iPod Mini to her new iPod Nano. At first, I thought I needed to install special software to do the music transfer; however, it turns out that there is a method that doesn’t require extra software. I found it in the comments from this webpage, Get songs off your iPod. The steps are to copy the music directly from the old iPod, import the music into iTunes, and then copy/sync to the new iPod.
Before we start, non-IOS iPods (which excludes iPod Touch) are either formatted for Windows or for Mac. So depending upon the format, you will need to use the corresponding operating system to retrieve the music from the old iPod. In my case, the old iPod was formatted for Windows. (The instructions below should also apply for Mac.)
Copy Music From the Old iPod
- Connect the old iPod to the computer using the USB sync cable.
- Launch a File Explorer window and look for a new drive with a label like “Bob’s iPod”. That is the iPod’s hard drive.
- If you don’t see a drive for the iPod, then you will need to set the “Enable disk use” under iTunes.
- Open iTunes and you should see the iPod listed under DEVICES. Select the iPod.
- If you see a “Welcome to Your New iPod” message, click on the Continue button, and then the Get Started button.
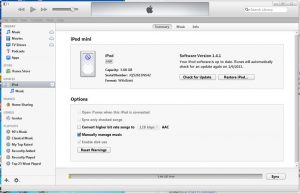
- Under the Summary tab, make sure that “Enable disk use” is selected. On my computer, the “Enable disk use” was selected by default and grayed out because “Manually manage music” is selected. (If you wish to unselect “Enable disk use”, you must unselect “Manually manage music” first. Disabling “Manually manage music” means that the iPod will be overwritten to match whatever is in the iTunes library automatically.)
- In File Explorer, open the iPod’s drive and you will see three folders: Calendars, Contacts, and Notes.
- There is a hidden folder named iPod_Control. To see it, go to your folder properties and enable the “Show hidden folders” property. Under Windows 7, you would click on the menu Organize, Folder and search options, View tab, and check the “Show hidden files, folders, and drives” option.
- Go into the iPod_Control folder and then into the Music subfolder. You will see many folders named like F00, F01, etc. Under those folders, you will find mp3 files with names like DGUZ.mp3, TBBO.mp3, etc. These are your mp3 music files. (Don’t be concern about the weird names because the song titles and artists are embedded in the mp3 files and iTunes will use that embedded info.)
- Copy the whole iPod_Control\Music folder to your hard drive.
Import Music into iTunes
Actually, you don’t need to import the copied music into iTunes. Instead, you could drag each of the copied mp3 files directly to the new iPod; however, you would need to go into each of the copied Music folder’s subfolders to select the mp3 files. To avoid that effort, I recommend using the first import method listed below, “Add Folder to Library”.
If you wish to rename the copied mp3 files to the actually song titles, you will want to configure iTunes to copy and organize imported music files. To do so, go to iTunes menu Edit->Preferences…, Advanced tab, and make sure both “Keep iTunes Media folder organized” and “Copy files to iTunes Media folder when adding to library” options are checked. After importing the mp3 files, you will find them under the “iTunes Media folder location” (usually your user’s “Music\iTunes\iTunes Media” folder), renamed according to song title.
The iTunes application supports three methods to import music into the iTunes library. They are listed below with the first requiring the least effort:
- (Warning: This behavior might not exist in iTunes versions earlier than 11. Earlier versions of iTunes may not process subfolders.) Use the iTunes menu “File->Add Folder to Library…” to select the copied Music folder. iTunes will then import all the mp3 files under all the subfolders in the Music folder.
- (I believe this feature was added to iTunes 9.) Copy or move all the copied mp3 files to your user’s “Music\iTunes\iTunes Media\Automatically Add to iTunes” folder. Within seconds, iTunes will detect the files and import them; the imported mp3 files will disappear from that folder.
- Drag and drop the copied mp3 files to the iTune’s LIBRARY on the left sidebar.
Unfortunately, in the last two import methods, you will need to go into each of the copied Music’s subfolders to select the mp3 files. So I recommend updating to the latest iTunes and using the “Add Folder to Library…” method.
Copy Music to the new iPod
- Connect the new iPod to the computer.
- Under iTunes, select the new iPod under DEVICES. If you see a “Welcome to Your New iPod” message, click on the Continue button, and then the Get Started button.
- Go to iTunes LIBRARY->Music and select the Songs tab.
- Select the music which you wish to copy and drag them to the iPod under DEVICES.
Alternatively, you could sync the music to the new iPod by selecting the iPod under iTunes DEVICES, going to the Music tab, checking the “Sync Music” option, and then performing a Sync.
If you are getting rid of your old iPod, you can wipe it by doing a restore. Under iTunes, select the old iPod under DEVICES, go to Summary tab, and click on the “Restore iPod…” button. Once the iPod is rebooting, you can disconnect it. If you don’t, the iPod will reboot, reconnect to iTunes, and you will see the “”Welcome to Your New iPod” screen. You can eject and disconnect the iPod at that point.

